The original edit
A split hero, collection highlights and a brand story.
A HOME FOR THOUGHTFUL GUIDANCE
Everything you need to get started
and build your Terrafolk store.
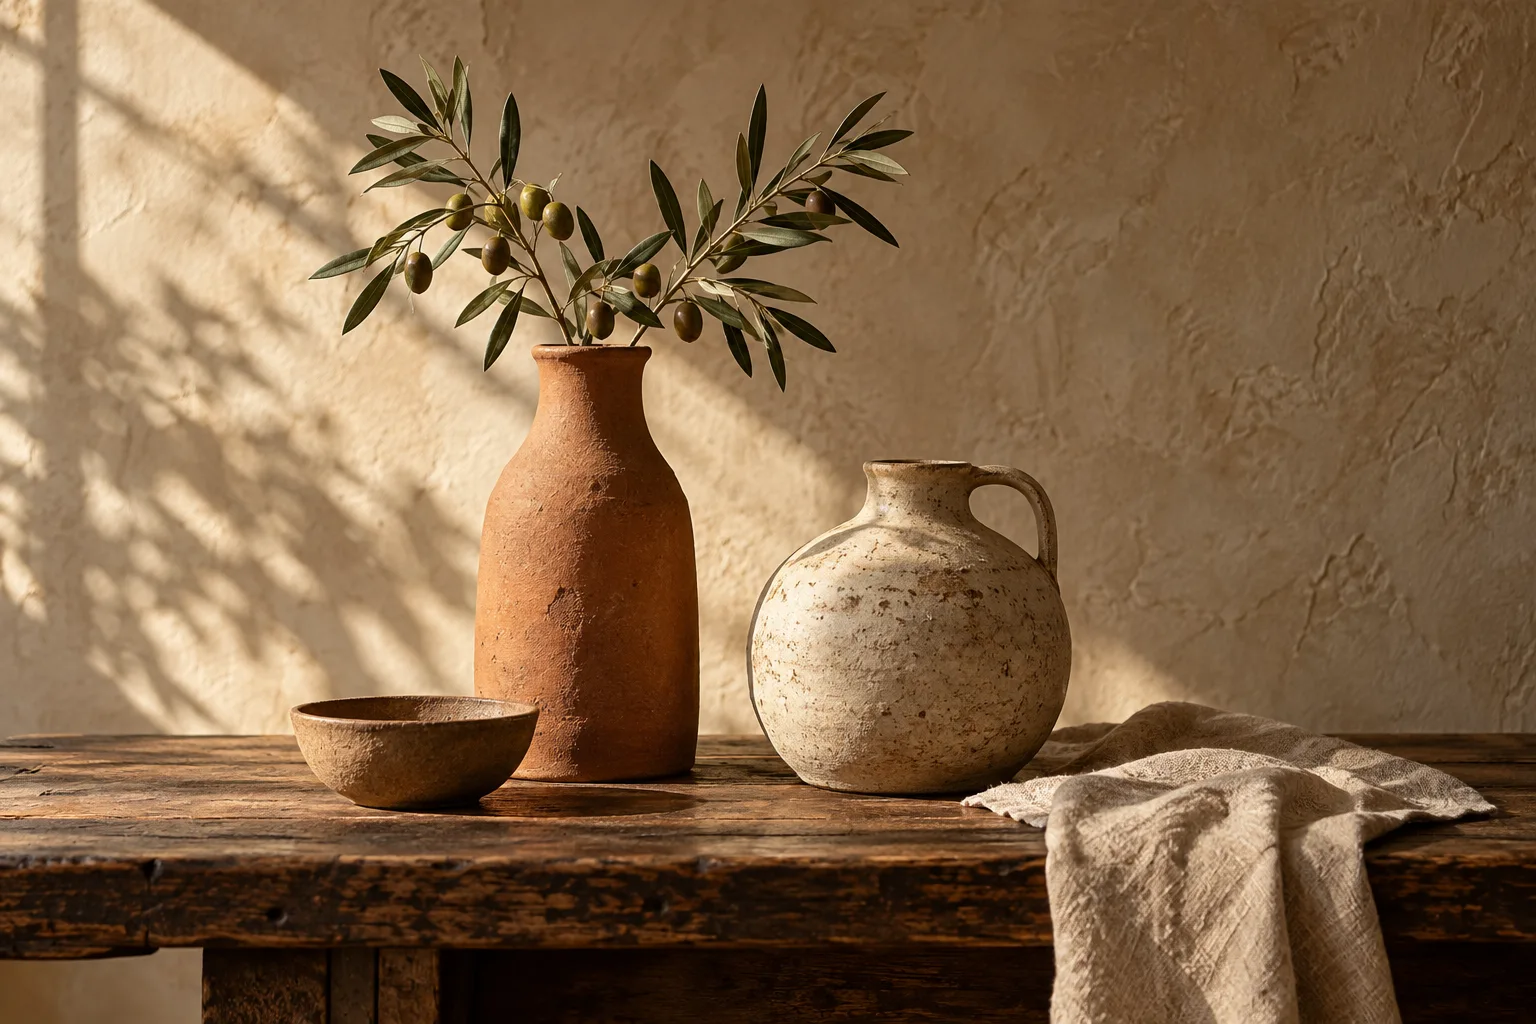
01 / WELCOME
A considered store starts with a few simple settings. This guide helps you install Terrafolk, build your content and maintain your website.
Terrafolk is a block theme for handmade goods, ceramics and homeware. Edit your header, footer and layouts in Appearance → Editor; manage products, orders and payments with WooCommerce. No page builder is required.
02 / INSTALLATION
| Component | Theme requirements |
|---|---|
| WordPress | Minimum version 6.7, as declared in the theme metadata. |
| PHP | Minimum version 7.4, as declared in the theme metadata. Use a PHP version that your hosting provider still supports. |
| WooCommerce | Required for selling products. The demo has been tested with WooCommerce 11.2.1. |
| Browser | Enable JavaScript for drawers, Quick View and enhanced interactions. |
terrafolk-1.53.0.zip and click Install Now.style.css inside the theme folder named terrafolk/.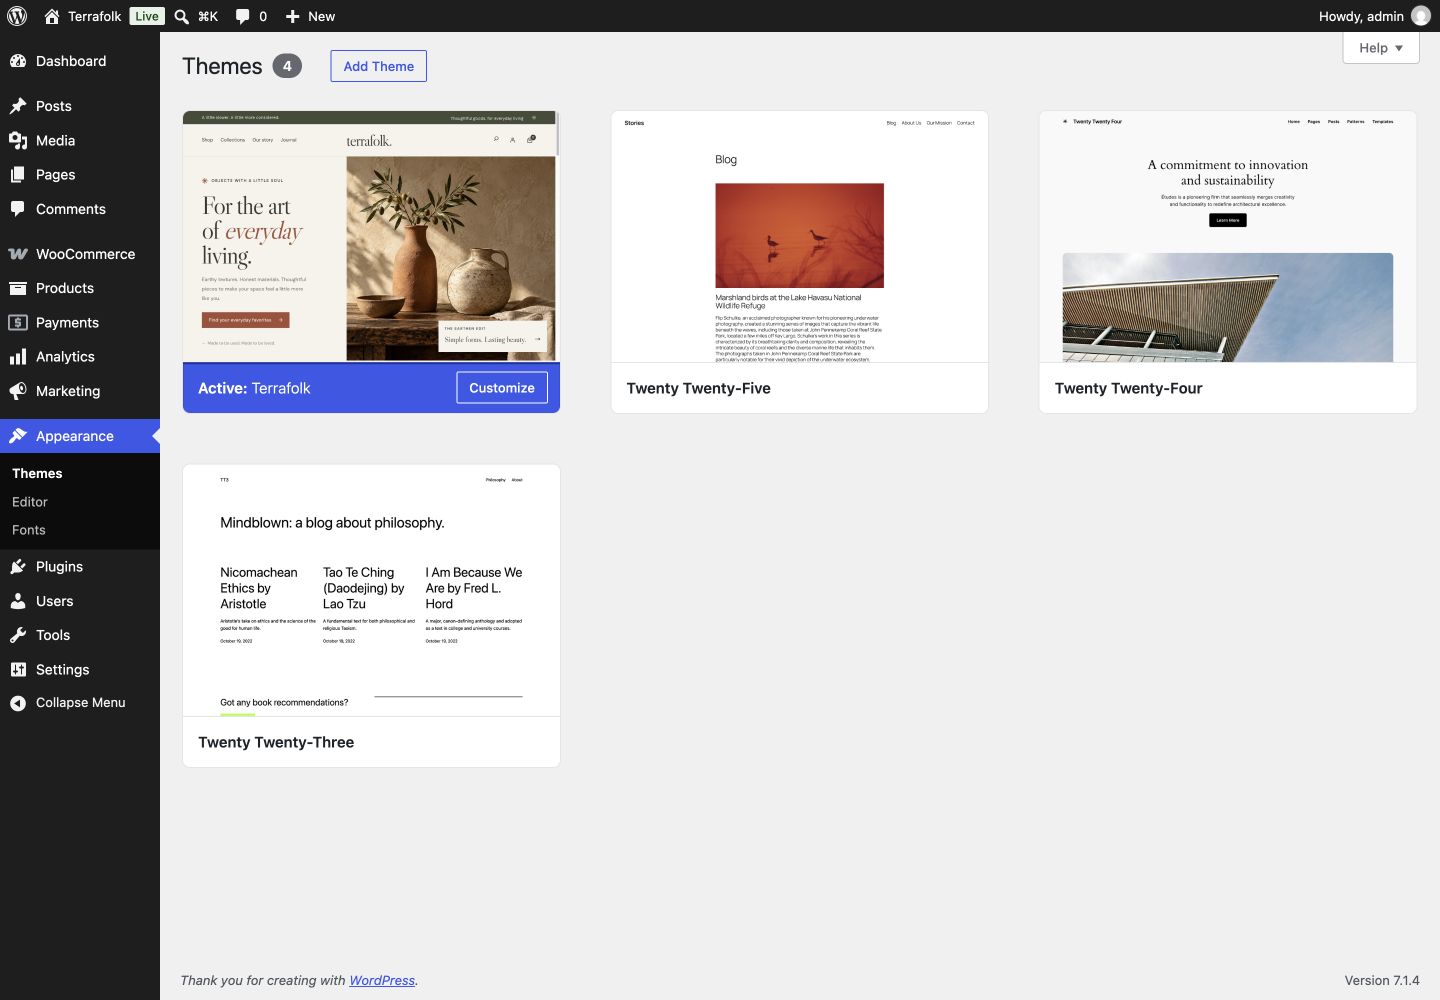
Appearance → Themes
The Active: Terrafolk label confirms the current theme. Use Add Theme / Upload Theme to install the theme ZIP; do not upload the documentation ZIP here.
Open full-size image ↗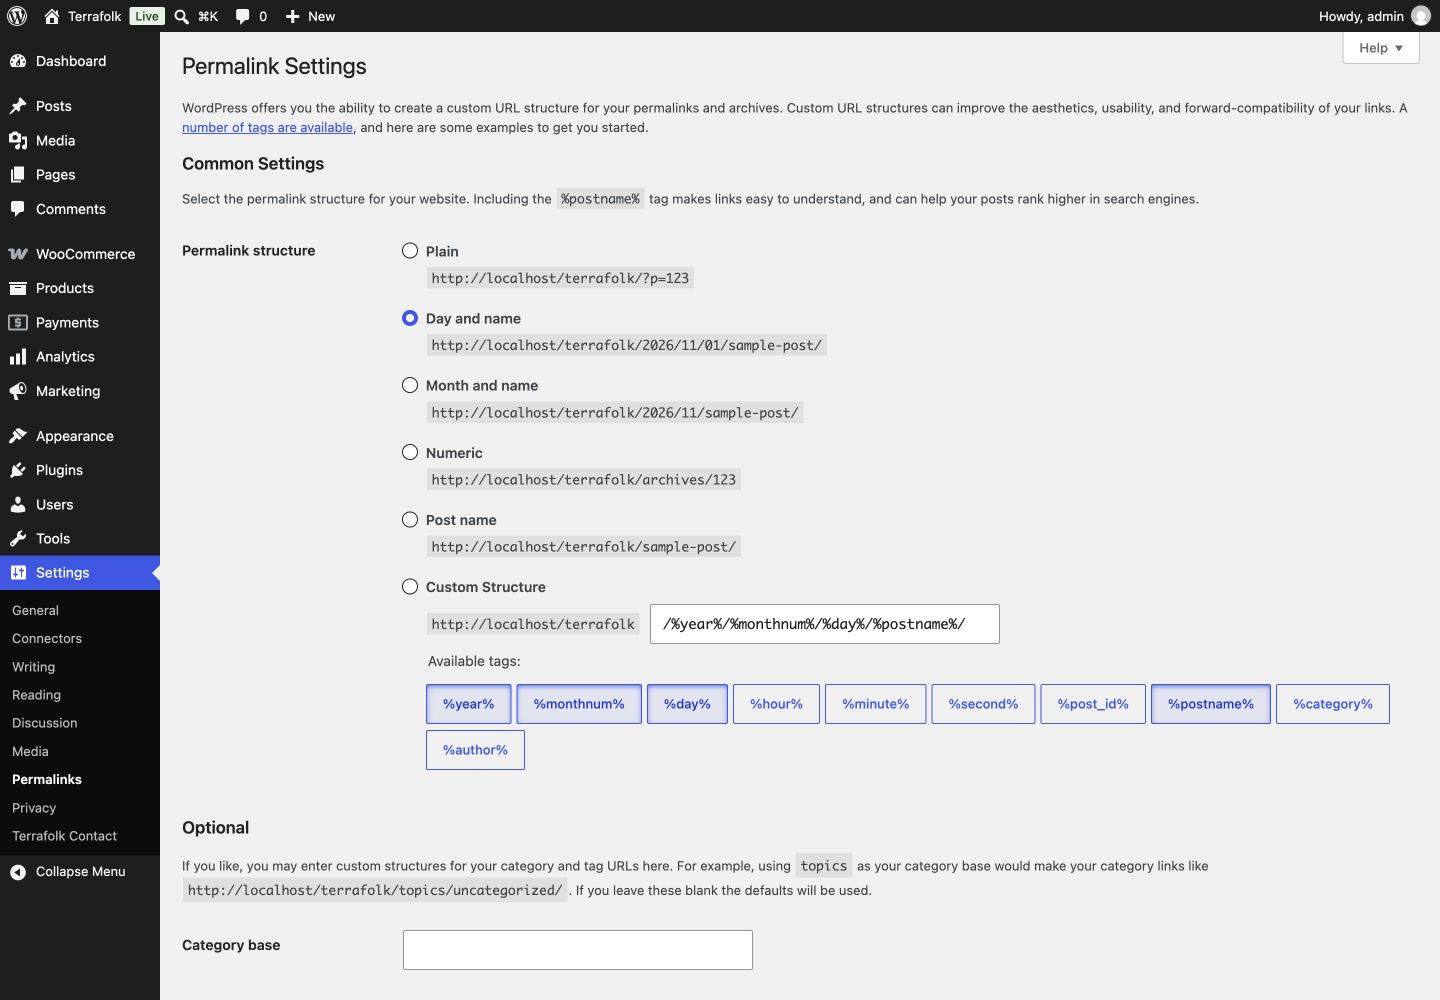
Settings → Permalinks
This screenshot shows the URL structure settings. Choose a suitable structure and save only when you want to change it. Do not copy the demo's localhost URL.
Open full-size image ↗03 / STORE FOUNDATIONS
Complete WooCommerce configuration before refining the design. The theme displays your store data; WooCommerce and payment gateway plugins handle transactions.
| Page | Content to retain | Setting |
|---|---|---|
| Shop | The product catalog is rendered by WooCommerce. | Select the Shop page under Products in WooCommerce settings. |
| Cart | The native WooCommerce Cart block. | Assign the Cart page in WooCommerce → Settings → Advanced. |
| Checkout | The native WooCommerce Checkout block. | Assign the Checkout page under Advanced. |
| My account | Shortcode [woocommerce_my_account]. | Assign the My account page under Advanced. |
WooCommerce displays the Thank You page after an order is created. You do not need a replacement static page. Order details, addresses, downloads and payment methods are available through My Account endpoints.
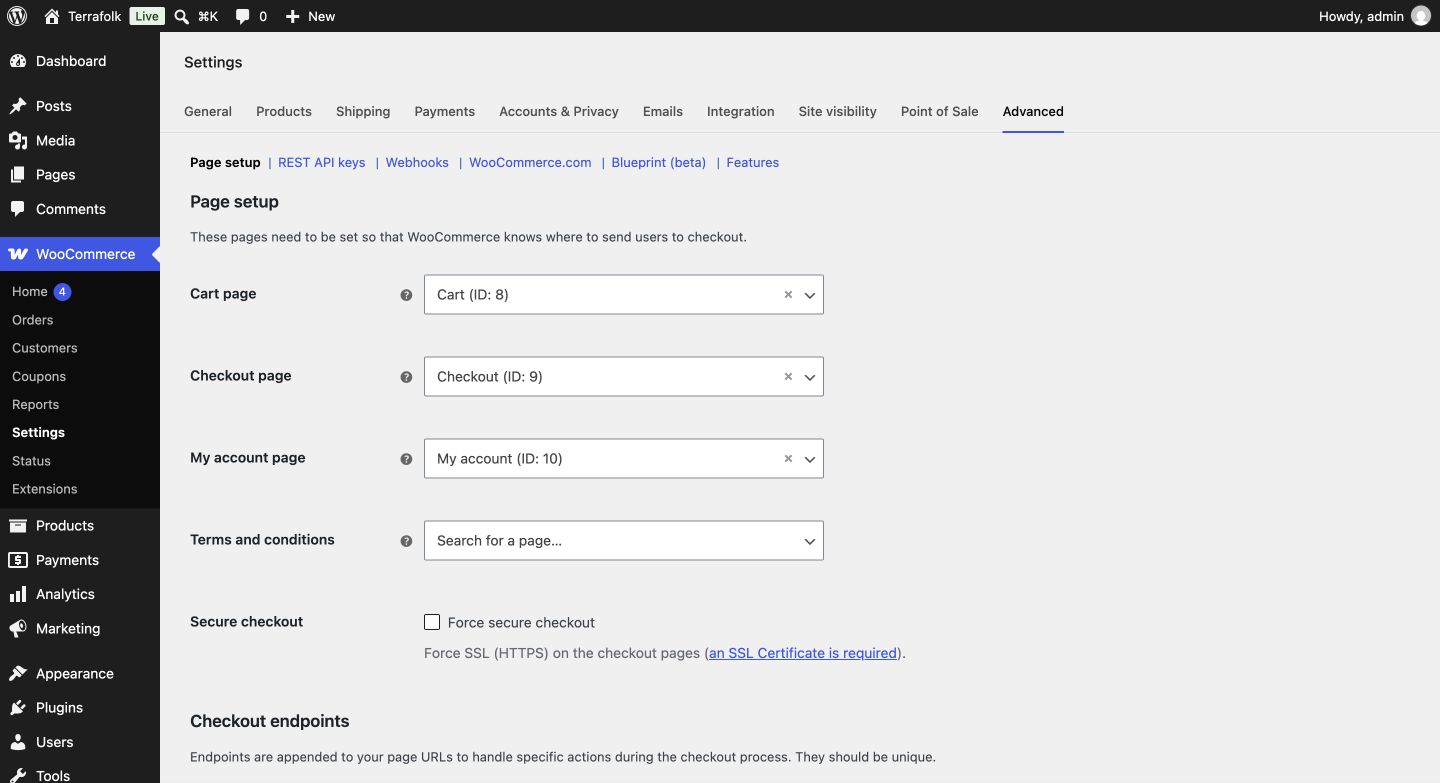
WooCommerce → Settings → Advanced → Page setup
Select the correct existing page for each field. The IDs belong to this demo only. Its Terms and conditions field is empty; select your store's terms page if needed.
Open full-size image ↗04 / FOUR WAYS TO FEEL AT HOME
The four designs share the header, footer, typography and product cards. Their section layouts are different.
A split hero, collection highlights and a brand story.
Full-width photography, layered content and a slower pace.
An arched hero image, an asymmetric layout and staggered collections.
An oversized title, a horizontal lookbook image and collection rows.
| Suggested page / slug | Template | Pattern to insert |
|---|---|---|
home-02 | Home 02 — Slow living | Home 02 — The slow living edit |
home-03 | Home 03 — Objects and rituals | Home 03 — Objects and rituals |
home-04 | Home 04 — The gathering issue | Home 04 — The gathering issue |
You can also insert individual section patterns. Inserted patterns become blocks saved in the page; changing a pattern file does not automatically update that saved content.
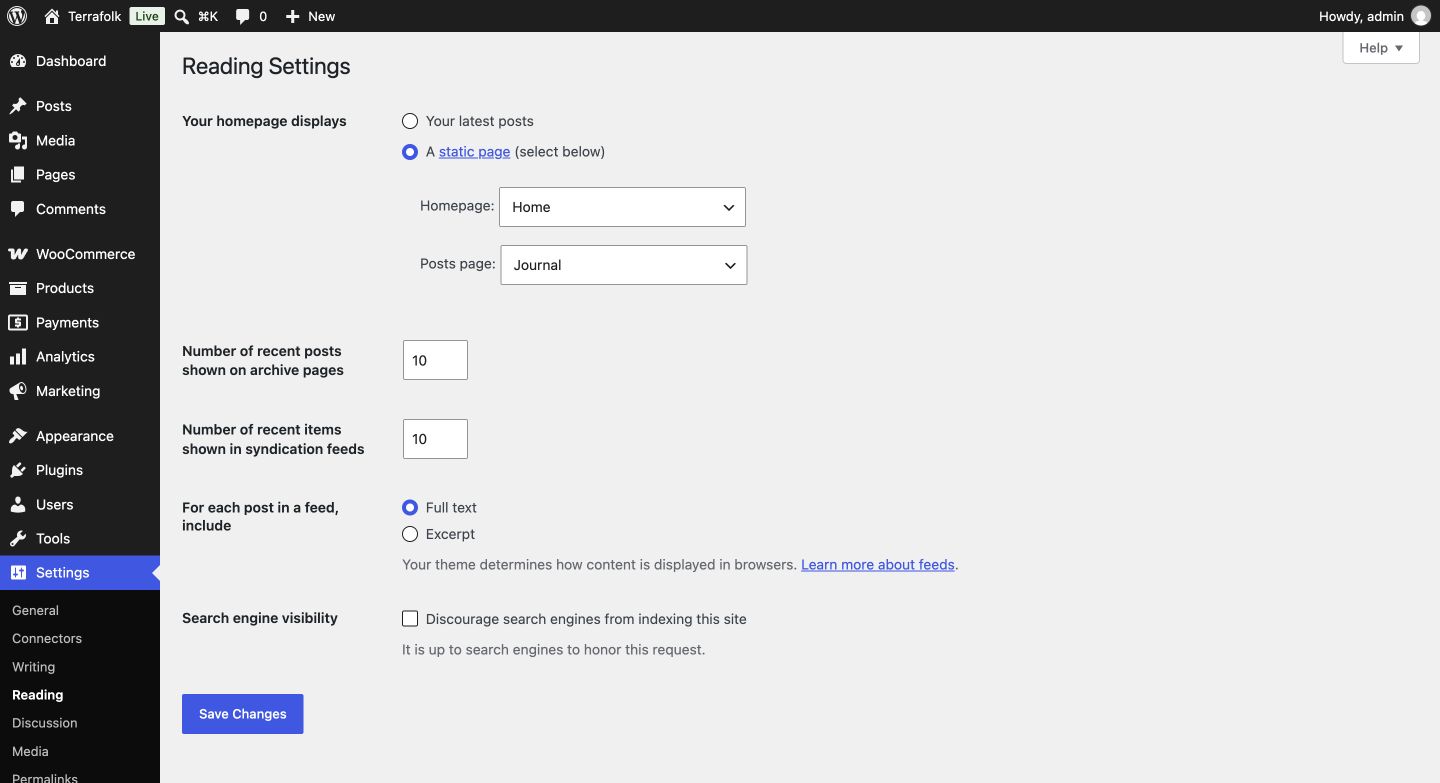
Settings → Reading
Choose A static page. Homepage controls the main landing page; Posts page controls Journal. This screenshot uses Home and Journal. Select Home 02–04 as the Homepage to use another design.
Open full-size image ↗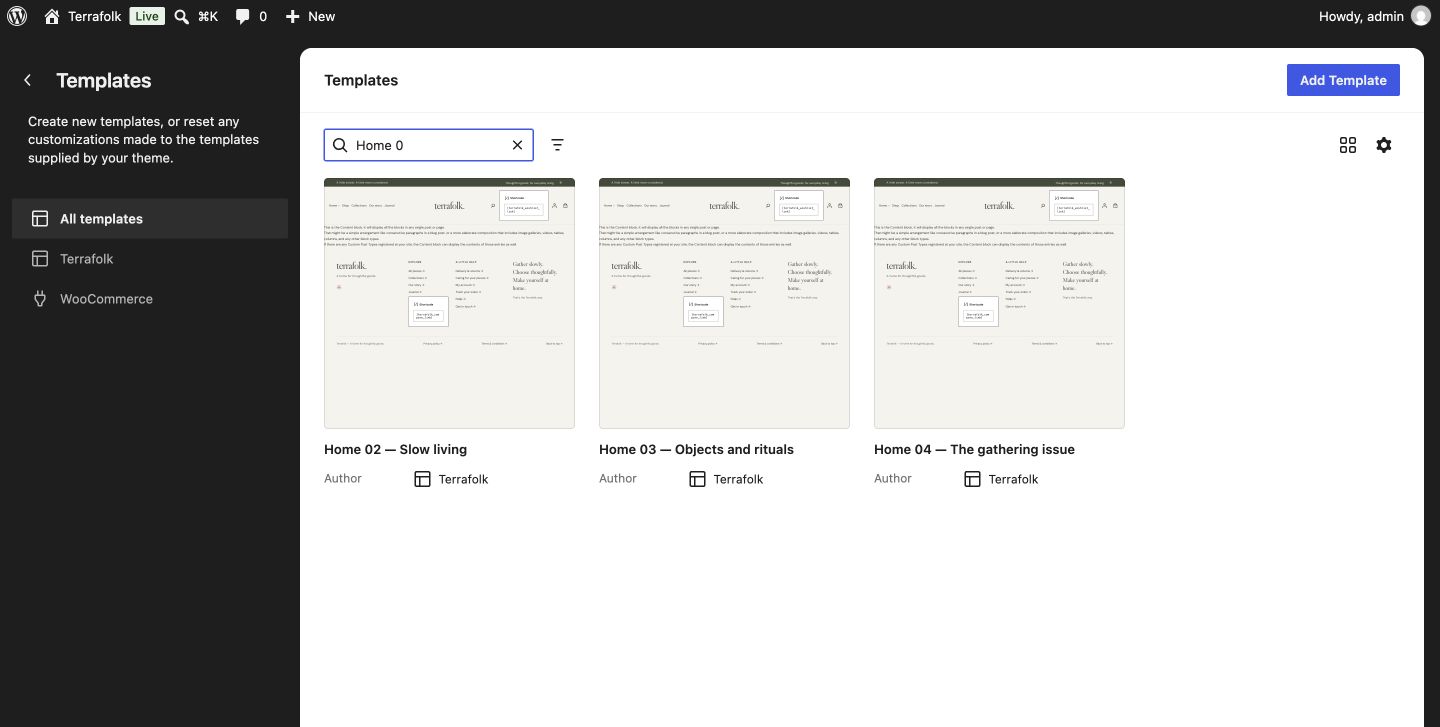
Appearance → Editor → Templates
Search for Home 0 to find the custom templates. Home 02–04 contain Post Content; insert their complete layout patterns into the corresponding pages. This older screenshot shows three custom templates. Terrafolk 1.53.0 also includes the independent Home 01 template used by new demo imports; the default root design still has a Front Page template.
Open full-size image ↗05 / NAVIGATION
home-02, home-03, home-04. Home 01 links to the published Home page when it uses the Home 01 custom template; otherwise it links to the site homepage. On new demo imports, this keeps Home 01 accessible even when Home 04 is assigned as the main homepage.On desktop, the Home submenu opens below the header. On mobile, its links appear in the native WordPress responsive menu.
Edit the Shop mega menu and Collections mega menu template parts in the Site Editor. Replace images, group names and category links. Keep the CSS class terrafolk-shop-menu on the Shop link and terrafolk-collections-menu on the Collections link so the theme can attach the panel toggle buttons.
The header uses Site Title as its wordmark. Edit the Site Title or replace it with a Site Logo block for an image logo. Edit the announcement bar in Header and the Explore, help and policy groups in Footer. Replace example links, contact details and copy with your store's information.
06 / THE TERRAFOLK PALETTE
Open Appearance → Editor → Styles to change colors, fonts, text sizes and block styles. Use Browse styles to select the default Clay palette, Olive or Sand.
The theme uses Libre Caslon Display for headings and DM Sans for body text. Font files are served locally from the theme. Maintain clear contrast between text and backgrounds when changing a palette, particularly for small text, buttons and focus states.
Use the Site Editor's Additional CSS option if your WordPress version provides it, or put your CSS in a child theme. Homepage variants also have their own stylesheets, so scope layout selectors to the relevant page.
/* Example: change spacing only for Home 04 sections. */
.terrafolk-home-four .h4-section {
  padding-block: 72px;
}
Test on desktop and mobile before saving. Avoid editing the parent theme directly if you want your changes to survive updates.
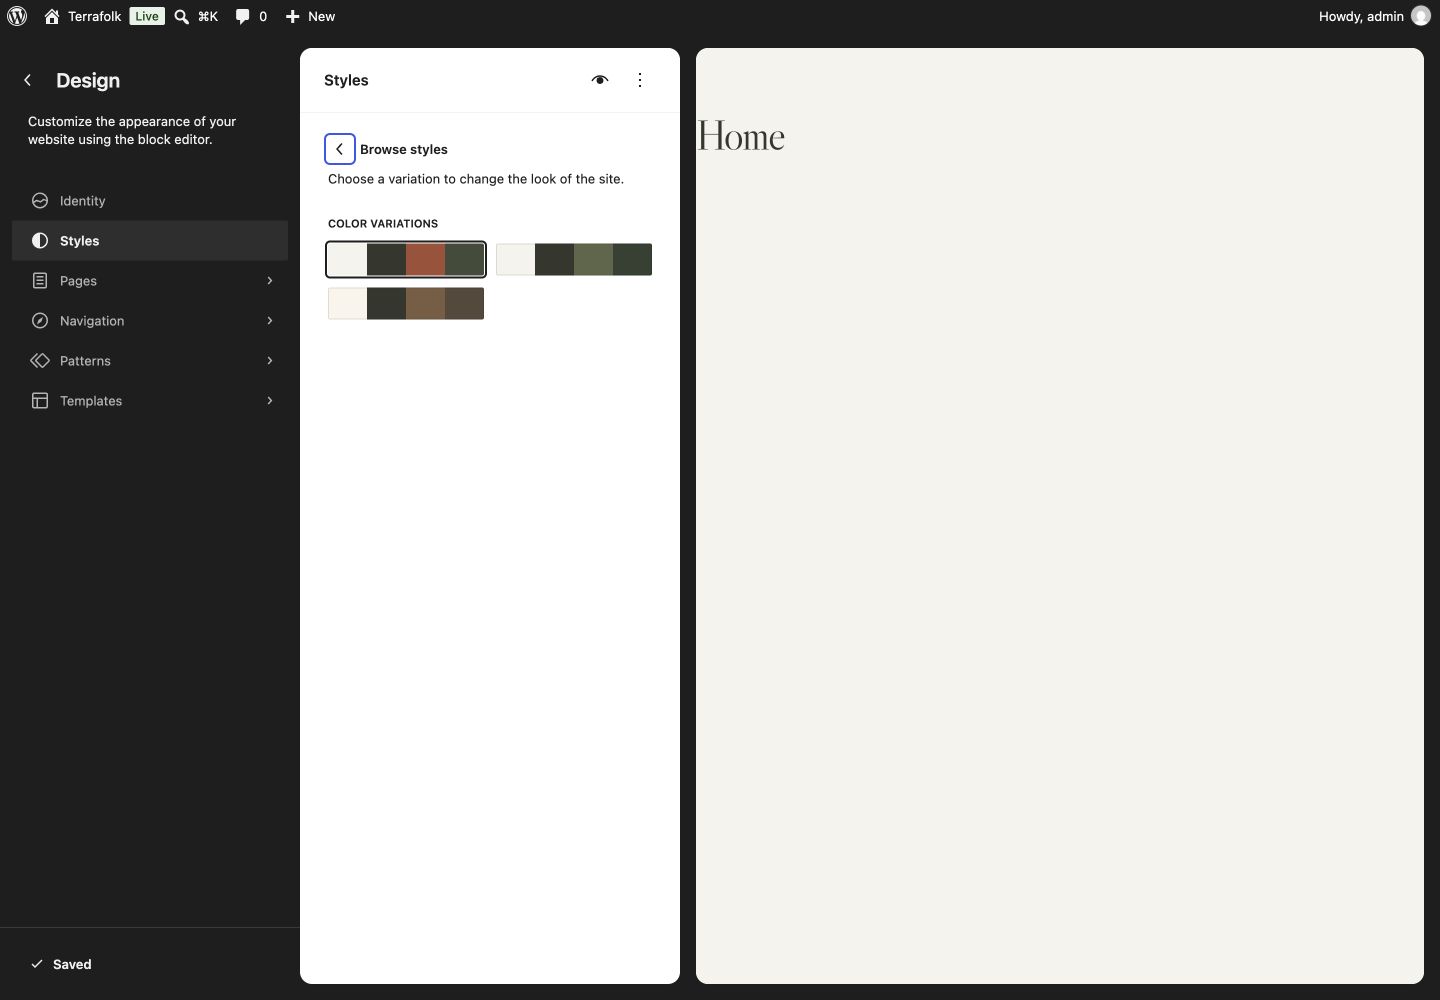
Appearance → Editor → Styles → Browse styles
The three palettes are Default, Olive and Sand. Select a variation to preview it, check the result and save if you want to apply it. No palette changes were made while capturing this screenshot.
Open full-size image ↗07 / YOUR COLLECTION
Upload images through Media → Add Media File or choose and upload them directly in an Image block. Terrafolk has no separate image settings screen.
New patterns provide Image blocks where you can choose your own photos. Selected images are saved with the page or template content and attachment IDs in the database. When moving a website, migrate its content, saved templates and Media Library together.
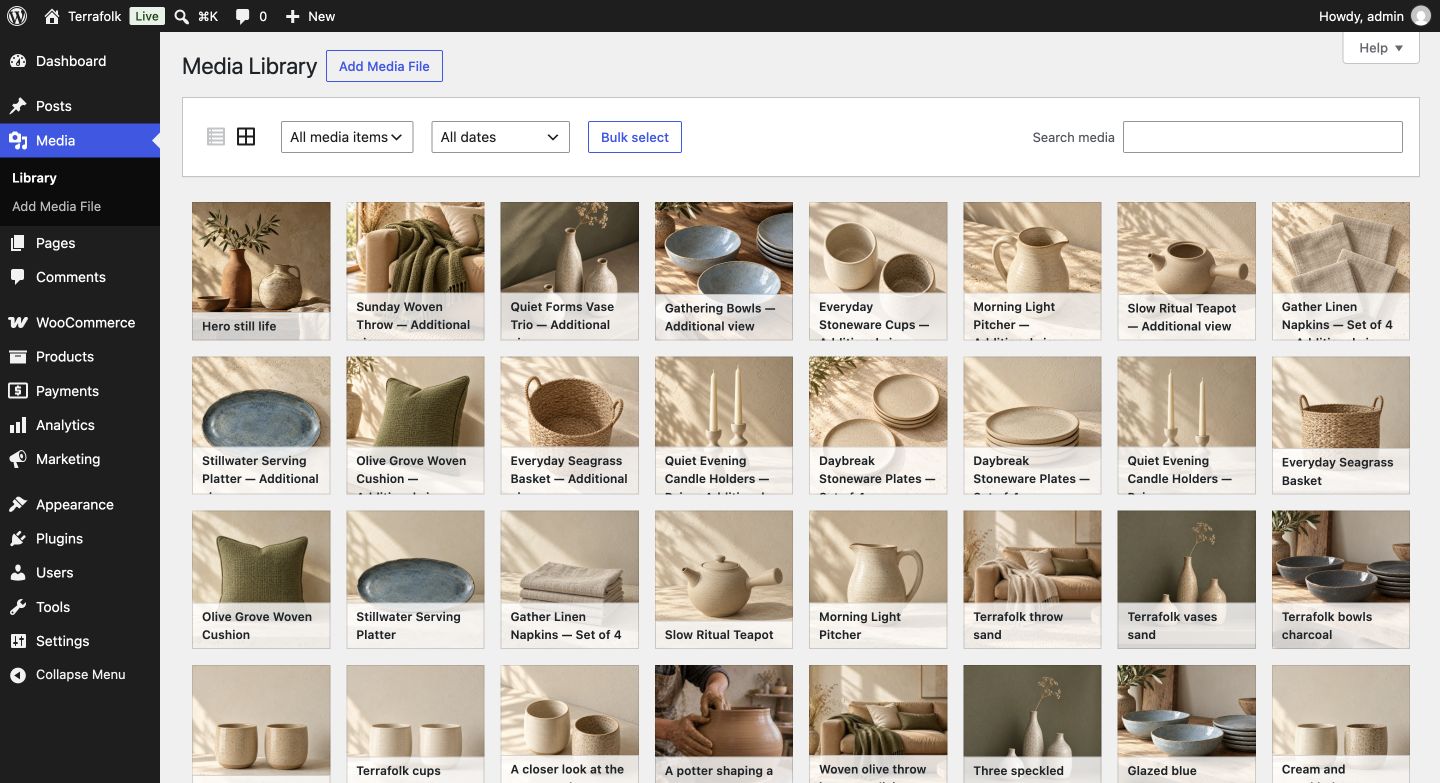
Media → Library / Add Media File
Upload images here or directly in an Image block. No image roles or additional Terrafolk image settings are required.
Open full-size image ↗Use a consistent main-image aspect ratio throughout the catalog. Square or portrait images with space around the product are easier to crop. A longest edge of around 1200–1600 px is a useful starting point; optimize file sizes before uploading. This is an editorial suggestion, not a theme requirement.
A gallery should include an overall view, alternative angles and material details. For color variations, assign the correct photo to each variation rather than only adding it to the shared gallery.
| Information | Data source |
|---|---|
| Name and price | The WooCommerce product name and regular/sale price. |
| Material | A global attribute with the slug material, taxonomy pa_material. |
| Color swatches | A global attribute with the slug color, taxonomy pa_color. Its display name can be Color or Palette. |
| Small badge | The first product tag; discounted products use a Sale badge. |
| + button | Simple products can be added to the cart; products requiring choices lead to the appropriate options for their product type. |
Material and color rows are omitted when those attributes are missing. Displaying a palette does not mean that color variations have been created.
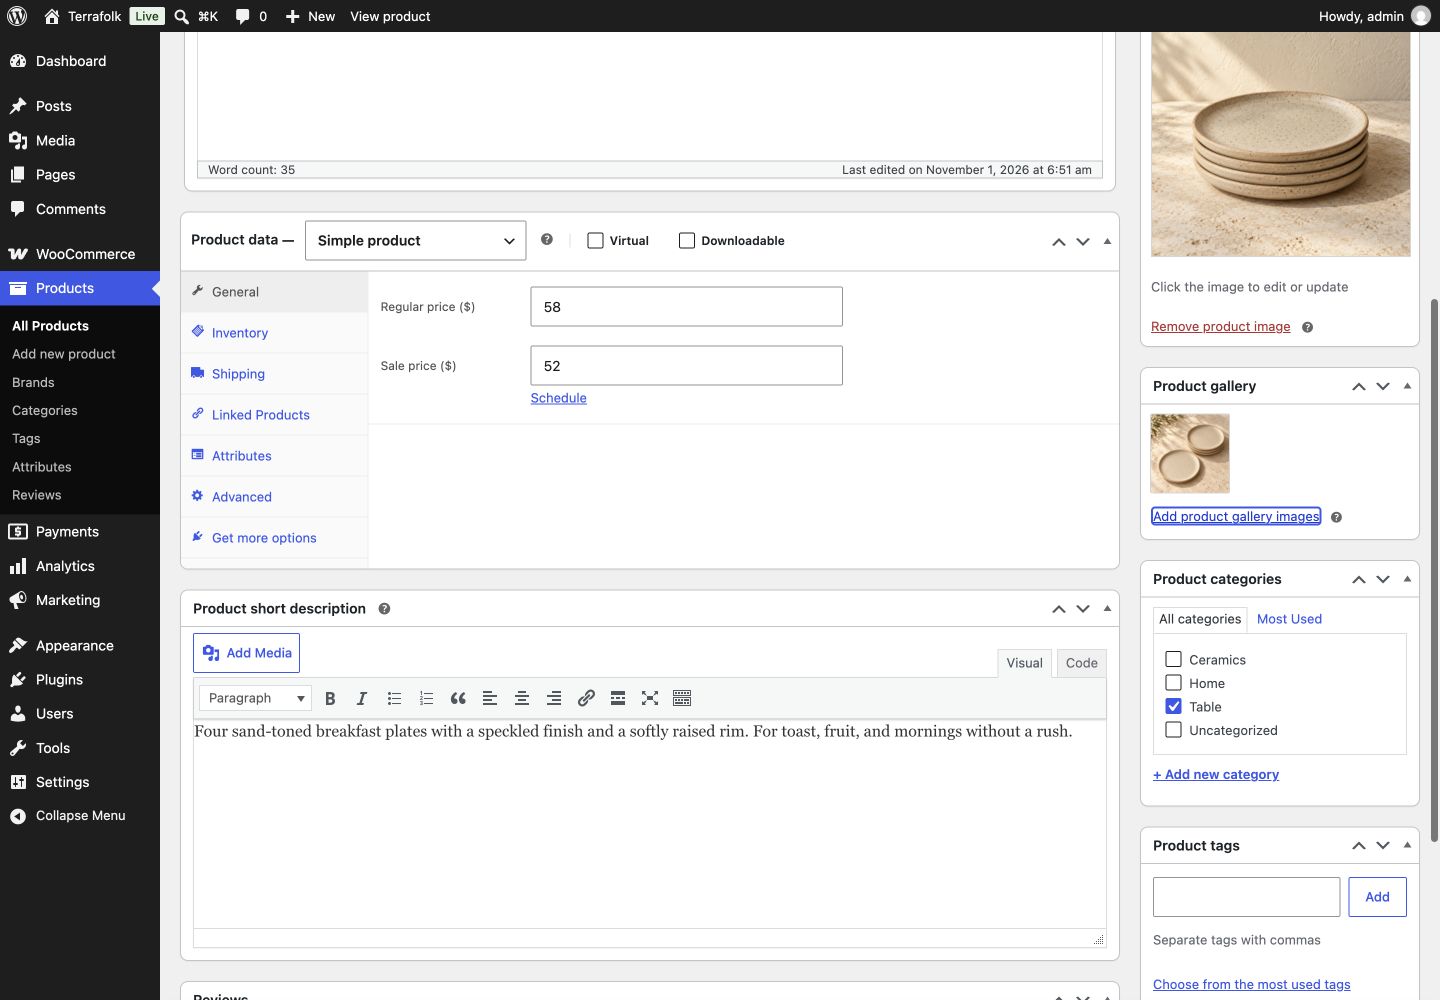
Products → Edit product
Product image is the main photo; Product gallery contains additional views. Use Add product gallery images to add photos and drag thumbnails to reorder them. The example prices 58/52 are demo data only.
Open full-size image ↗08 / PRODUCT OPTIONS
color; add terms such as Cream, Sand, Blue, Charcoal and Olive. Create Material with the slug material for material descriptions.The theme presents variation attributes as buttons and supported colors as swatches. WooCommerce still determines valid combinations, pricing and stock availability. A variation without a price may not be purchasable.
Card swatches can select a color and change the photo when valid color variations exist. If the product only has descriptive color terms, the dots are informational. For products with multiple attributes, shoppers still need to choose the remaining options; a color swatch does not replace all required selections.
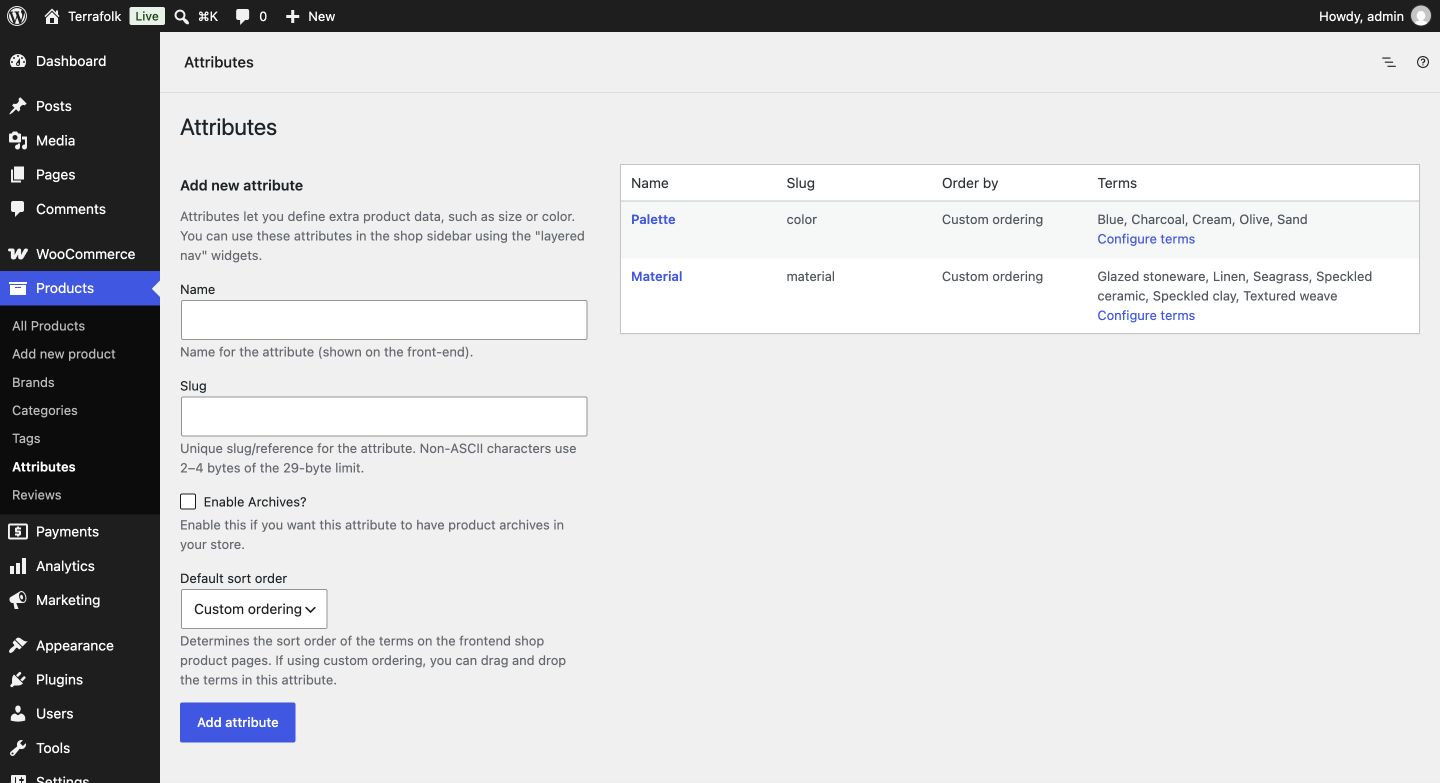
Products → Attributes
The demo uses Palette as its display name while keeping the slug color. Material uses the slug material. Open Configure terms to add values before assigning them to a product.
Open full-size image ↗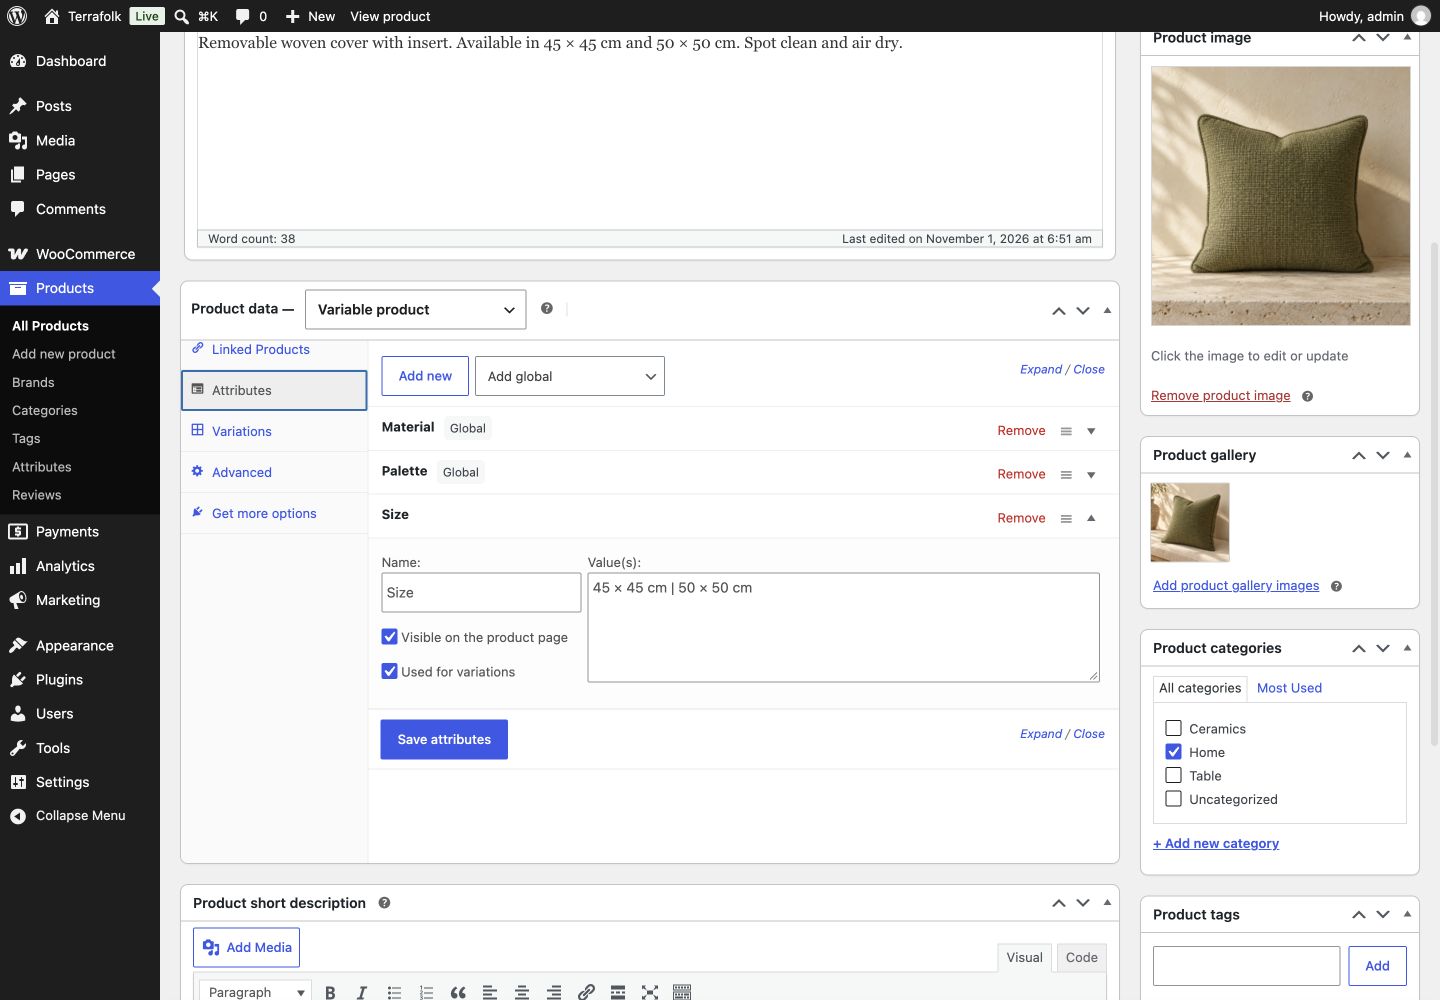
Products → Edit product → Product data → Attributes
The screenshot shows two Size values separated by a | character, with Visible on the product page and Used for variations enabled. For colors, use your global Palette/Color attribute, then save the attributes after editing them.
Open full-size image ↗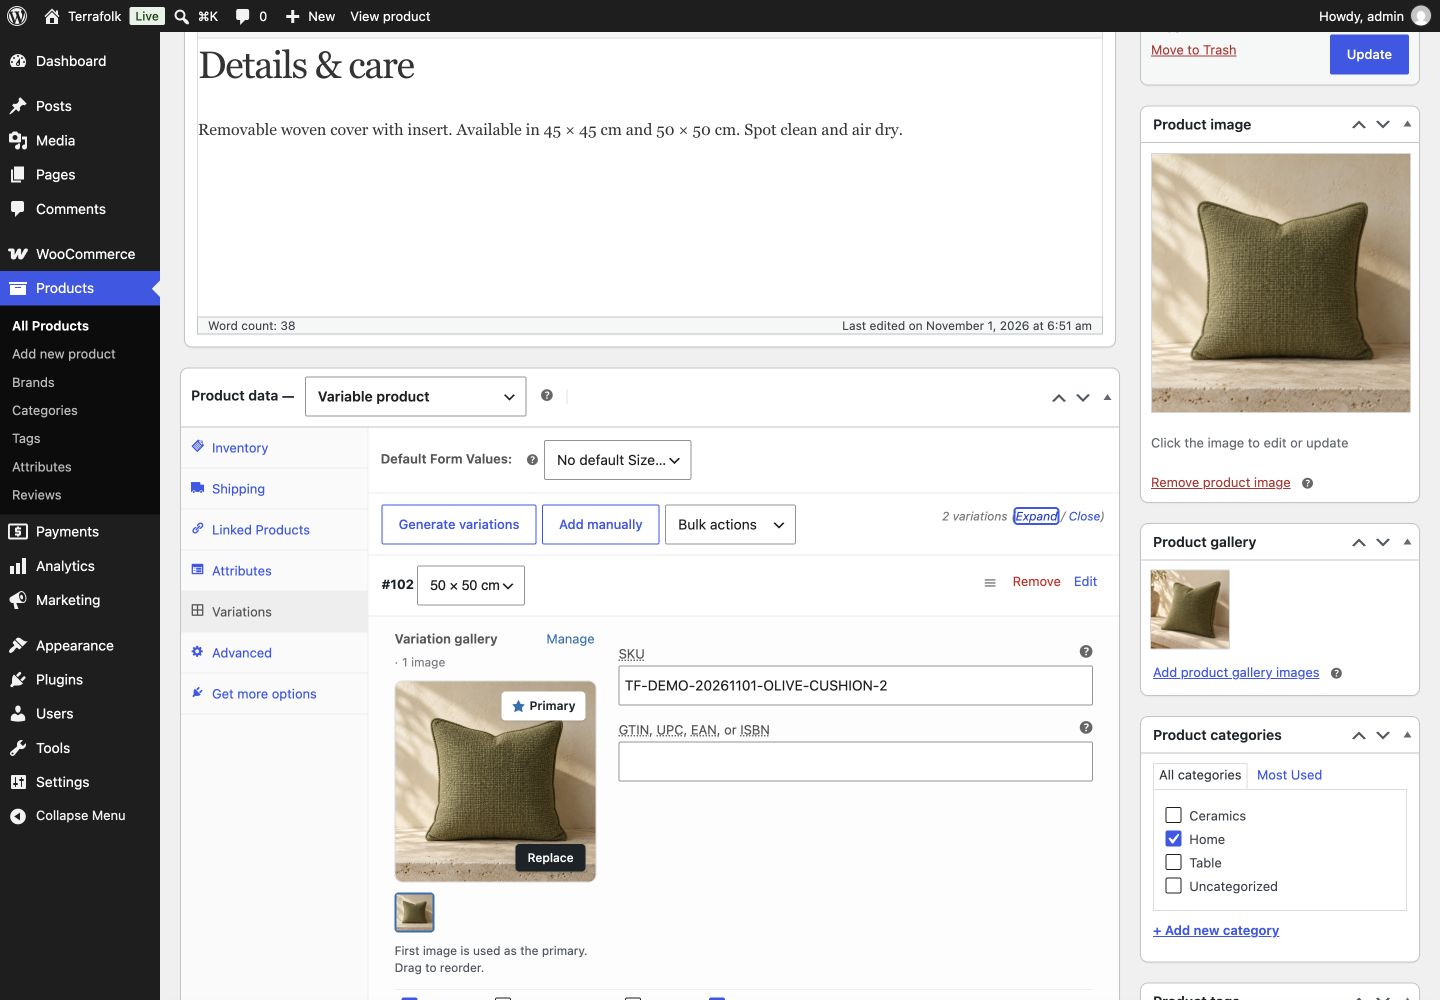
Products → Edit product → Product data → Variations
Choose Variable product, open Variations and expand the combination you want to edit. Assign its matching photo. Do not generate the variations again if all combinations already exist.
Open full-size image ↗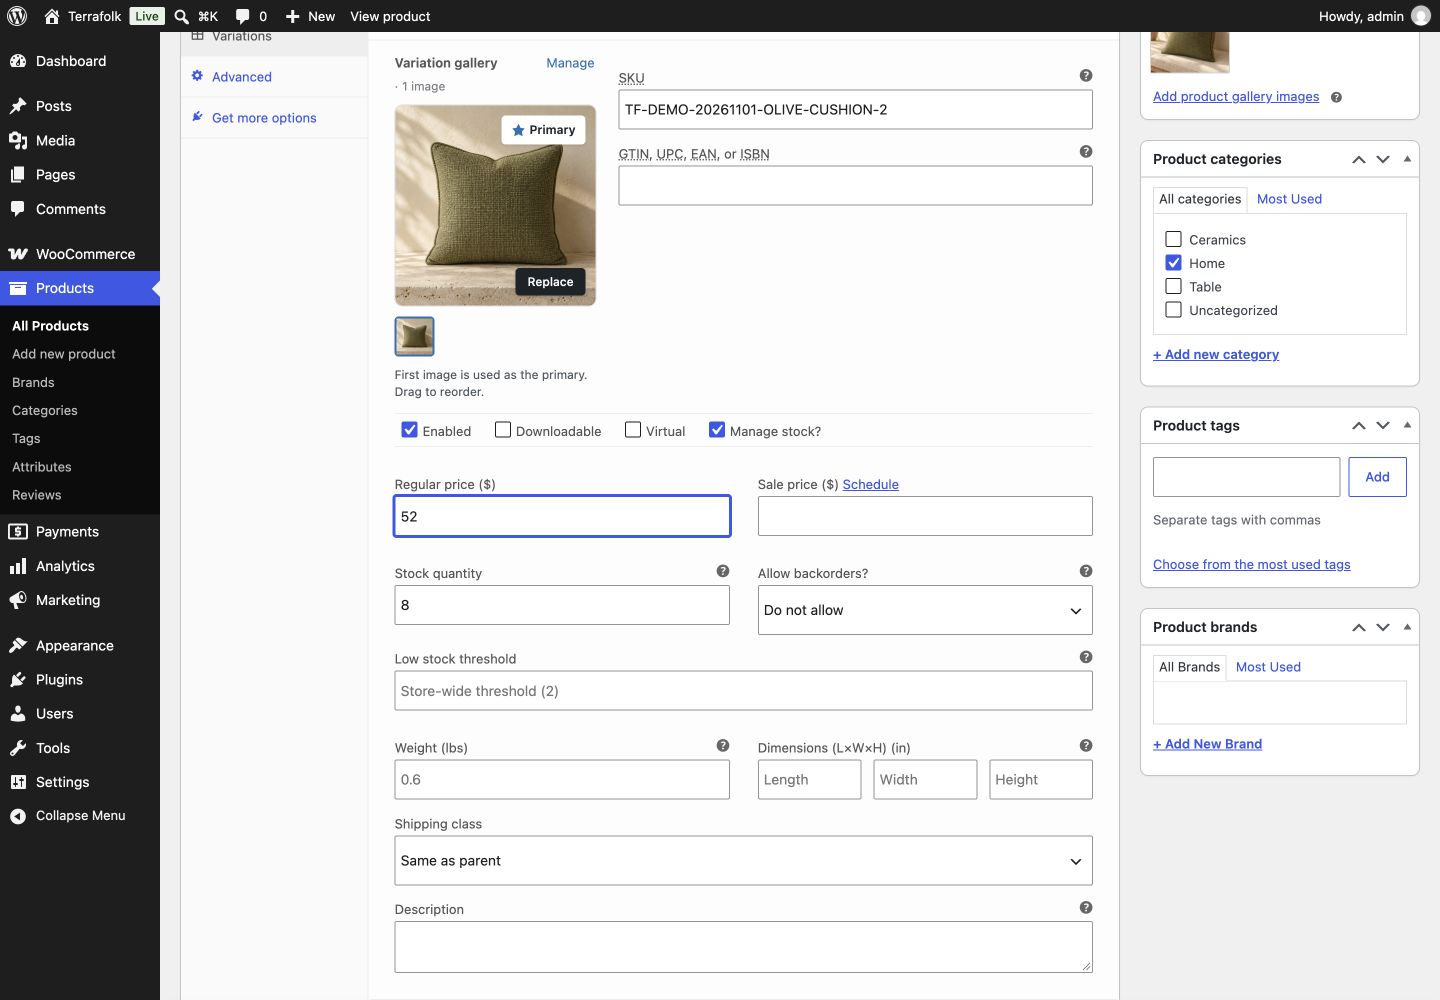
Products → Edit product → Variations → expand a variation
Set a Regular price for each variation. If Manage stock is enabled, enter the available quantity. The screenshot's prices and quantities belong to a demo product, not required store settings.
Open full-size image ↗09 / FIND YOUR PIECES
Open Appearance → Editor → Templates → Product Catalog to edit the introduction, product list and filters. Category, Price range, Color and Availability use real WooCommerce data.
color, select the appropriate attribute in the block and check its appearance.To change the number of products per page or the column count, select Product Collection in the template and use its available query/layout controls. Pagination appears only when the result count exceeds the per-page limit. Keep the archive query inherited so category and search results are not replaced with a fixed list.
10 / OPTIONAL STOREFRONT FEATURES
The theme supplies the presentation for some features, while plugins handle their data and behavior. The Terrafolk plugins below are separate in the demo and are not included in the Terrafolk 1.53.0 theme ZIP. If supplied with your purchase or distribution, install each plugin ZIP separately through Plugins → Add New → Upload Plugin.
| Plugin | Purpose | Content setup |
|---|---|---|
| Terrafolk Wishlist | Stores the wishlist and adds product-card actions. | The wishlist page contains [terrafolk_wishlist]. |
| Terrafolk Compare | Selects and compares products. | The compare page contains [terrafolk_compare]. |
| Terrafolk Quick View | Provides a product popup with variation selection and add-to-cart controls. | Activate the plugin alongside WooCommerce; buttons appear on compatible product cards. |
| Terrafolk Storefront | Supplies live product suggestions in the Search drawer. | Type at least two characters; use ↑/↓ and Enter to navigate and open results. |
| Contact Form 7 | Provides the contact form through the plugin's official block. | Install Contact Form 7 from WordPress.org before importing. Edit the form in Contact → Contact Forms → Terrafolk Contact. On the Contact page, choose the form in its Contact Form 7 block. |
Standard search still uses the WordPress/WooCommerce product search form. Without the live-search plugin, suggestions are unavailable. For contact forms, check the recipient, demo mode and email delivery on your hosting. The theme does not configure an email service.
For newsletters, replace the invitation section near the bottom of the page with a form block from your preferred newsletter plugin. The sample section does not collect email addresses.
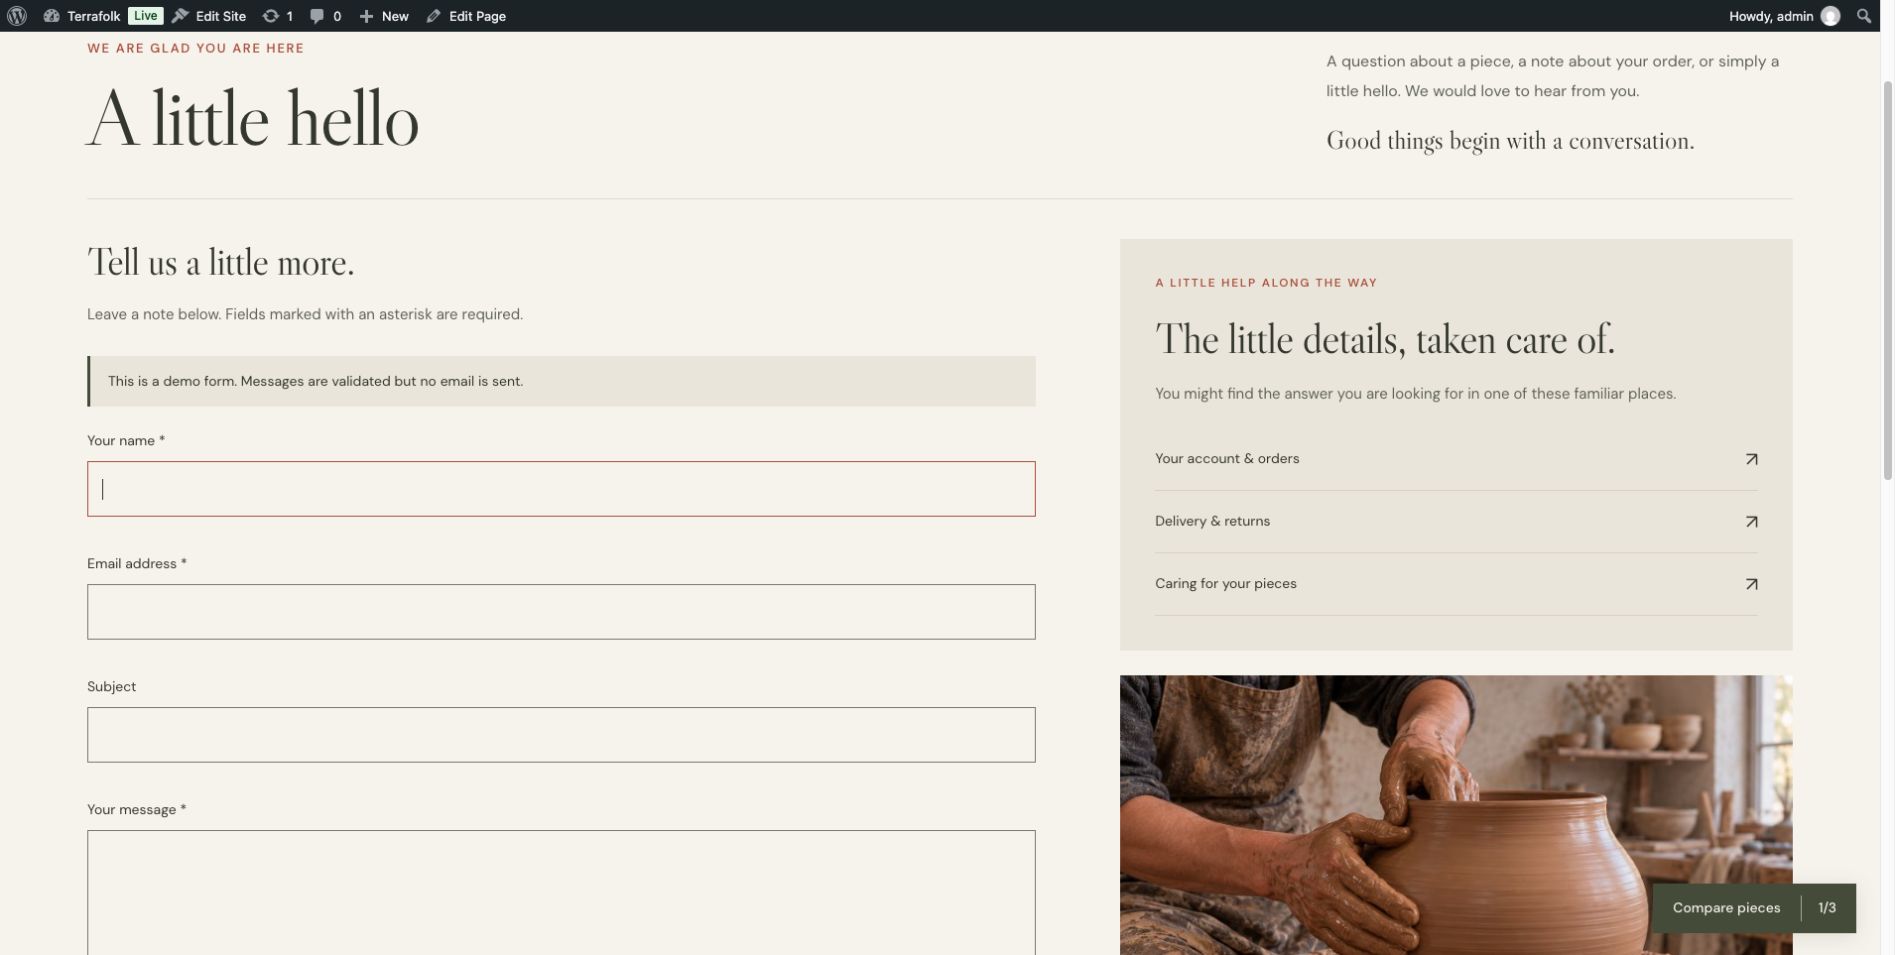
Captured on November 2, 2026. The demo form does not send email. Contact Form 7 handles its inputs and validation messages. The screenshot predates the removal of the introductory demo notice in Importer 1.1.1.
11 / THE REST OF YOUR STORE
| Page / slug | Content or action |
|---|---|
our-story | Insert the Our Story page content pattern, then edit the story and images. |
contact | Insert the Contact content pattern and select a form in the official Contact Form 7 block. |
delivery-returns | Insert Delivery and Returns page content; replace the demo copy with your store's actual policy. |
care-guide | Insert Care Guide page content and provide care instructions appropriate to each product. |
privacy-policy | Insert Privacy Policy page content and assign it in Settings → Privacy if required. |
terms-conditions | Insert Terms and Conditions content, edit the terms and select the Terms page in WooCommerce if needed. |
faq | Insert FAQ page content and edit its Details blocks. |
order-tracking | Insert the order tracking form pattern or [woocommerce_order_tracking]. |
login / register | Keep [woocommerce_my_account] in each page; its slug-specific template provides the corresponding layout. |
Create a page, set its slug, insert the matching pattern from the Terrafolk category and publish it. The slug-specific template supplies the outer layout; Post Content comes from the page. Do not insert the complete content pattern into both the template and the page, as that duplicates the content.
Enable account creation on the My account page in WooCommerce → Settings → Accounts & Privacy if you want to offer registration. Lost Password and Reset Password use WooCommerce's recovery flow and emails. Working email delivery is needed to test the full process.
My Account retains the Orders, View order, Addresses, Account details, Downloads and Payment methods endpoints. Their content depends on the signed-in account, orders and payment plugins. Order Tracking requires an order number and billing email; carrier tracking requires a separate integration.
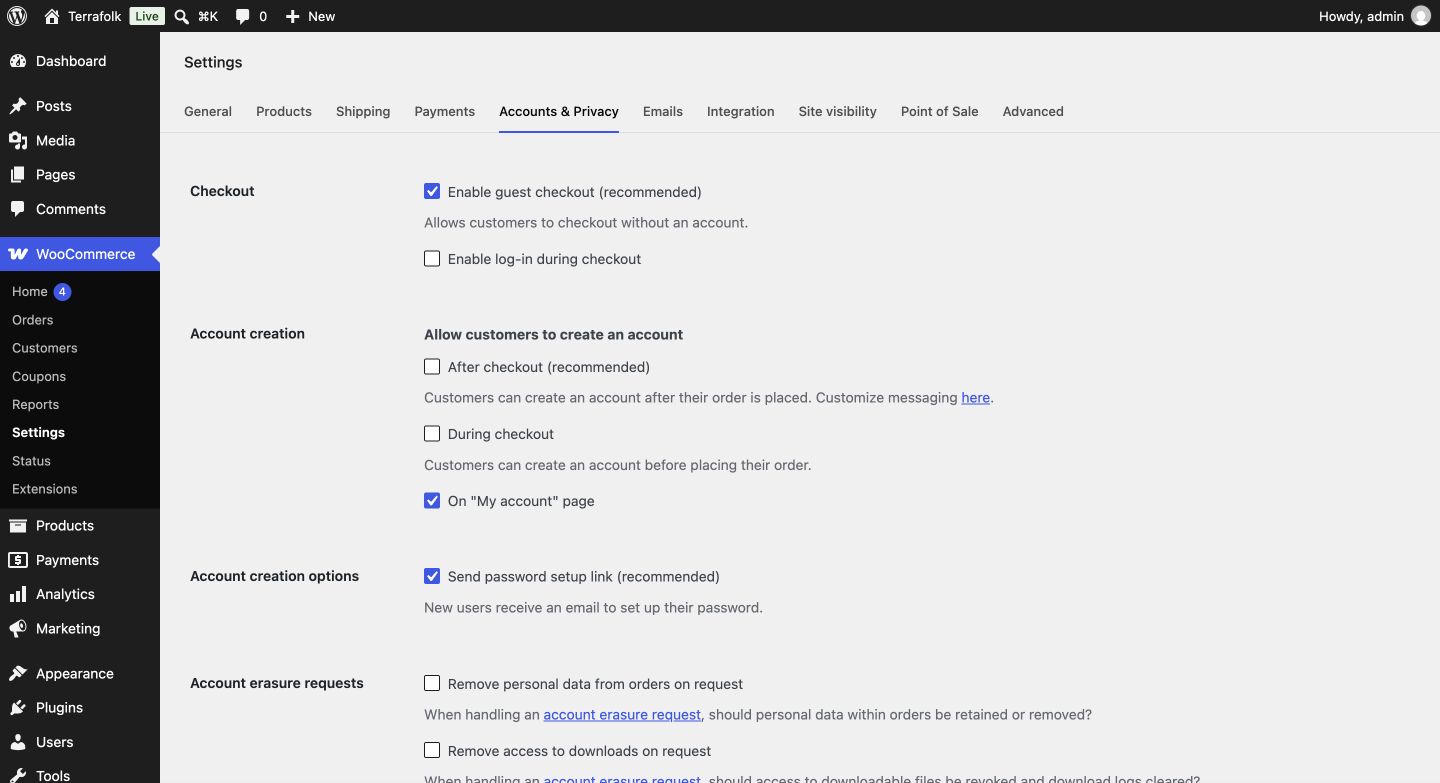
WooCommerce → Settings → Accounts & Privacy
Under Account creation, enable On My account page if you want customers to register. Send password setup link controls the password-creation email; test actual email delivery before launch.
Open full-size image ↗12 / STORIES & CONVERSATIONS
Enable comments in Settings → Discussion and in the individual post settings. Moderate them under Comments. For pagination, enable comment pages in Discussion and set the number of comments per page. Terrafolk supports AJAX pagination while preserving text already entered in the form.
Enable reviews in WooCommerce → Settings → Products and for each relevant product. Approved, rated reviews contribute to the average score and star distribution. Click a star bar to filter; the list and pagination update through AJAX. Pagination appears only when enough reviews exist under the comment paging settings.
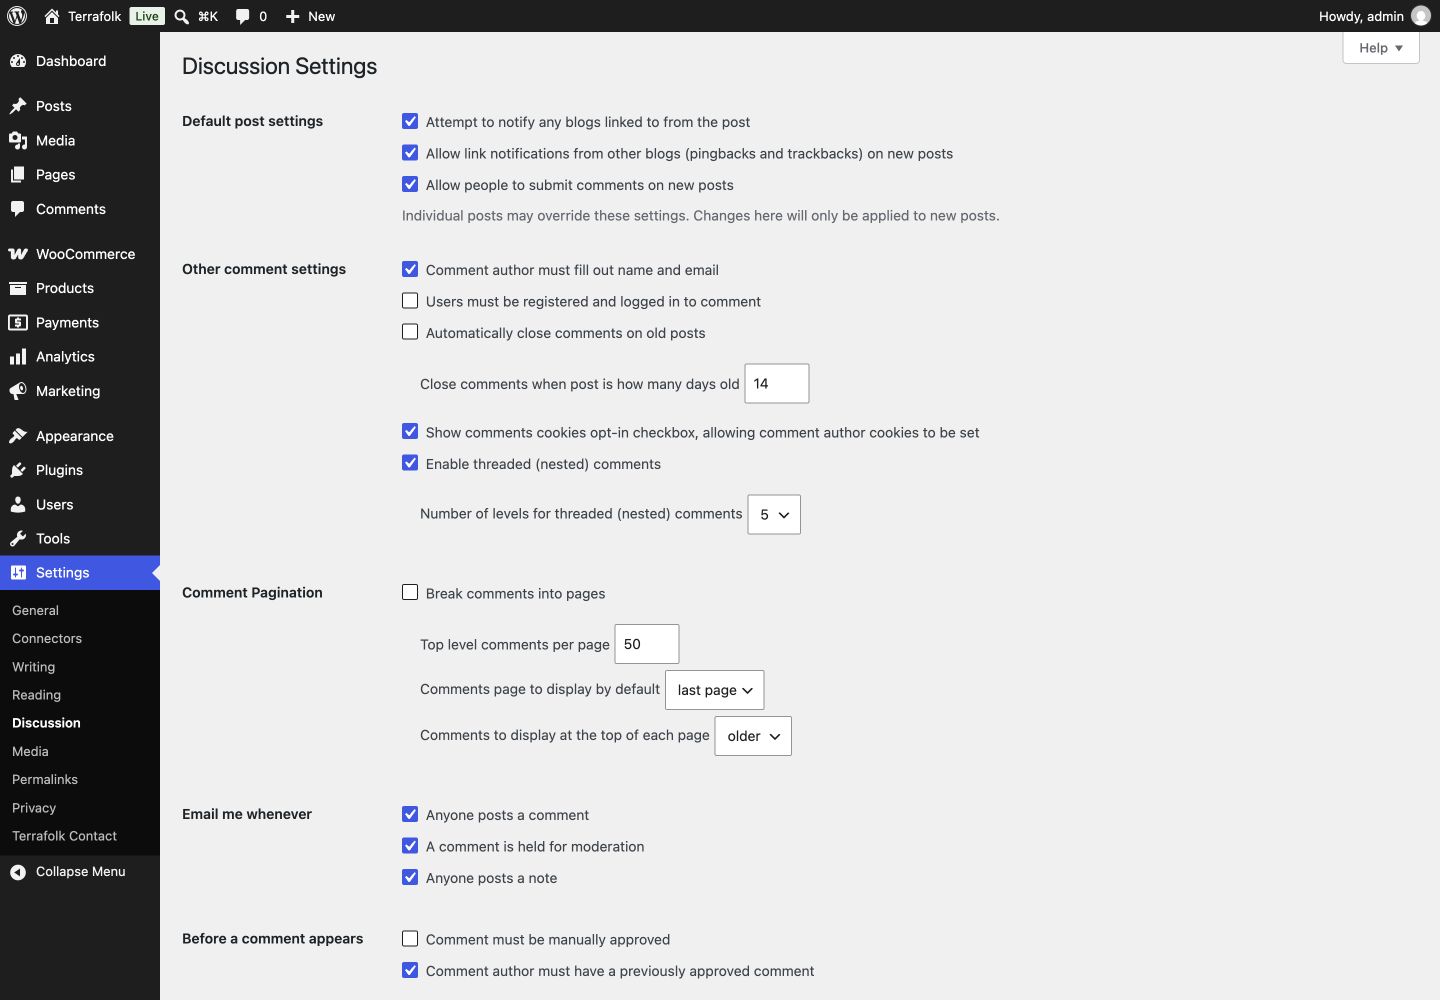
Settings → Discussion
Allow people to submit comments on new posts sets the default for new posts. Enable Break comments into pages to paginate comments; it is unchecked in this screenshot. Choose a suitable page size and save when you want to apply the setting.
Open full-size image ↗13 / DEMO IMPORT
Terrafolk Demo Importer is a separate plugin that brings the homepage layouts, images, products and Journal content into WordPress.
terrafolk-demo-importer-1.1.1.zip, install and activate it.Contact Form 7 6.2.4.1 requires WordPress 7.1 and PHP 8.3. The PHP 7.4 demo currently uses the compatible 6.1.5 release; upgrade your environment before using the newer plugin on a live store. The theme still works without a form plugin, and optional integrations show fallback messages instead of raw shortcodes.
Wishlist, Compare, Quick View and live search use the corresponding Terrafolk plugins; Contact uses Contact Form 7 from WordPress.org. Install these separately. The importer does not install or activate them automatically. You can deactivate the importer after use; imported images and content remain in WordPress.
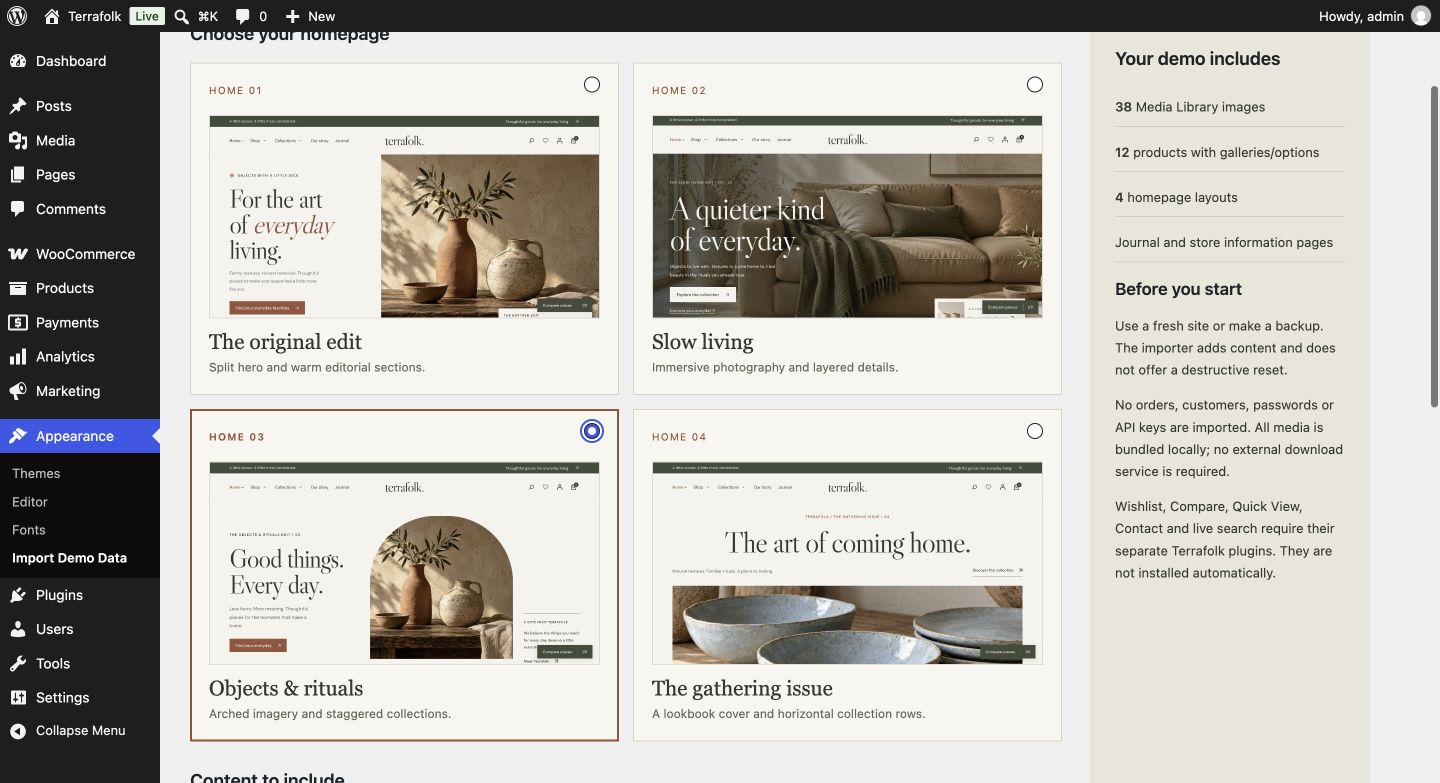
Appearance → Import Demo Data
Choose the homepage and content before importing. Enable page assignments only when you want to apply them to the website.
The demo pack is not a replacement for migration software. Move a customized website with a suitable backup/migration tool, or use Products → Export/Import for products and Tools → Export/Import for posts. After migration, check image URLs, database templates, permalinks and page assignments.
14 / MAKE IT YOUR OWN
| To change… | Edit here |
|---|---|
| Home 02–04 content | Pages → the corresponding page. |
| Home 01 content | Site Editor → Front Page or the imported Home 01 template. |
| Header, footer, megamenu | Site Editor → template parts. |
| Prices, galleries, variations and stock | Products → Edit product. |
| Shop / Single product layouts | Site Editor → the corresponding template. |
| Site-wide colors and fonts | Site Editor → Styles. |
| Wishlist, Compare, Quick View and contact behavior | The relevant integration plugin; keep persistent store functionality outside the theme. |
Create a child theme for lasting PHP, template or CSS changes. A minimal style.css example:
/*
Theme Name: Terrafolk Child
Template: terrafolk
Version: 1.0.0
Text Domain: terrafolk-child
*/
This metadata only identifies the child theme; it does not load its CSS automatically. Enqueue a separate stylesheet with wp_enqueue_style() in the child theme, using the terrafolk handle as its dependency. Check editor styles too if the editing experience needs to match.
Replacing theme files does not replace templates saved in the Site Editor. Reset an individual template only when you intend to discard its customizations.
15 / A LITTLE HELP
Install WooCommerce, create product data and build pages using the templates/patterns, or use the separate demo importer. The theme ZIP does not contain the demo database. Check Homepage/Posts page assignments and optional plugins.
Choose the correct custom template and insert the complete homepage pattern once in the page content. Do not also insert the same layout into a template that already contains Post Content.
Edit Front Page in the Site Editor for the default root layout, or Home 01 for an imported page using that custom template. These templates do not use the Home page's Post Content for their sections. Check any page cache as well.
Publish the page using the expected home-02, home-03 or home-04 slug. If you have customized and saved the header, add or update its Navigation links manually.
Check the global color attribute, its terms, Used for variations, each variation's price/stock and its image. Descriptive color dots do not behave as variation selectors.
Check that the corresponding integration plugin is installed and active. These features are separate from the theme ZIP. Wishlist/Compare pages need the appropriate shortcode.
Open Contact → Contact Forms → Terrafolk Contact → Additional Settings. The demo form contains demo_mode: on, so no email is sent. Before production, remove that setting, adjust any remaining demo copy, configure the Mail tab with an appropriate recipient/domain and test email/SMTP delivery on your hosting. A demo success response does not confirm actual email delivery.
Check Publish status, Catalog visibility, prices, stock, attributes/variations and active filters. Clear the filters to compare the results. Variations without prices may not be purchasable.
The result count must exceed the per-page limit. Check Settings → Reading for posts, and Discussion plus comment/review permissions for comments. Keep the appropriate inherited template query settings.
Check Site Editor saved customizations, the child theme and caches. Back up the template before resetting only the one you need to restore. Do not delete page or product data to resolve a styling issue.
16 / READY FOR EVERYDAY
Record your WordPress, WooCommerce and Terrafolk versions, relevant plugins, the affected URL, reproduction steps and screenshots. Do not include passwords or payment details. This guide does not establish a support channel or response-time commitment.
17 / REFERENCE
terrafolk/
├── style.css              # Theme metadata
├── theme.json             # Global Styles & custom templates
├── functions.php          # Setup, helpers, presentation hooks
├── templates/             # Front Page, Home 01–04, WooCommerce, blog
├── parts/                 # Header, footer, megamenu
├── patterns/              # Editable block patterns
├── assets/css/            # Shared & page-specific styles
├── assets/js/             # Frontend enhancements
├── assets/images/         # Bundled editorial images
├── assets/fonts/          # Local fonts & license notices
├── styles/                # Olive and Sand style variations
└── languages/             # terrafolk.pot
Full copyright information is provided in RESOURCES.txt, readme.txt and the theme/font license files. The theme is GPL-2.0-or-later; WooCommerce-derived markup is identified as GPL-3.0-or-later in COPYING-WOOCOMMERCE.txt. DM Sans and Libre Caslon Display use the SIL Open Font License 1.1.
Bundled editorial photos and demo product images were generated with AI for Terrafolk. Gallery images and product demo data belong to the example site's Media Library/database. Check the asset inventory included with your distribution before using them or moving the website.
Terrafolk User Guide · Theme 1.53.0
Updated November 2, 2026