
Contents — 22 chapters
Make it
your everyday.
From the first installation to your store opening. A practical guide to making Rové your own with Gutenberg and WooCommerce.
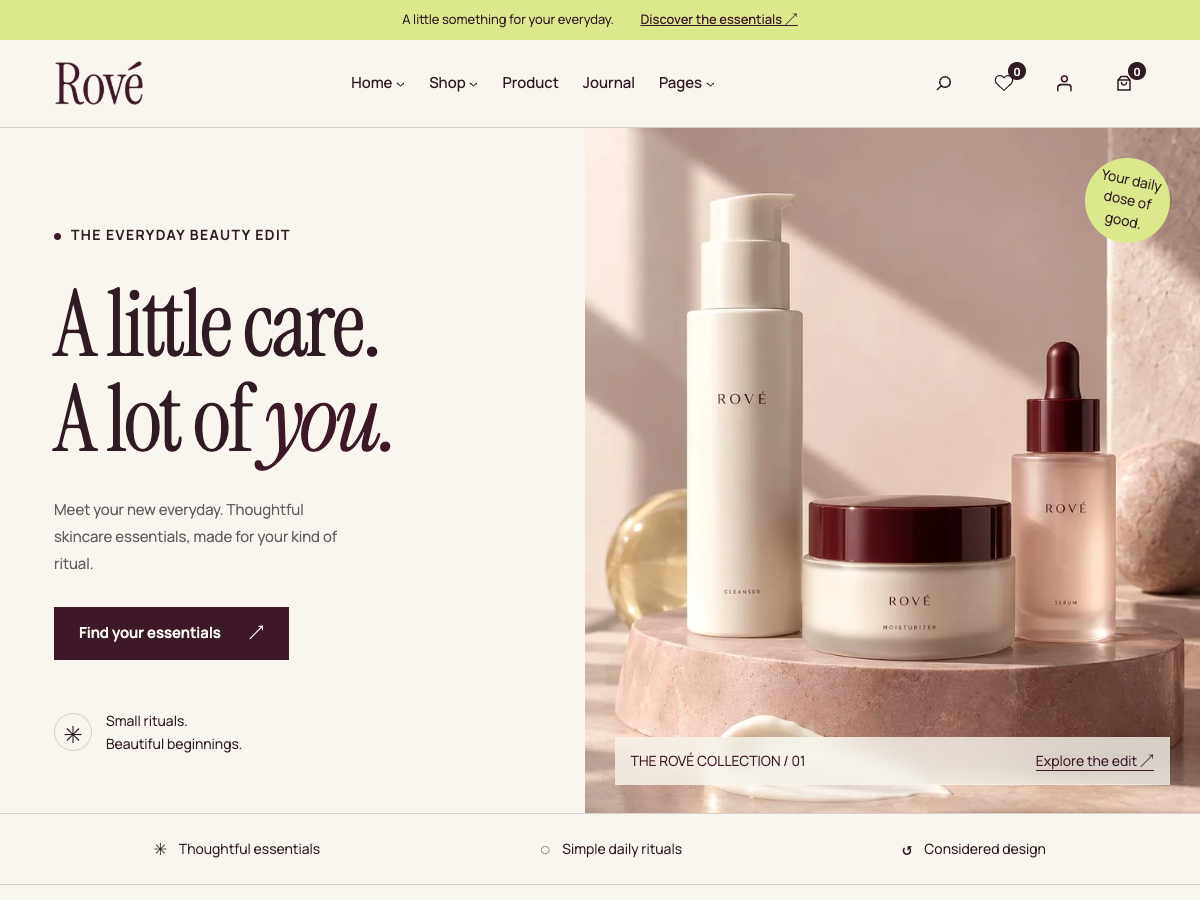
Start here
Welcome to Rové, a beauty and skincare block theme. Build pages with Gutenberg, shape your store with native WooCommerce, and customize the design without editing PHP.
- Install the theme and the plugins you need.
- Import a demo on a new or backed-up website. All five homepage designs remain available.
- Replace the logo, then choose colors and fonts.
- Edit your pages, products and navigation. Configure real shipping, taxes, payments and email.
- Complete the launch checklist before opening the store.
Requirements & package
This guide describes Rové 1.0.82, checked against the versions below. Admin labels can vary with your WordPress version and language.
| Component | Guide baseline |
|---|---|
| Rové | 1.0.82 |
| Rové Store Tools | 0.7.6 |
| Rové Demo Import | 1.0.4 |
| WordPress / WooCommerce | 7.1.3 / 11.2.1 |
The theme declares WordPress 6.8+ and PHP 7.4+ compatibility. For a live store, follow the current WordPress hosting requirements: PHP 8.3+, MySQL 8.0+ or MariaDB 10.11+, and HTTPS. The declared minimum is not a recommendation to keep an old PHP installation.
You need an administrator account and permission to upload themes, install plugins and write to wp-content/uploads. Ask your host to check PHP memory, upload and execution limits if an installation or import stops.
Install theme & plugins
Appearance → Themes → Add New → Upload Theme
-
Choose
rove-1.0.82.zip, click Install Now, then Activate. - Review the recommended plugin notice. Install only the components needed for your site.
- For a companion ZIP, use Plugins → Add New → Upload Plugin, install and activate it.
| Plugin | When to use it |
|---|---|
| WooCommerce | Required for a working shop, products, cart, checkout and customer accounts. Complete its setup wizard with your own store details. |
| Rové Store Tools 0.7.6 | Optional wishlist, quick view and AJAX Add to bag. Required for the complete Rové demo import. |
| Rové Demo Import 1.0.4 | Optional local demo installer. It can be deactivated after setup. |
| Contact Form 7 | Optional contact form integration. |
| Mailchimp for WordPress (MC4WP) | Optional newsletter integration. Requires your own Mailchimp connection. |
Theme activation does not automatically activate plugins or import content. For the complete demo, activate WooCommerce and Store Tools before opening the importer. Activate the two form plugins first if you want their example forms.
Import the demo
Appearance → Import Demo Data
- Back up the database and uploads, or start with a new WordPress installation.
- Select the homepage you want as the starting front page. All five layouts are imported.
- Enable Set up demo pages and missing branding to assign the front page, Journal and WooCommerce pages, and fill empty logo/Site Icon settings. Disable it to keep your current assignments.
- Click Import demo data. Keep the progress screen open. Pause stops after the current item; Continue import resumes after a pause or interruption.
- Review the completion links. Check Settings → Reading and WooCommerce → Settings → Advanced for the assigned pages.
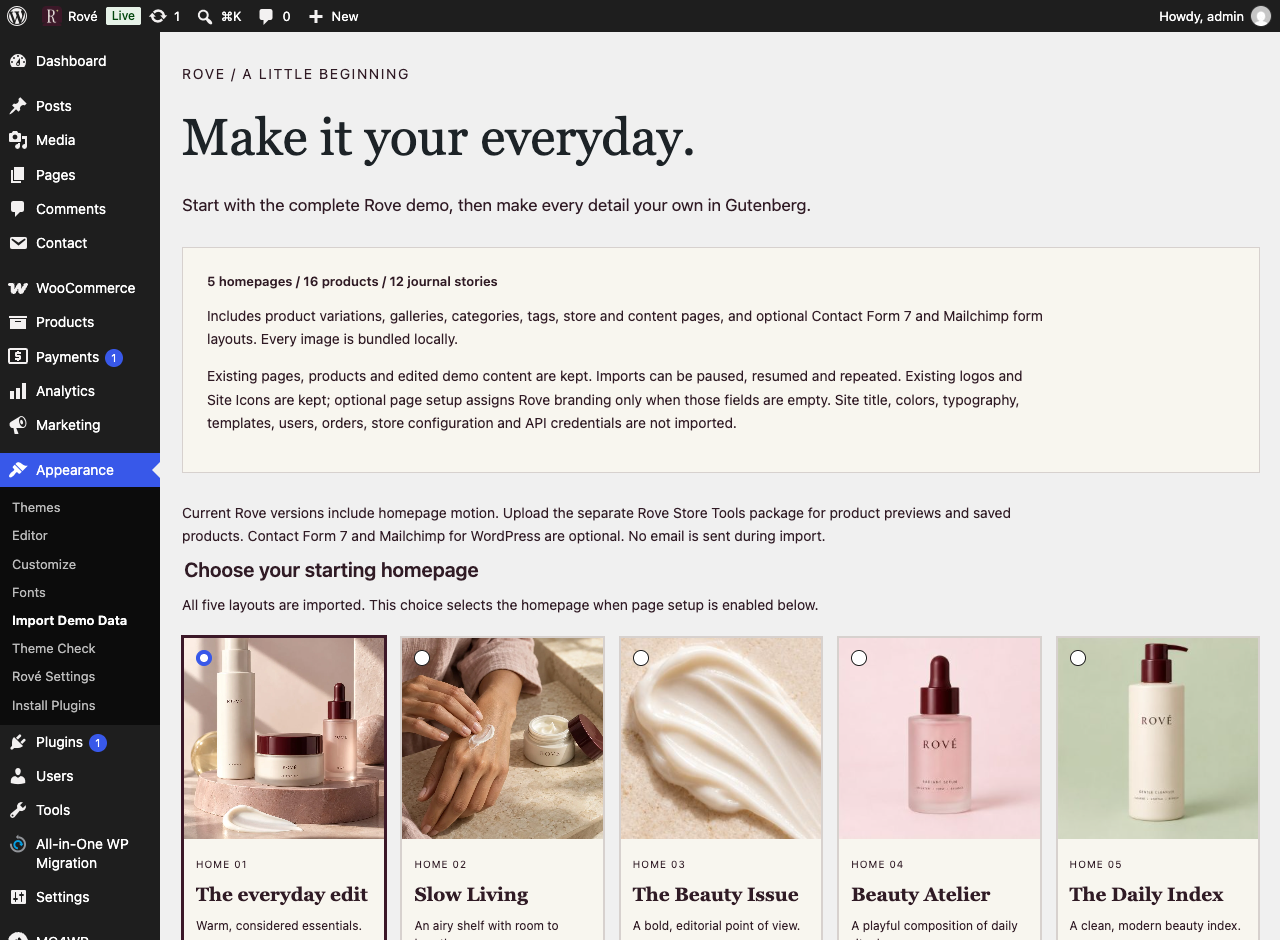
The current demo contains 24 Media attachments (including logo and Site Icon), 16 products, 32 variations, 12 sample stories and 17 pages. Photo files are bundled with the importer and copied into this website’s Media Library; a connection to the original demo website is not required.
No customers, orders, API keys or mailing credentials are imported. Demo policies and product copy are examples. Replace them before selling. The importer does not change WooCommerce Coming Soon/site visibility settings. You may deactivate Demo Import after setup; imported content and Media remain.
Find the right editor
Rové separates content from reusable layouts. Open List View in Gutenberg to select the exact Group, Image, Heading or product collection you want to change.
| What to change | Where to edit |
|---|---|
| Text, photos and sections on Home 1–5 / regular pages | Pages → Edit. Use the page’s assigned Rové template. |
| Header, footer, Shop megamenu | Appearance → Editor → Patterns → Template Parts. |
| Shop and single product structure | Appearance → Editor → Templates → Product Catalog / Single Product. |
| Journal archive and article layout | Appearance → Editor → Templates → Blog Home / Single Posts. |
| Site-wide style defaults | Appearance → Customize; or Editor → Styles. See style priority. |
| Product facts, prices and stock | Products → Edit. Product data should not be typed into a shared template. |
To add a section, open the block inserter’s Patterns tab and browse the Rové patterns. Inserted patterns normally become editable copies. Changing a pattern source or another page does not automatically update all copies.
In Gutenberg
Select the block first, then use the inspector on the right. Page or Template settings are separate from Block settings. Depending on the selected block and WordPress version, the inspector may use Content, Settings and Styles controls.
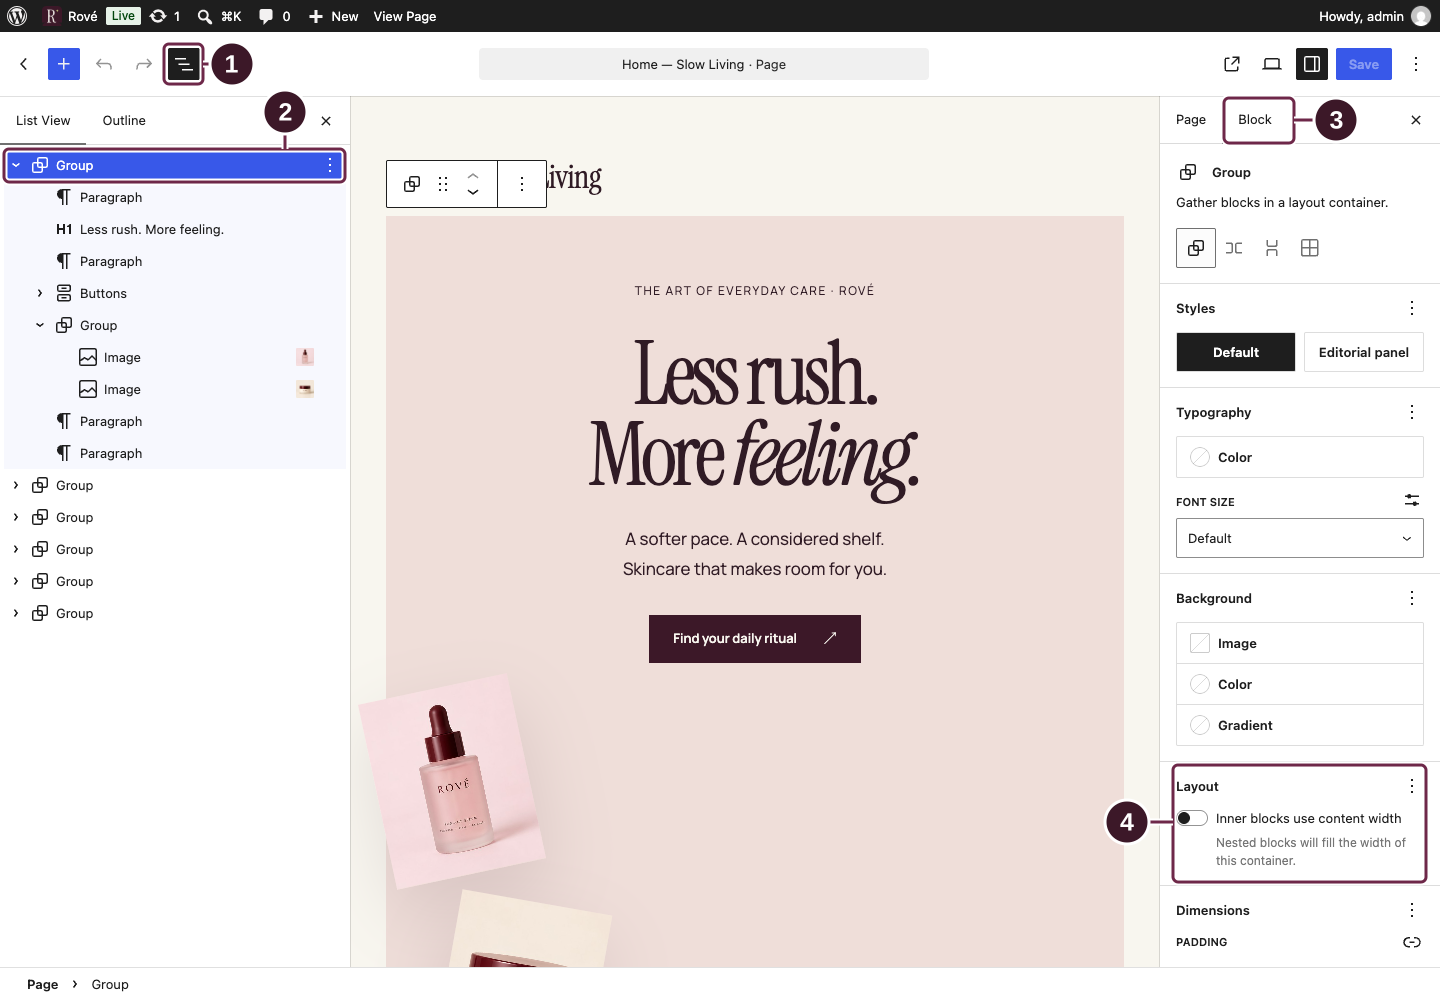
Open Document Overview → List View, select a section Group, then use the Block inspector on the right. Layout, colors, typography and dimensions apply to the selected Group.
Open full-size screenshot ↗Follow the selection path, then adjust only the settings needed for your section.
- Open Document Overview to reveal List View.
- Select the section Group in List View.
- Choose Block to edit the selected section instead of page-level settings.
- Use Layout to inspect content width. Dimensions and spacing controls are further down this inspector.
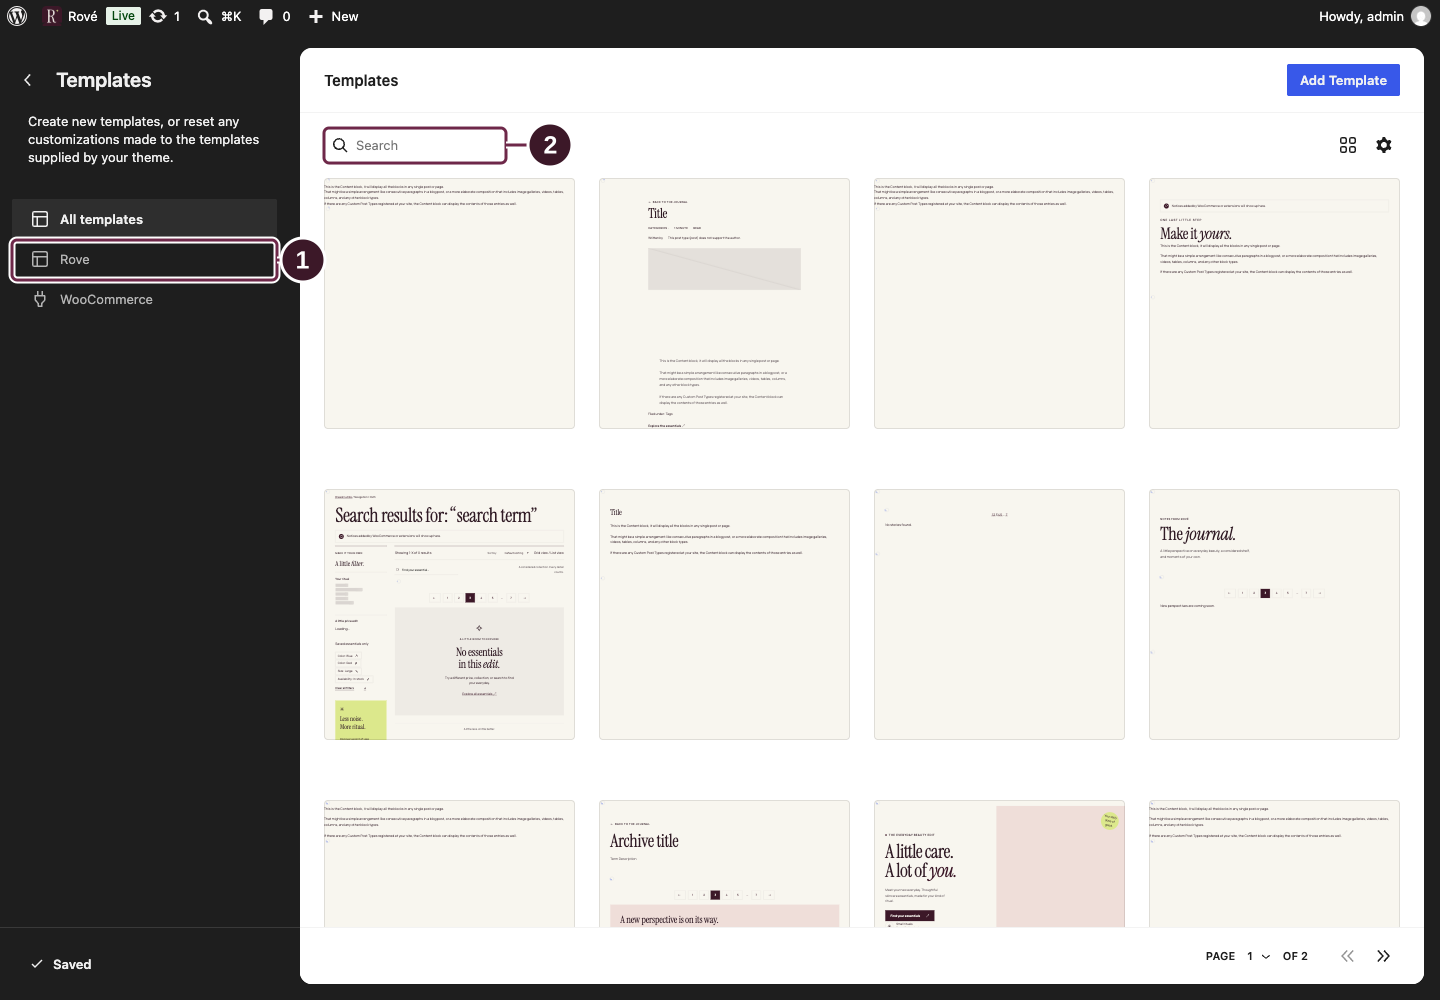
Open Appearance → Editor → Templates to find shared layouts. Use Search to find a template by name, then open its card. Changes here affect the pages that use that template.
Open full-size screenshot ↗Filter the library before opening the shared template you want to edit.
- Choose Rove to show the templates supplied by this theme.
- Search for a template name, such as Single Product, then open the matching result.
Follow the matching numbers below each screenshot. Click the image to enlarge it with all markers visible. Captured in WordPress 7.1; labels may differ slightly in other versions.
Five homepages
Pages → Edit page → Page settings → Template
Settings → Reading → Your homepage displays → A static page
Choose a page, assign its matching template and publish it. In Reading settings select that page as Homepage and Journal as Posts page. Keep these two assignments different.
| Page | Template label | Template file |
|---|---|---|
| Home 1 | Homepage — The everyday edit |
page-home-one
|
| Home 2 | Homepage — Slow Living |
page-home-two
|
| Home 3 | Homepage — The Beauty Issue |
page-home-three
|
| Home 4 | Homepage — Beauty Atelier |
page-home-four
|
| Home 5 | Homepage — The Daily Index |
page-home-five
|
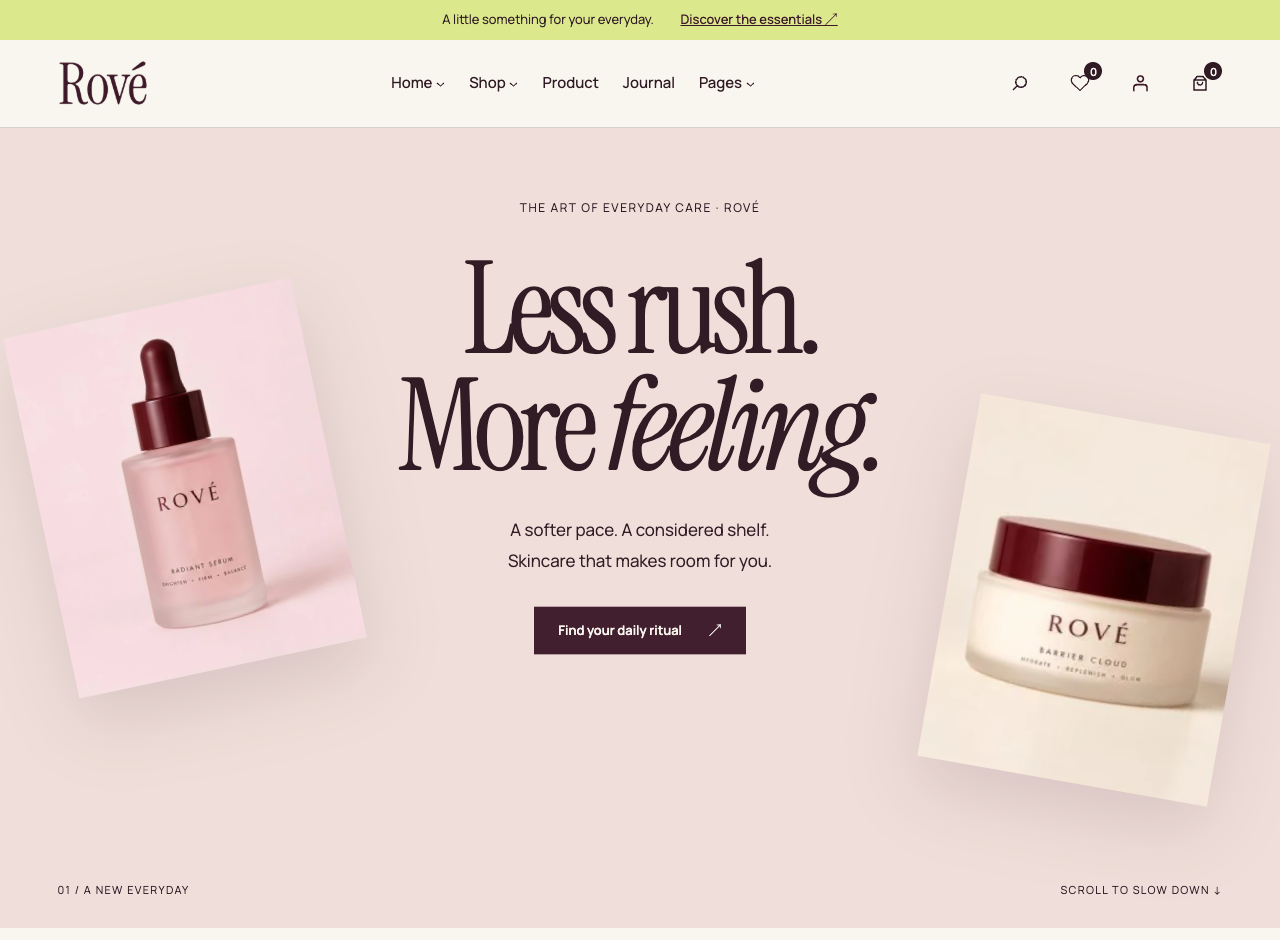
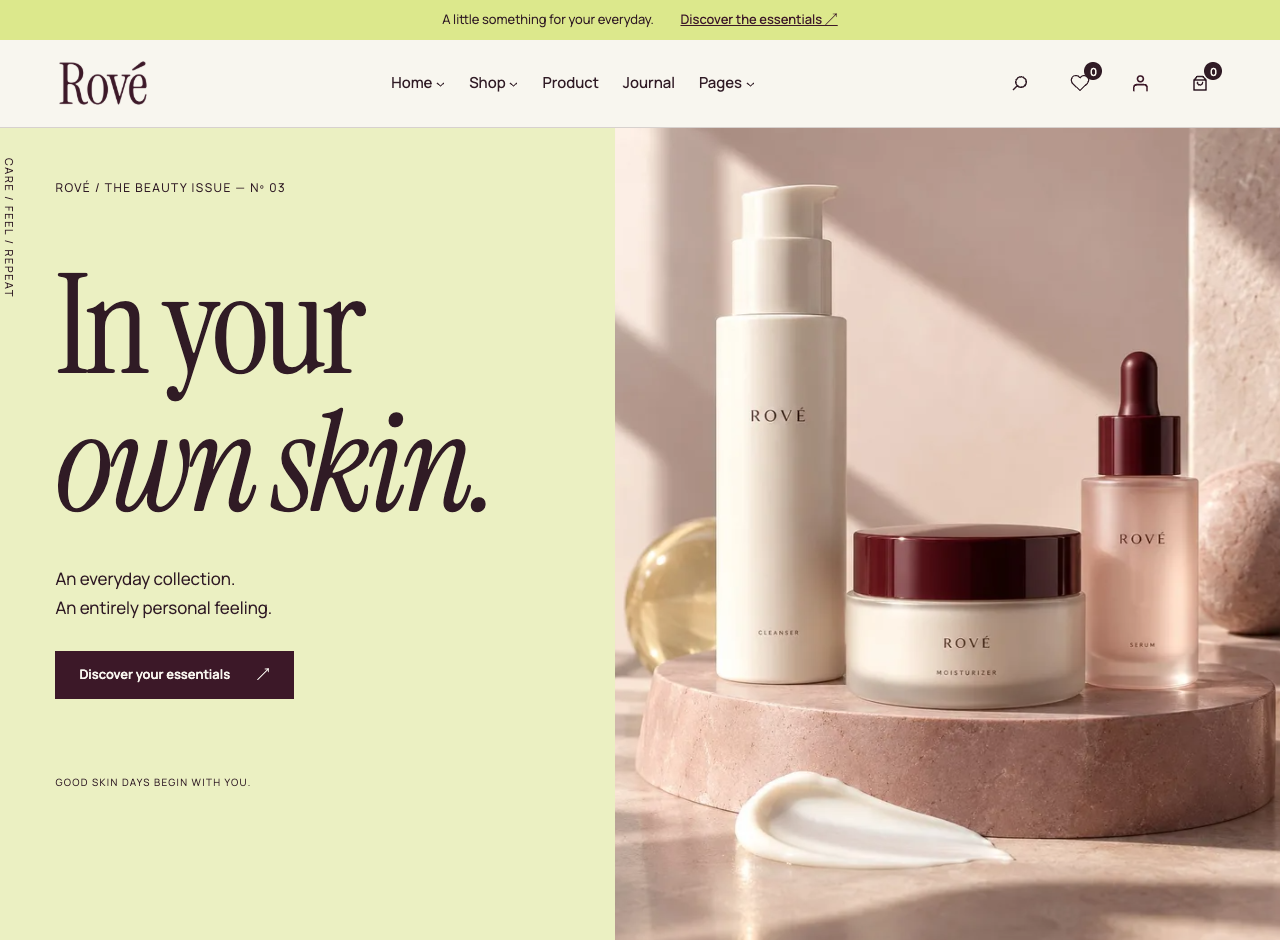
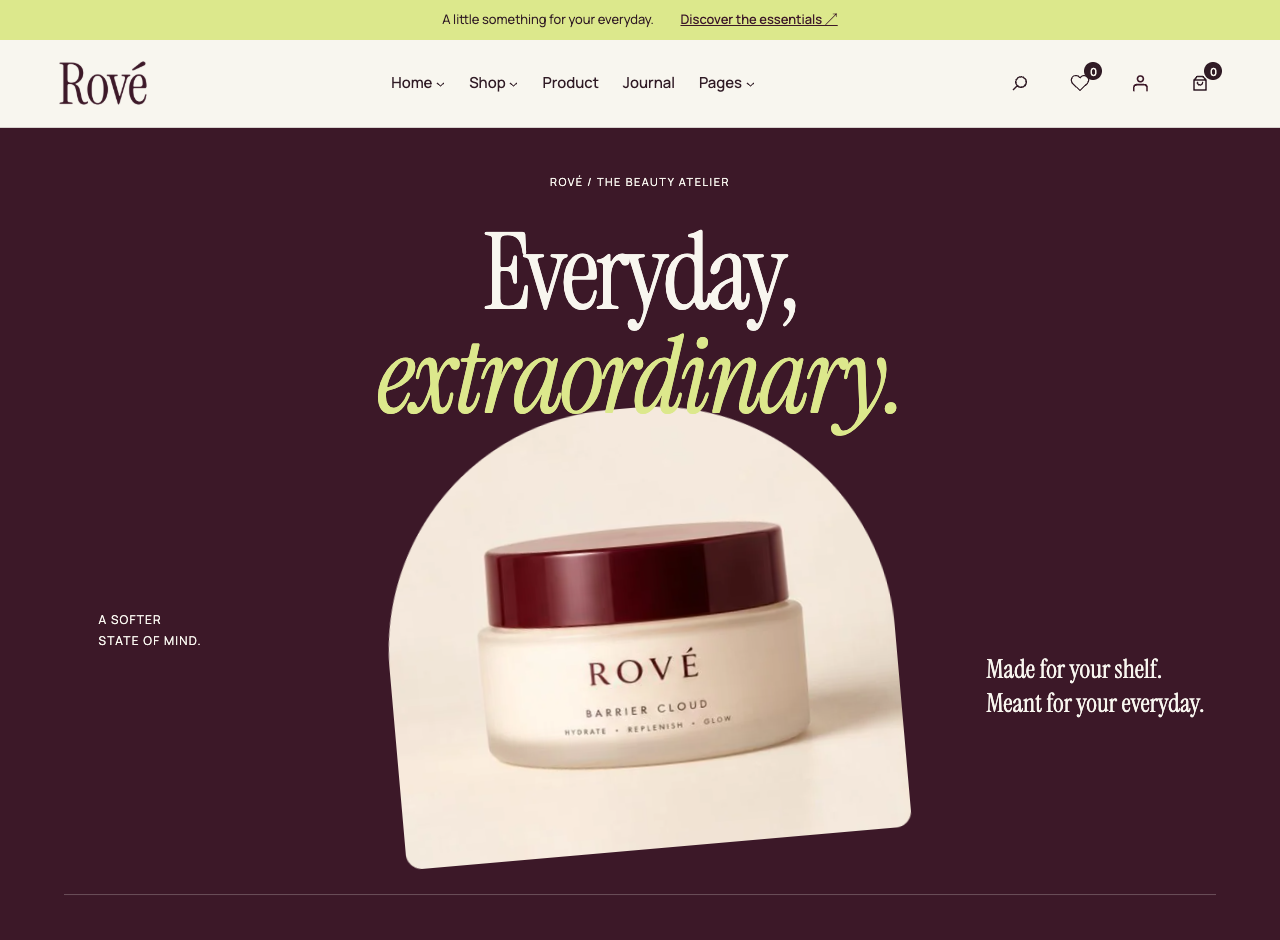
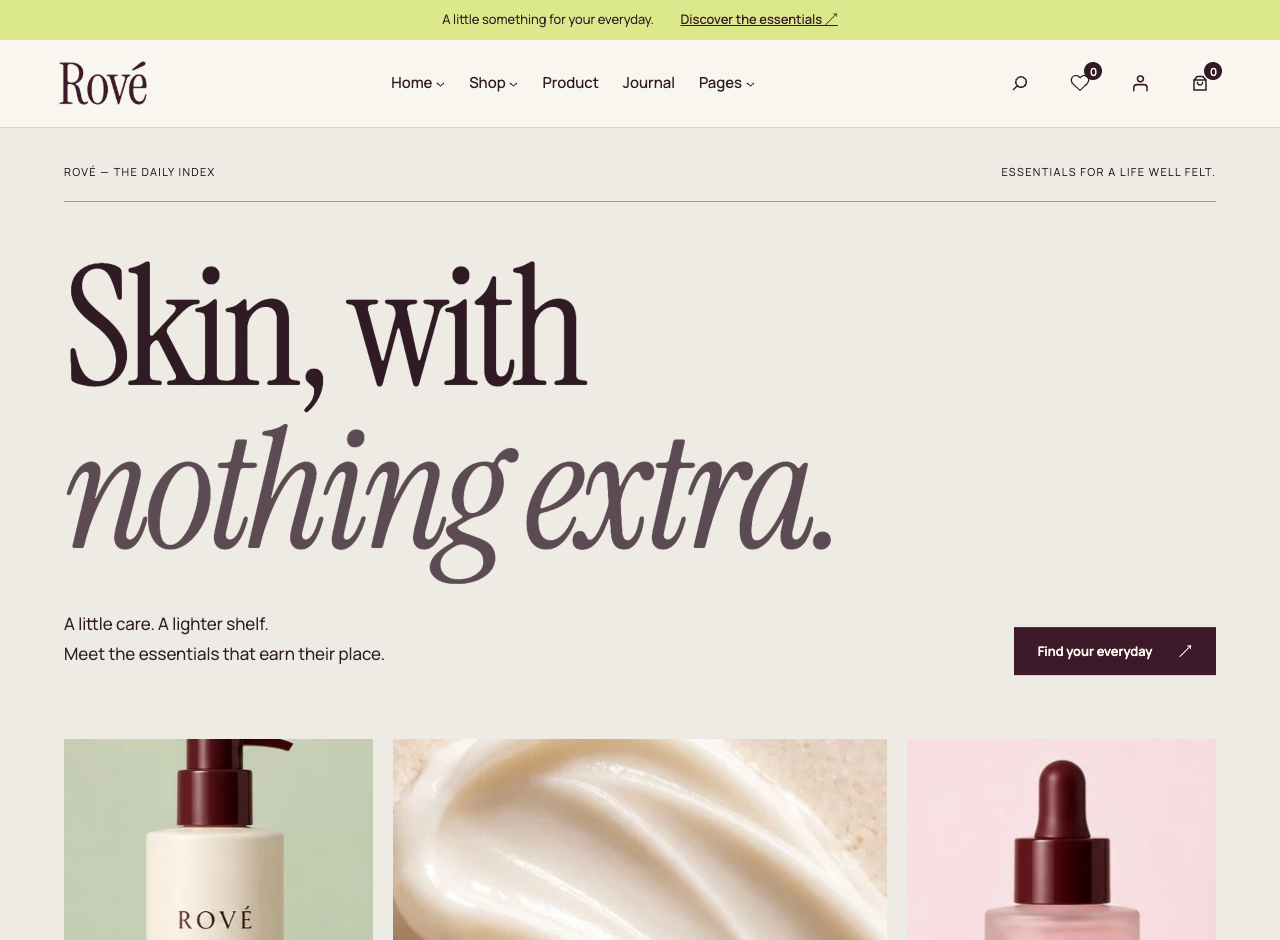
Imported Home 1 is edited in Pages, like the other homepages. If you are using the theme’s fallback front page instead of imported page content, inspect the Front Page template in Site Editor.
- Home 3: the horizontal product section is limited to eight products without pagination. Desktop pinning applies at viewport width ≥1100px and height ≥800px; smaller screens use a normal grid.
- Home 4: “Three Little Moments” includes pointer-following floating images.
- Home 5: “The Rové Way” uses the same type of floating image interaction.
Select images through Media Library in the block editor. Keep animation wrapper classes intact and check mobile after changing image proportions or long headings.
In Gutenberg
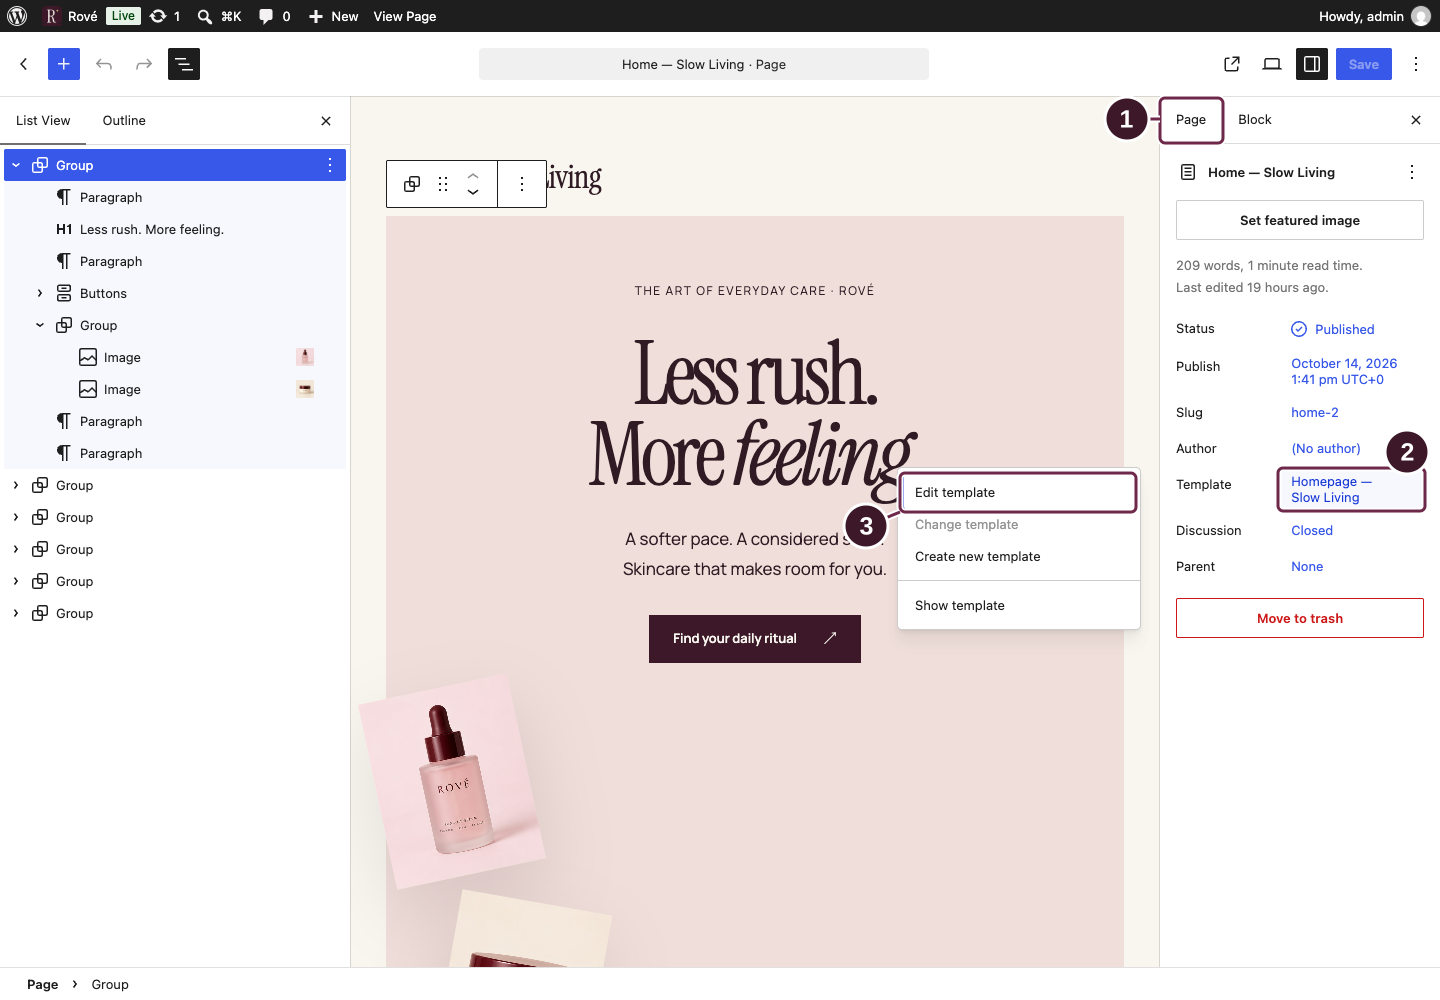
Switch from Block to Page in the inspector. Open Template options to inspect or change the page template. Match Home 2 with Homepage — Slow Living; choose the corresponding template for the other homepages.
Open full-size screenshot ↗Inspect the assigned template first. Opening the shared layout is optional.
- Choose Page rather than Block.
- Click the assigned template name to open its options.
- Choose Edit template only when changing the shared layout. Edit normal homepage text and images in the page itself.
Follow the matching numbers below each screenshot. Click the image to enlarge it with all markers visible. Captured in WordPress 7.1; labels may differ slightly in other versions.
Logo & favicon
Appearance → Customize → Site Identity
- Use Select/Change logo and choose your logo from Media Library.
- Use Site Icon to upload a square image, preferably a crisp 512 × 512 PNG. Crop if WordPress asks.
- Publish. Refresh the front end and check a new browser tab; favicons may be cached.
The header and footer use the native Gutenberg Site Logo block and share the same logo selection. Edit each block’s width in its template part if needed. Without a logo, Rové falls back to the Site Title. Changing typography does not recolor or redraw an uploaded logo.
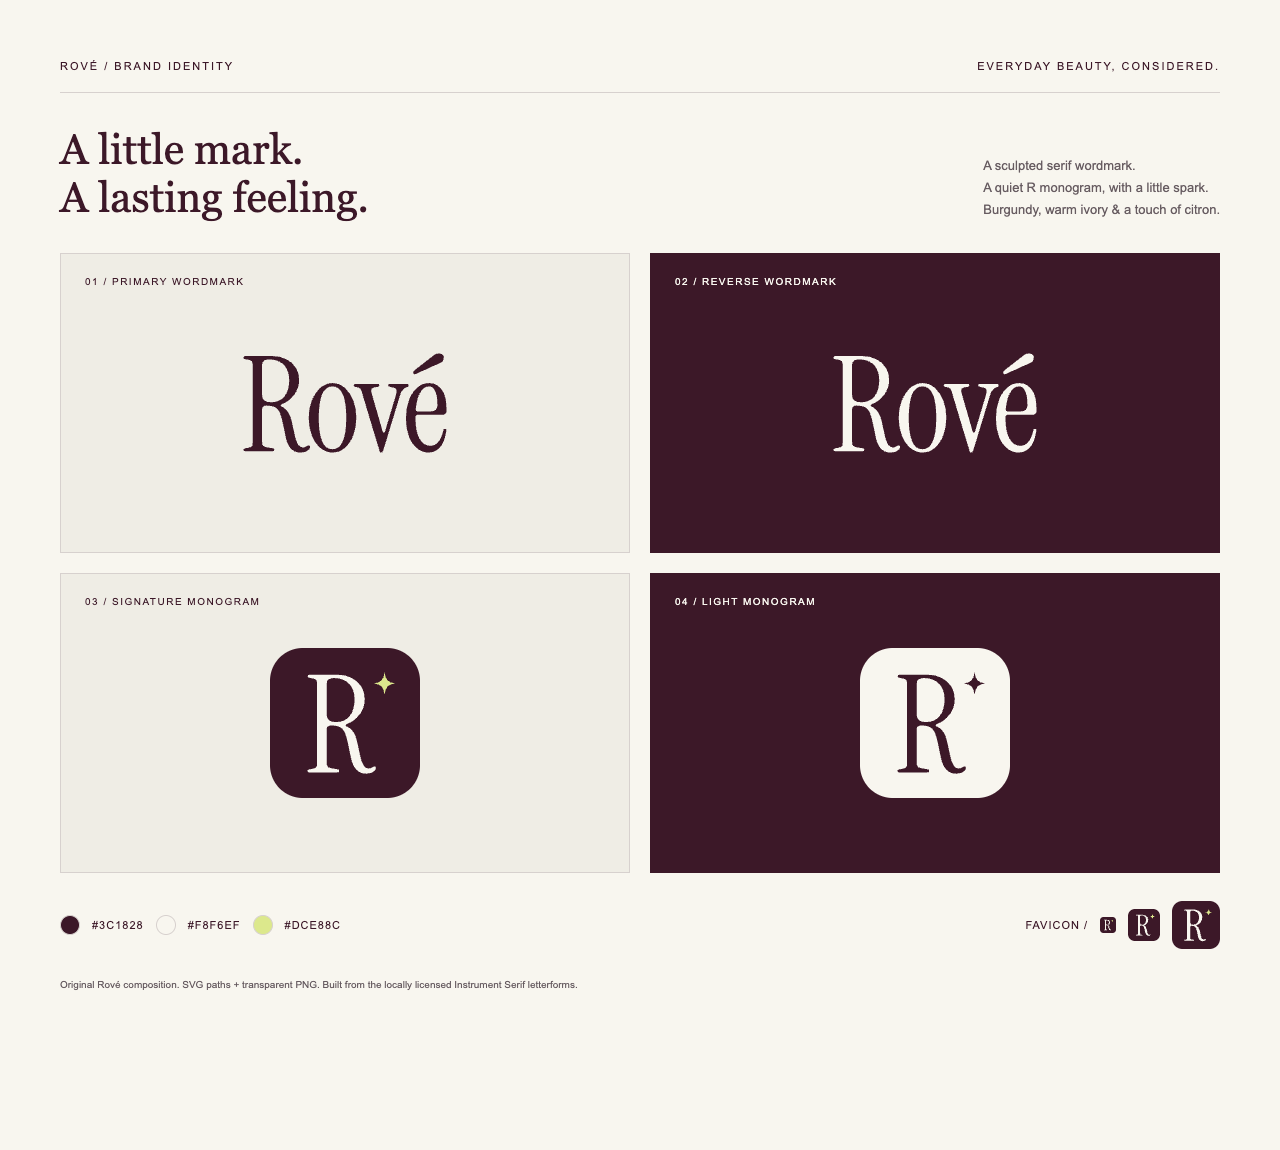
The separate brand kit includes SVG source artwork, transparent PNGs and favicon sizes from 16 to 512px. Use PNG for the standard WordPress upload flow. Rové does not enable unrestricted SVG uploads. Replace the demo brand before launching your own store.
In Gutenberg
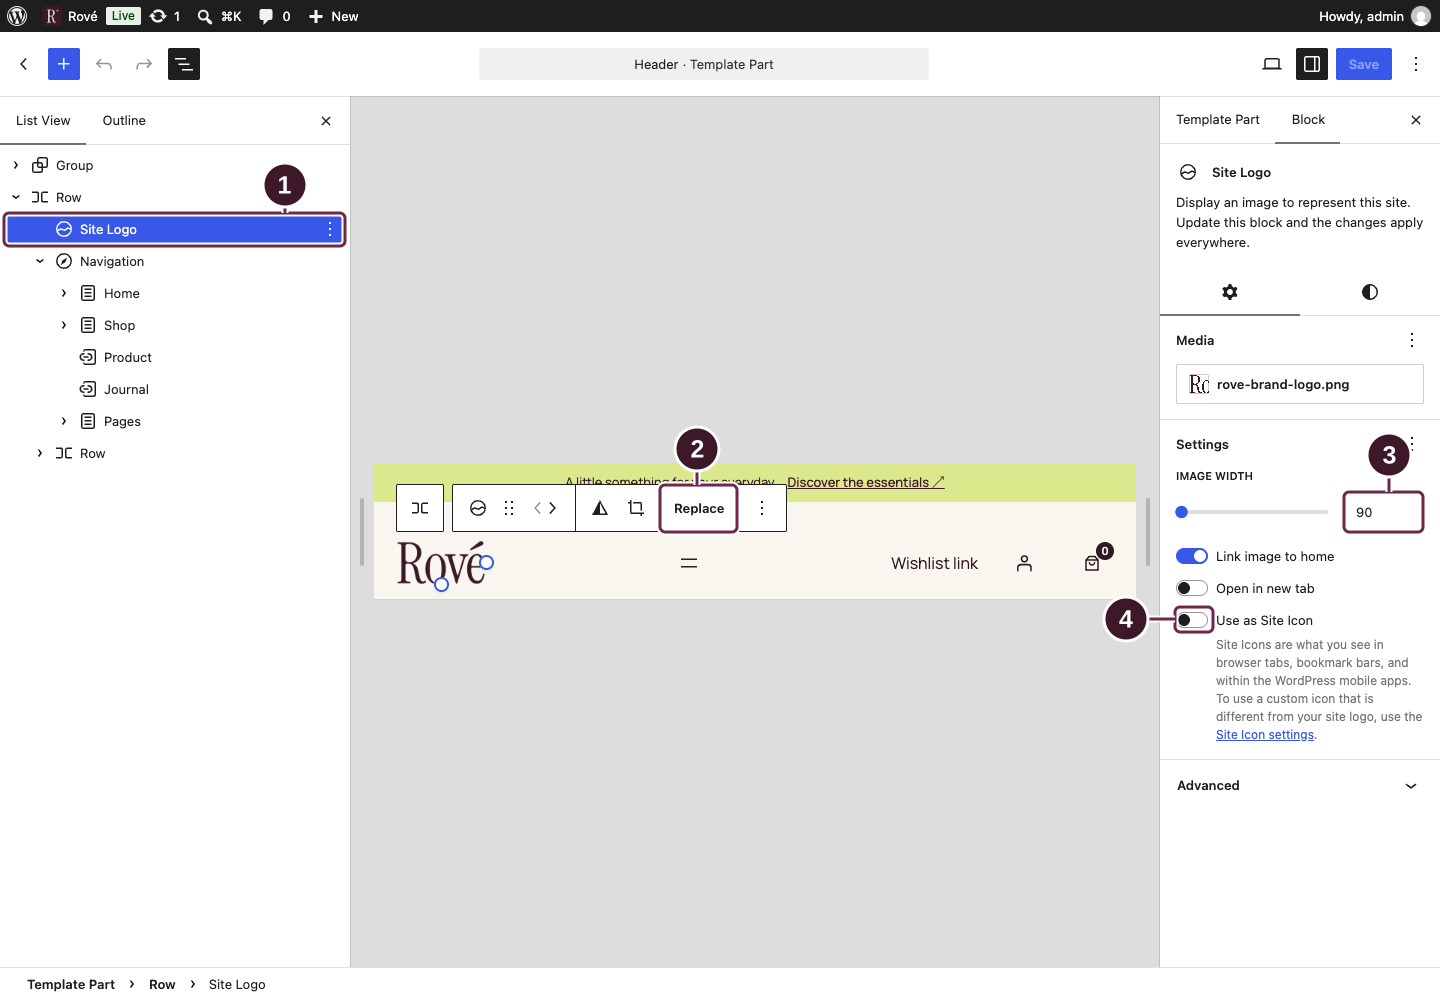
In Header or Footer, select Site Logo in List View. Use Media to choose the shared logo and Image width to size this block. Keep Use as Site Icon off when your favicon is a separate image.
Open full-size screenshot ↗Select the shared logo, then review the options relevant to your brand.
- Select Site Logo in the Header or Footer List View.
- Use Replace to choose the logo from Media Library.
- Adjust Image width for this Site Logo block.
- Keep Use as Site Icon off when the favicon is a separate image.
Follow the matching numbers below each screenshot. Click the image to enlarge it with all markers visible. Captured in WordPress 7.1; labels may differ slightly in other versions.
Colors & typography
Appearance → Customize → Rové — Colors & Typography
Alternative: Appearance → Editor → Styles → Browse styles
Choose one of four color schemes or select Custom to edit individual palette colors. Your custom values are kept when switching schemes. Clearing a color restores its default.
The four presets are also available as Gutenberg Style Variations. In Customizer you can set the body and heading font independently: Manrope, Instrument Serif, System, Georgia or Arial. Base text size ranges from 14–20px, with 16px as the default. Theme fonts are self-hosted.
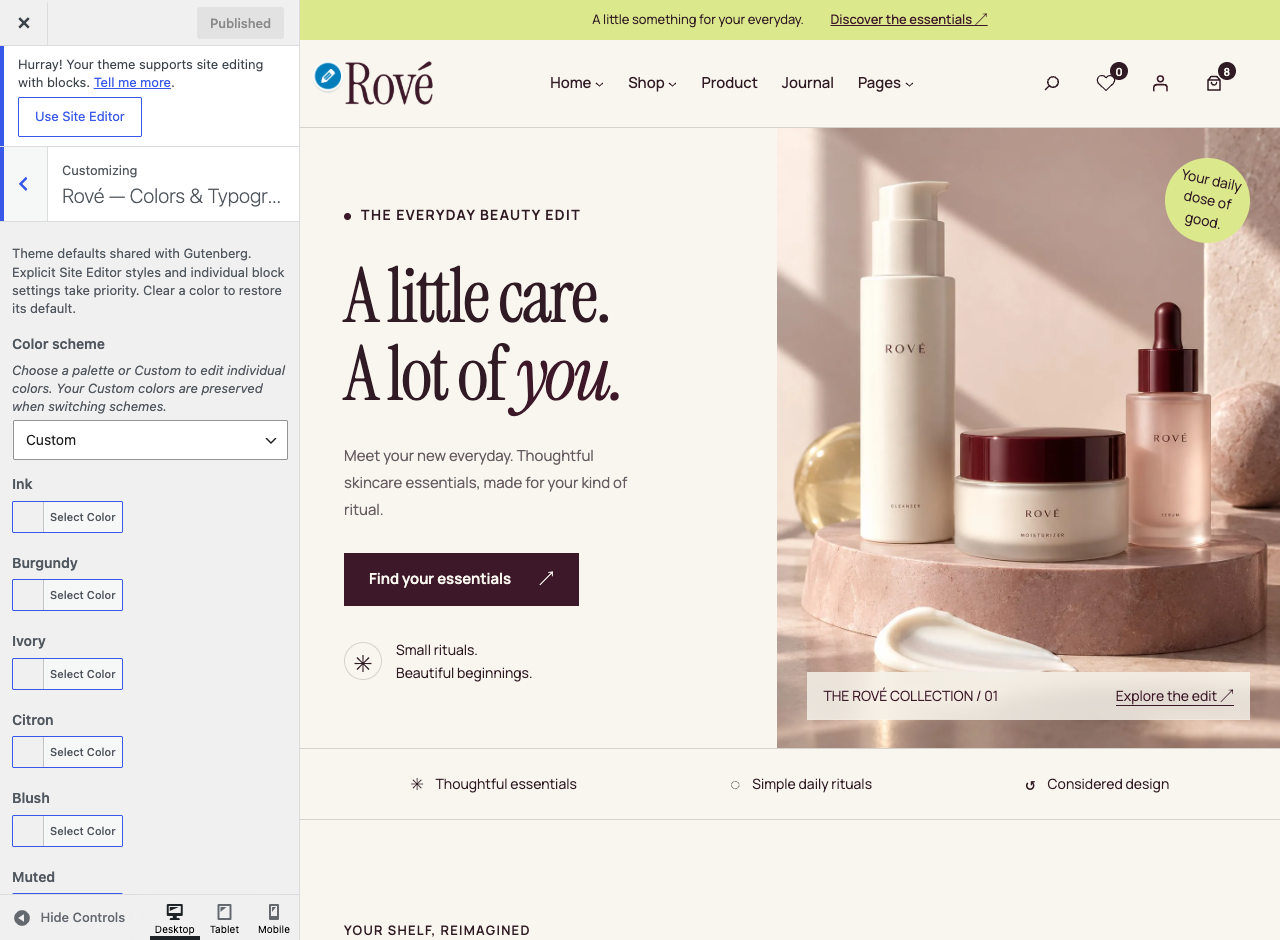
Choose one main place to manage your global design. Use block-level colors only for deliberate exceptions. Photos, logos and embedded third-party form styles may need their own changes.
In Gutenberg
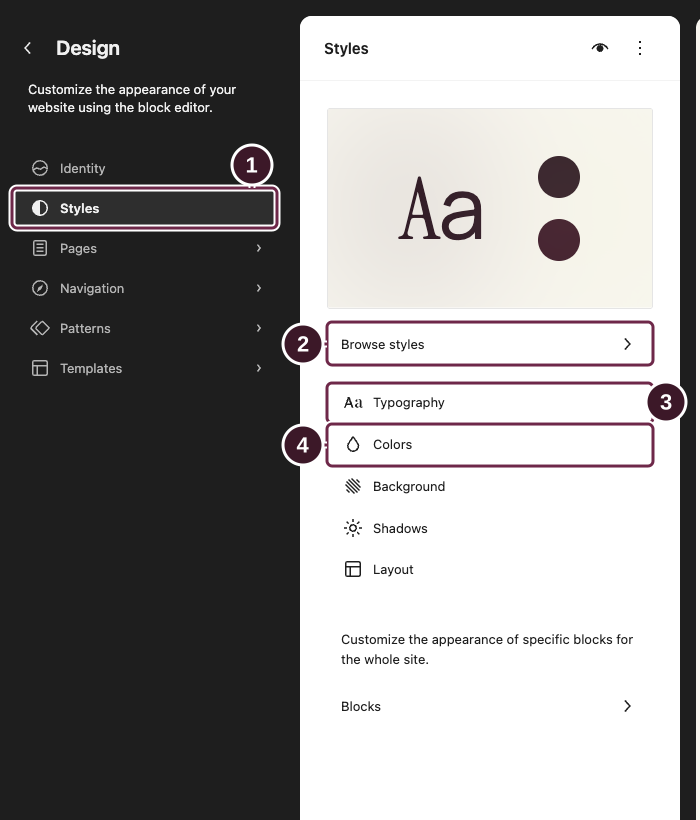
Appearance → Editor → Styles is the Gutenberg route for global design. Browse styles contains the presets; Typography and Colors open their respective controls.
Open full-size screenshot ↗After opening Styles, choose the branch you need. Markers 2–4 are alternative paths.
- Open Styles in the Site Editor navigation.
- For complete presets, choose Browse styles.
- For fonts and text settings, choose Typography instead.
- For the palette and element colors, choose Colors instead.
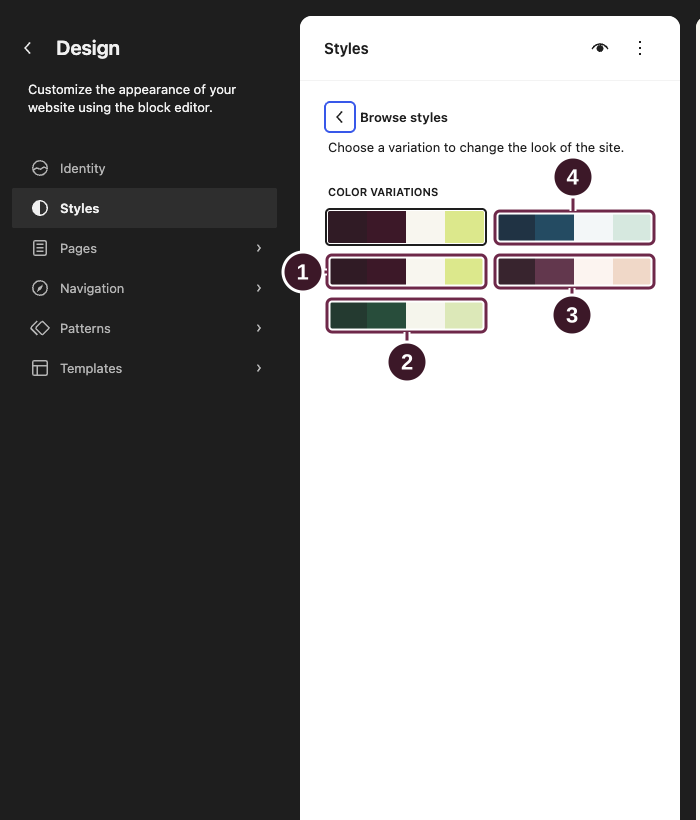
Open Browse styles to inspect the Rové variations. Selecting a variation changes the design preview; save only when you want to apply it.
Open full-size screenshot ↗Choose one of these presets; the numbers identify alternatives, not four consecutive clicks.
- Choose Rové Original for the ivory, burgundy and citron palette.
- Choose Sage Ritual for the green palette.
- Choose Rose Atelier for the rose palette.
- Choose Coastal Calm for the blue palette. Preview your chosen preset and save when ready.
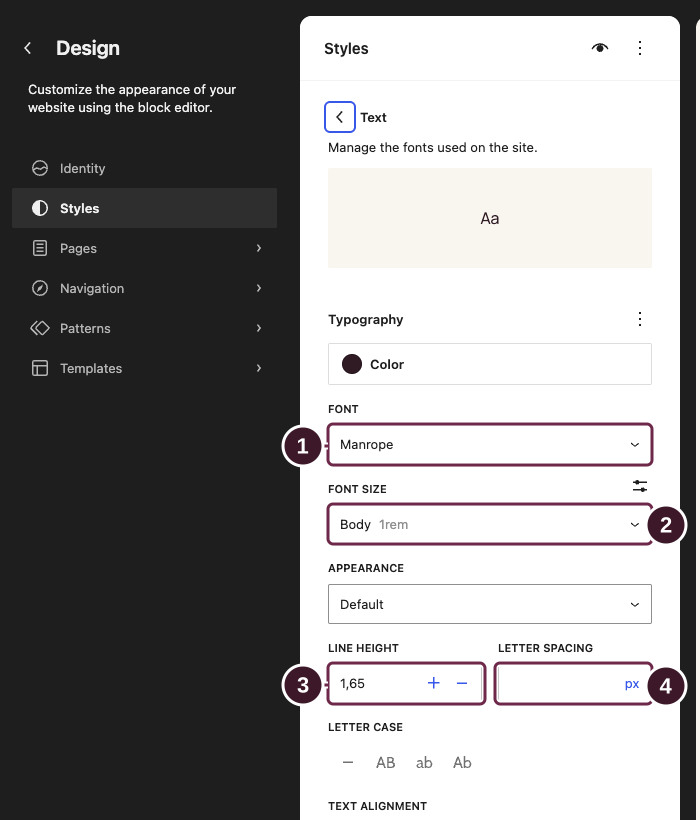
Open Typography, then the element you want to style, such as Text or Headings. These are saved Global Styles and can override the defaults set in Customizer.
Open full-size screenshot ↗This screen is Styles → Typography → Text. Adjust these controls independently as needed.
- Open Font to choose the font family for Text.
- Open Font size to choose a size preset or a supported custom value.
- Adjust Line height for the space between lines.
- Adjust Letter spacing only if your design needs it.
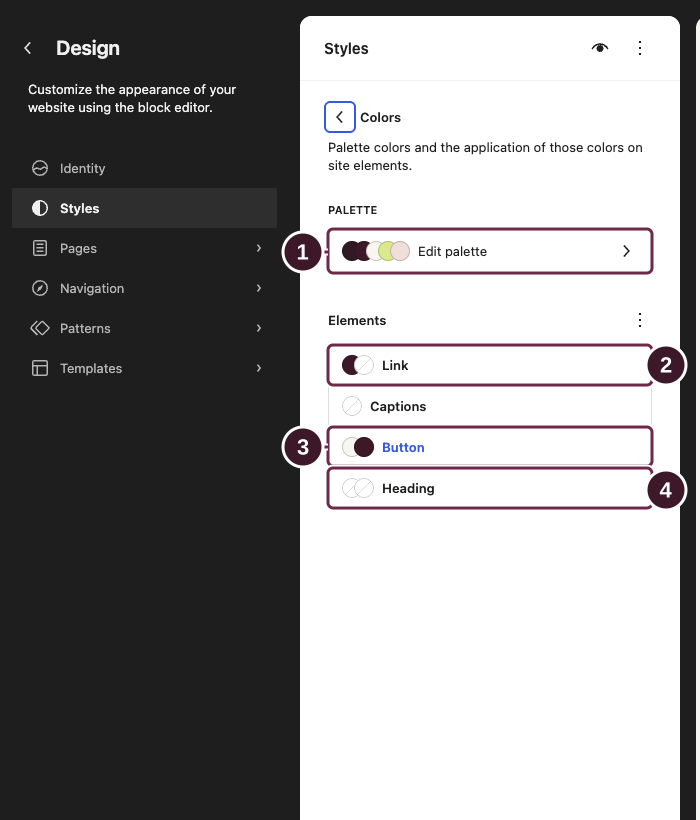
Open Colors to inspect the palette and element colors. For a color that still differs, select the affected block and check its local color settings.
Open full-size screenshot ↗This screen is Styles → Colors. Choose the palette or an element override as needed.
- Open Edit palette to inspect or change the global palette.
- Choose Link to inspect link colors.
- Choose Button to inspect button colors.
- Choose Heading to inspect heading colors. Element and block overrides can take priority over defaults.
Follow the matching numbers below each screenshot. Click the image to enlarge it with all markers visible. Captured in WordPress 7.1; labels may differ slightly in other versions.
Scroll & pointer effects
Appearance → Customize → Rové Settings → Motion effects — Home 2–5
Rové Settings → Floating hover images — Home 4 & 5
Enable or disable scroll and mouse movement separately. The floating image reveals on Home 4 and Home 5 have independent switches and speed controls. Preview the relevant homepage while adjusting these settings, then Publish.
| Control | Range / behavior |
|---|---|
| Scroll intensity / Mouse movement intensity | 25–200%, default 100. Higher values increase movement. Mobile scroll intensity is capped at 100%. |
| Scroll response speed / Mouse response speed | 25–200%, default 100. Higher values respond faster; lower values ease more slowly. |
| Home 4 / Home 5 floating image speed | 25–200%, default 100. Adjusts image reveal and following response. |
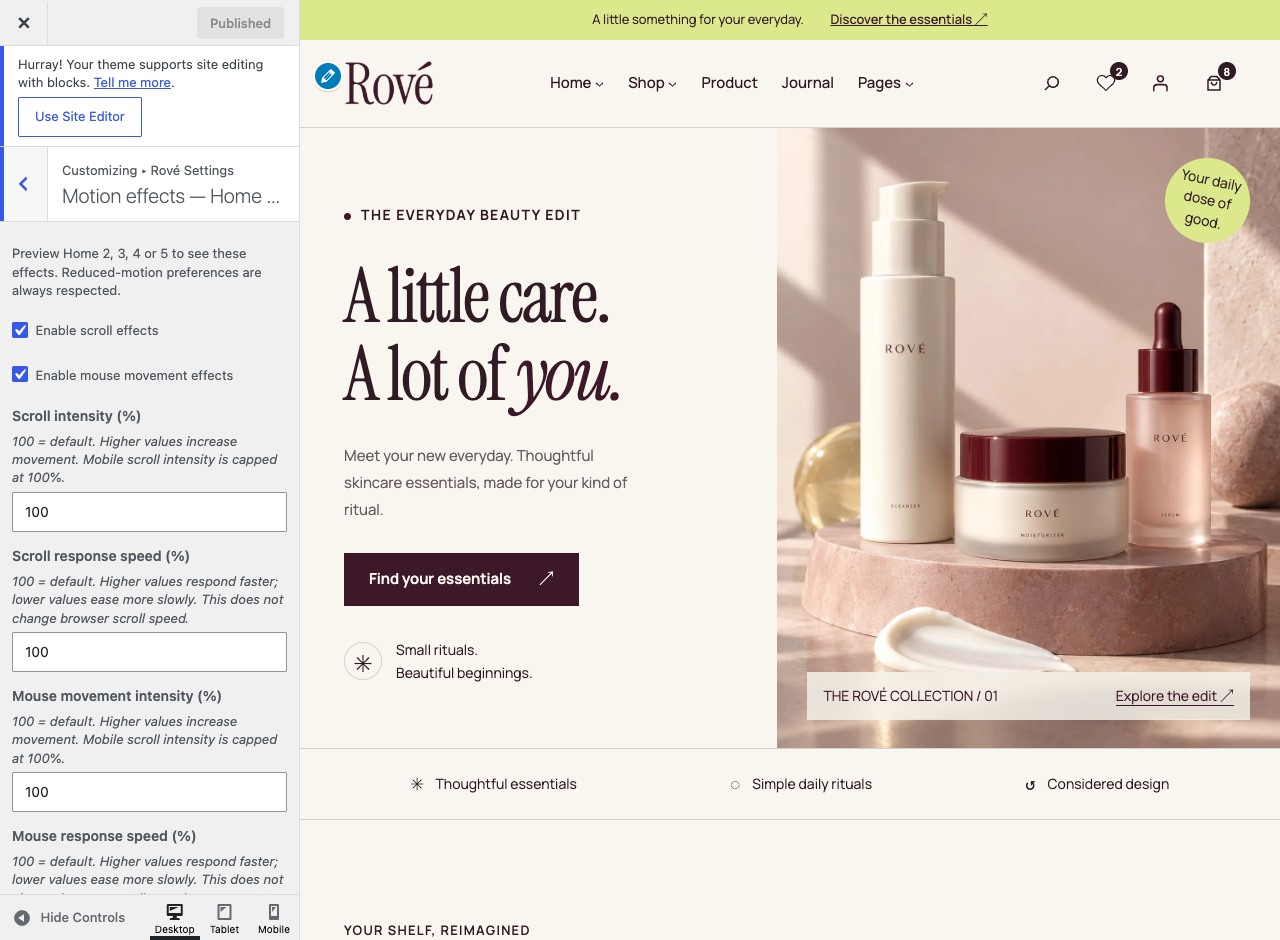
Touch devices do not run mouse-following or floating-hover effects. Scroll layouts adapt to small screens. A visitor’s prefers-reduced-motion setting takes priority and shows the static layout. Native page scrolling remains available.
Header, menus & footer
Appearance → Editor → Patterns → Template Parts → Header / Footer / Shop megamenu
- Open Header and select the Navigation block in List View.
- Edit menu labels, links and submenu items. The demo structure is Home, Shop, Product, Journal and Pages.
- Use Shop megamenu to edit its columns, category links, image and promotional copy in Gutenberg.
- Save the template parts you changed. Check desktop hover and the mobile navigation overlay.
Home and Pages open below the header on desktop. On mobile, Home, Shop and Pages use accordions. Keep labels short and review every demo link after changing slugs.
Search, wishlist and bag
The header search opens a product search dialog with live suggestions when WooCommerce is available. Escape, the close button or backdrop closes it. Keep the header Search block and its rove-header-search class for the popup behavior. Without JavaScript, the native search form still works.
Store Tools adds the wishlist behavior and live count. The bag uses WooCommerce Mini-Cart. To edit the newsletter and footer columns, open Footer; configure the mailing service separately under forms.
In Gutenberg
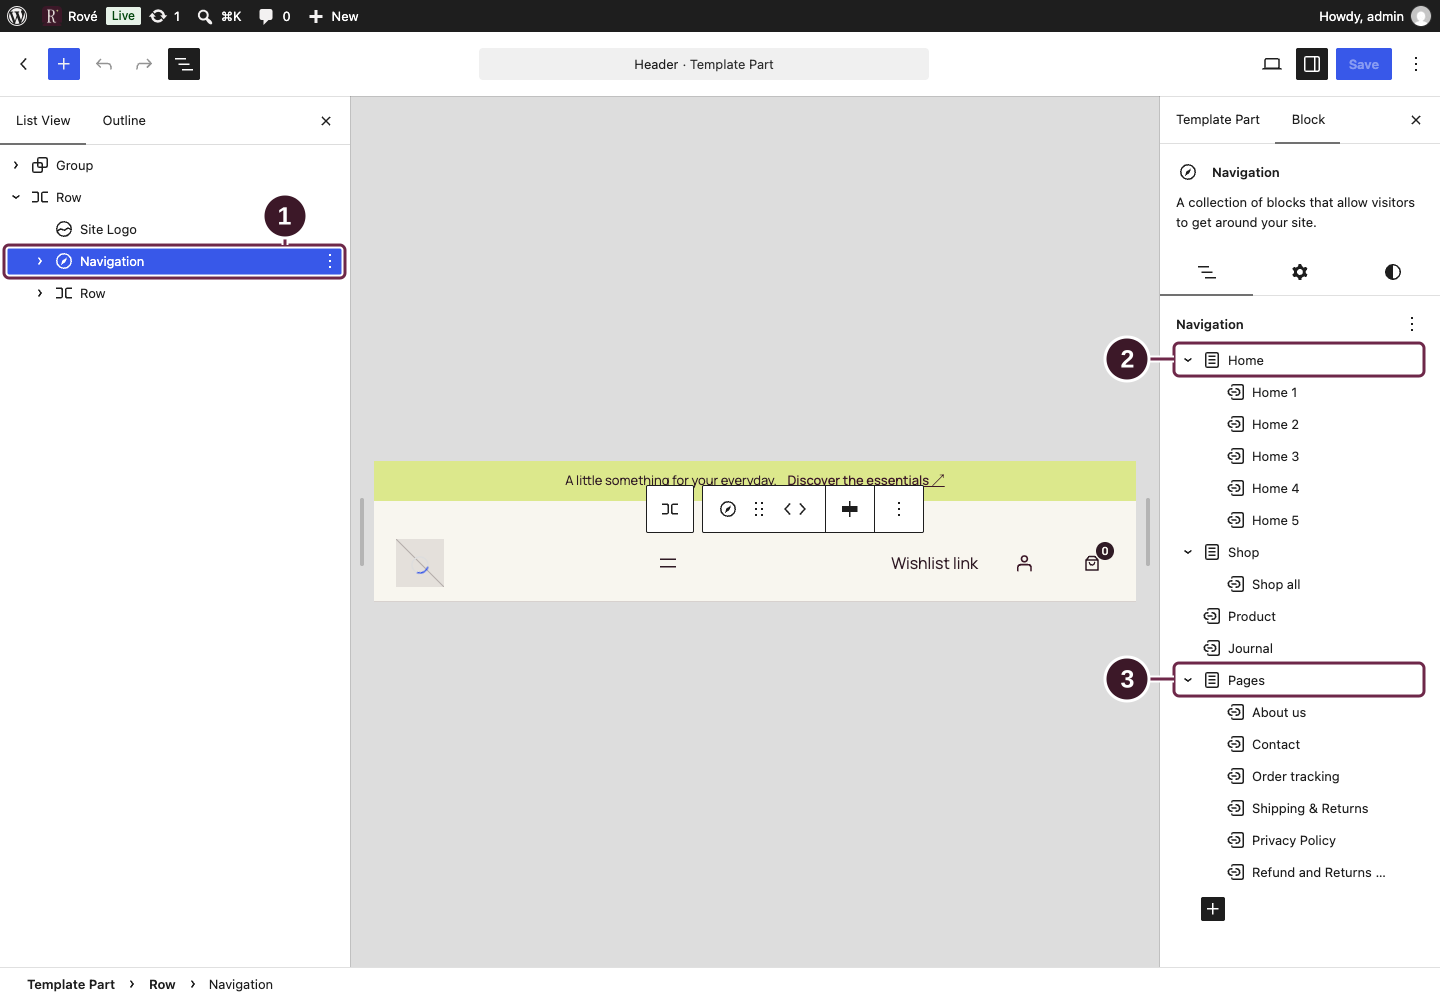
Select Navigation in the Header template part. Its content panel and List View expose Home, Shop, Product, Journal and Pages, including the submenu items.
Open full-size screenshot ↗Select the navigation, then use the arrows beside submenu items.
- Select Navigation in the Header List View.
- Use the Home arrow to expand or collapse it, then select a child link to edit.
- Use the Pages arrow for its child links. The Shop trigger and megamenu are covered in the next screenshots.
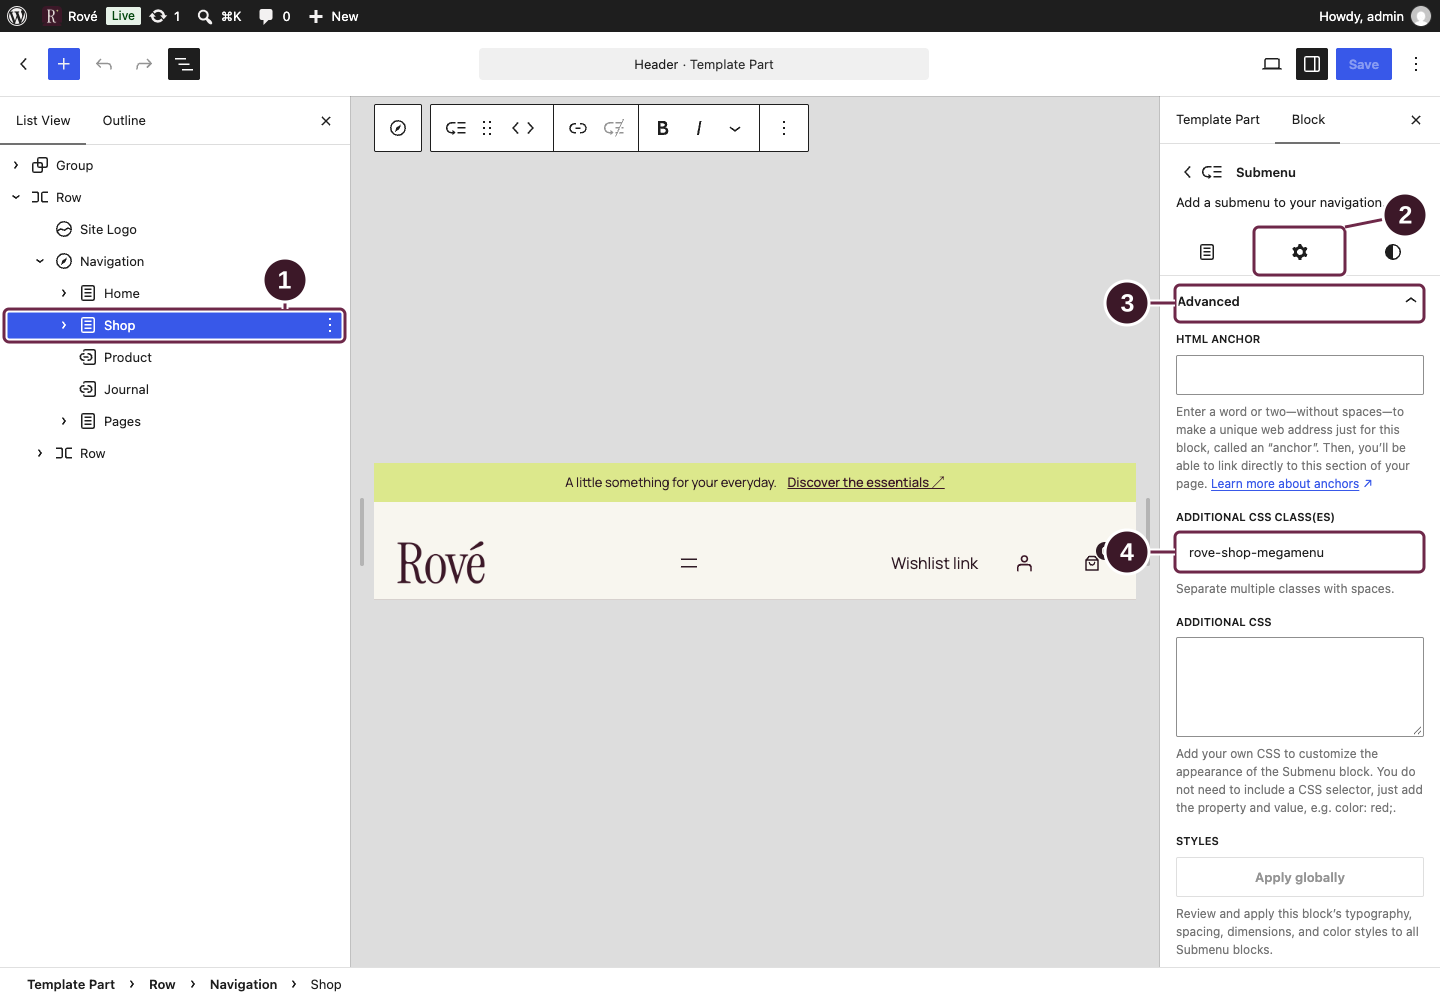
Select the Shop Navigation submenu, open its Settings/Advanced panel and retain rove-shop-megamenu under Additional CSS class(es). Change the link or label without removing this class.
Open full-size screenshot ↗Keep the existing class while editing the Shop label or destination.
- Select the Shop Navigation submenu in List View.
- Open the Settings tab, shown with the gear icon.
- Expand Advanced.
- Retain rove-shop-megamenu in Additional CSS class(es). Do not remove this class when renaming Shop.
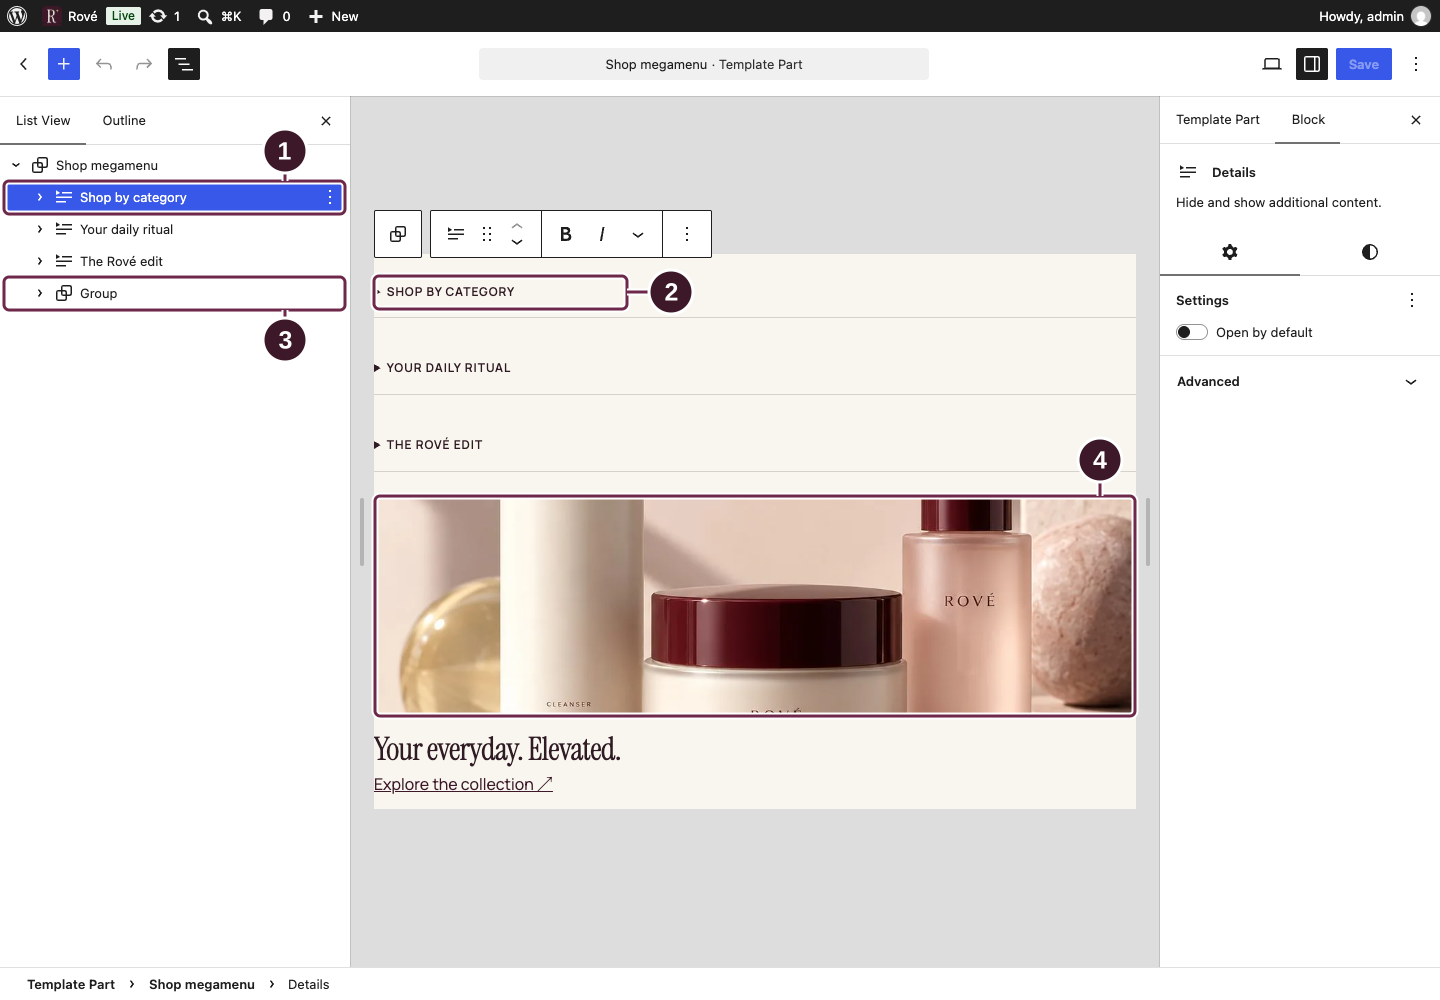
Edit Shop megamenu as its own template part. The Details blocks hold the link groups; the neighboring Image, Heading and Paragraph blocks form the promotional card.
Open full-size screenshot ↗Edit link groups and the promotional card in the Shop megamenu template part.
- Select a Details group, such as Shop by category, in List View.
- Click its summary arrow to reveal the link content for editing.
- Expand the neighboring Group in List View to find its image and text blocks.
- Select the promotional Image. Its own toolbar offers Replace; edit the neighboring Heading and Paragraph blocks separately.
Follow the matching numbers below each screenshot. Click the image to enlarge it with all markers visible. Captured in WordPress 7.1; labels may differ slightly in other versions.
Products & shop cards
Products → Add New / Edit → Product data
- Add a name, description, short description and Product image. Choose gallery images separately.
- For a simple product, set the price and stock. For a variable product, add attributes, enable Used for variations, create variations and set a price/stock for every purchasable option.
- Choose product categories, shipping details and a suitable tax status. Publish and test the product from the storefront.
See the official WooCommerce variable product guide for the native variation workflow. Setting a default variation controls the initial selected option.
| Optional ordinary attribute | Example / purpose |
|---|---|
| Card badge | Everyday essential — small label on the product photo. |
| Card subtitle | Daily moisturizer · 50 ml — secondary card description. |
These two editorial attributes do not need Used for variations. The Rové size-card UI supports native Size attributes with one to four non-empty options; other attributes retain their native dropdown controls.
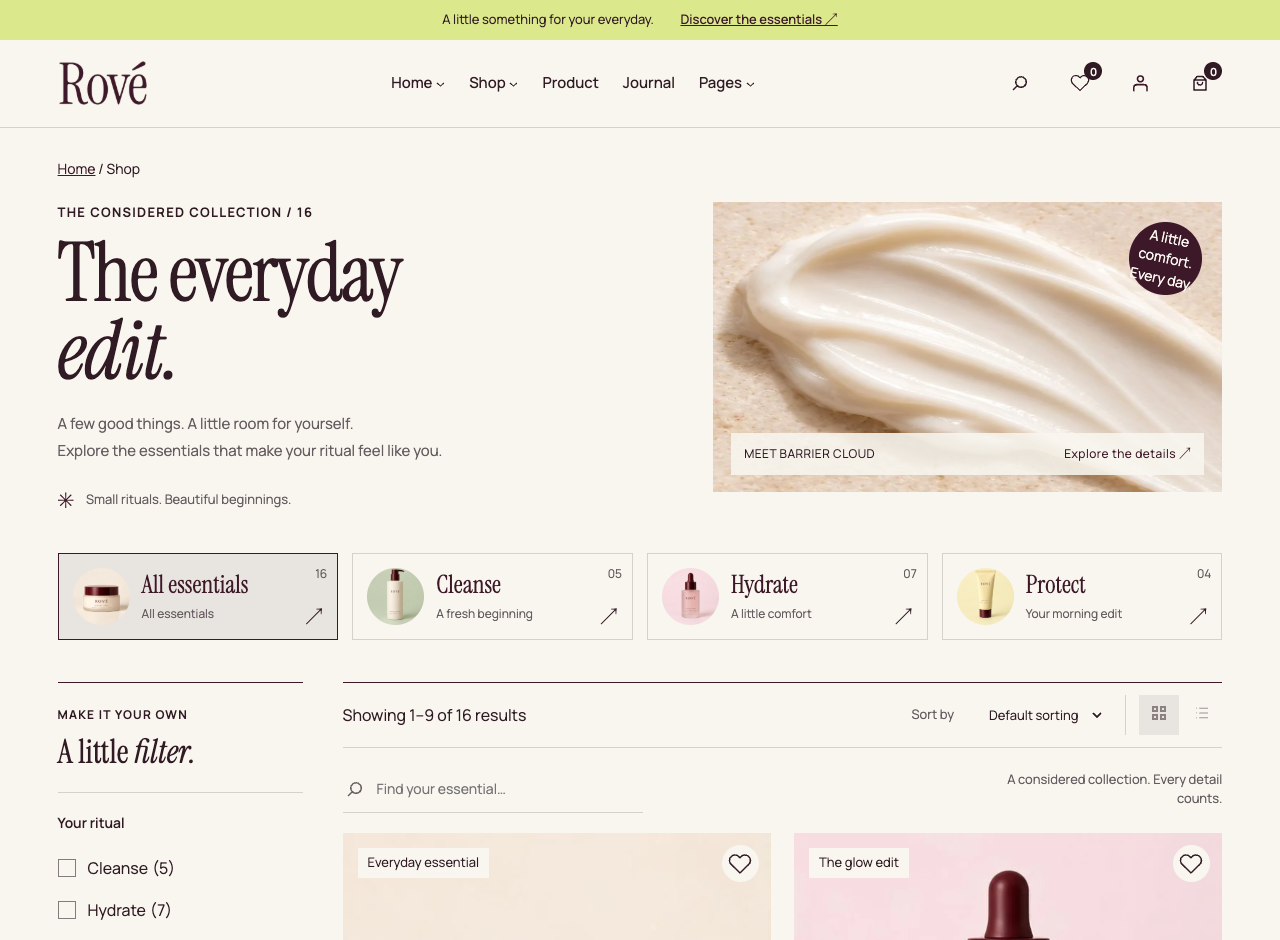
Shop displays nine products per page. Stock/catalog visibility and active filters can change the visible result count. For another collection, select its Product Collection block and adjust the query and Product Template. Card copies in separate collections are edited independently.
In Gutenberg
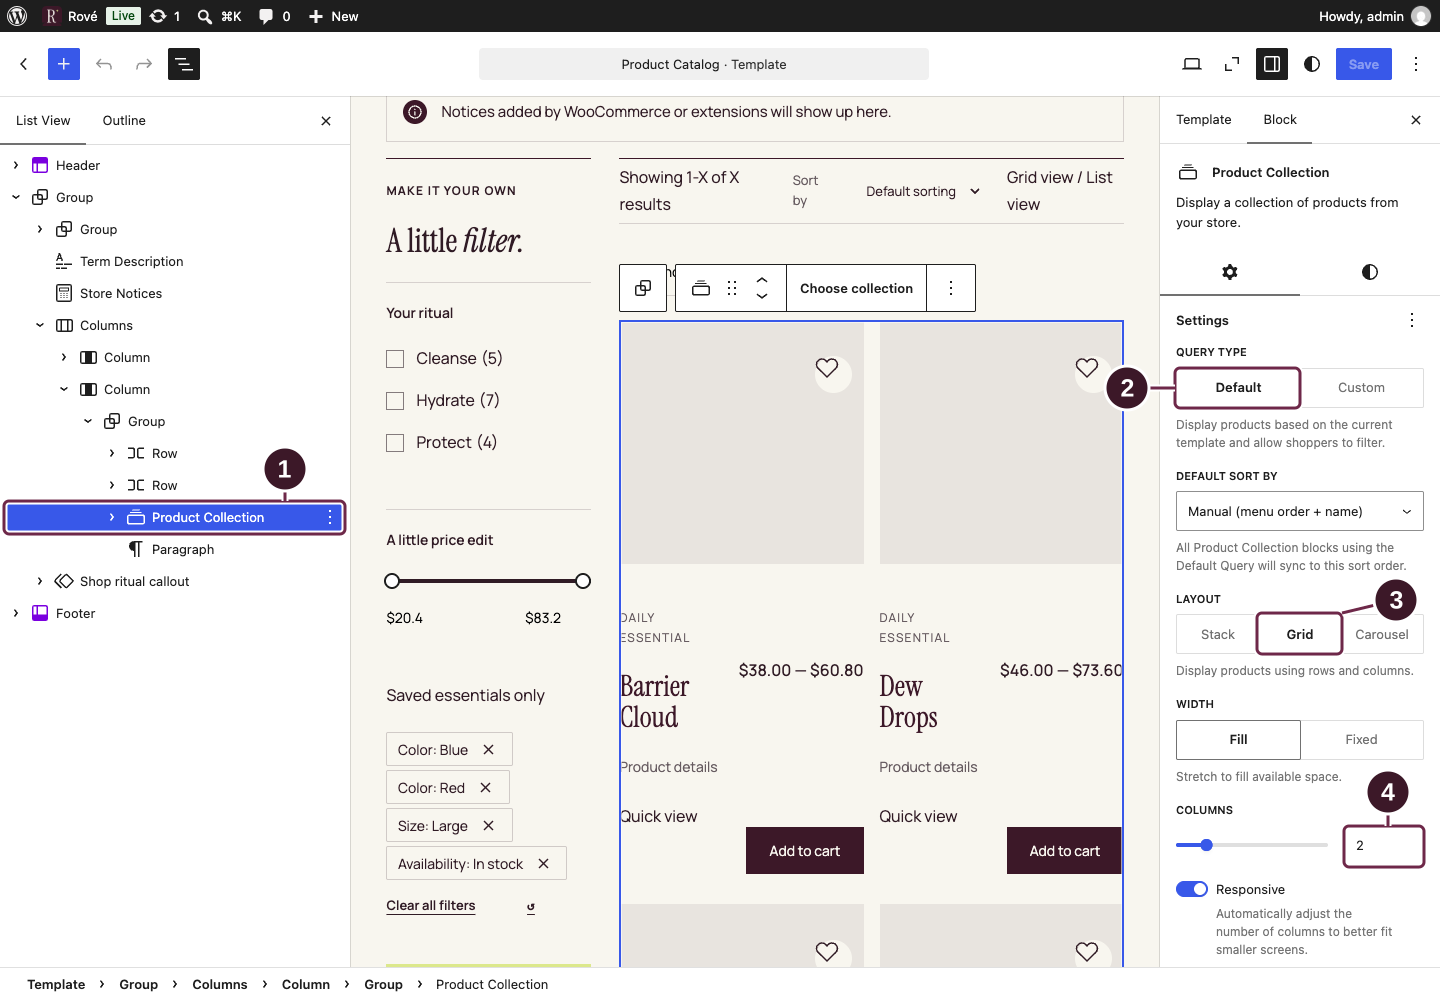
Select Product Collection in List View to inspect Query type, sorting and layout. Keep the catalog query connected to the current archive so customer filters continue to work. Edit its nested Product Template for card structure.
Open full-size screenshot ↗Inspect the catalog collection. Keep its query connected to the current archive.
- Select Product Collection in the Product Catalog template.
- Keep Query type set to Default for the archive and its filters.
- Use Grid for the collection layout.
- Inspect Columns and the Responsive option below. Check the storefront at desktop and mobile widths after layout changes.
Follow the matching numbers below each screenshot. Click the image to enlarge it with all markers visible. Captured in WordPress 7.1; labels may differ slightly in other versions.
Product details & quick view
Products → Edit → Attributes (product content)
Appearance → Editor → Templates → Single Product (layout)
The product page uses native WooCommerce gallery behavior: a slider, thumbnails, previous/next controls and PhotoSwipe. Visitors can click the main image to open the lightbox. Add real gallery images in the product editor rather than inserting separate images into the shared template.
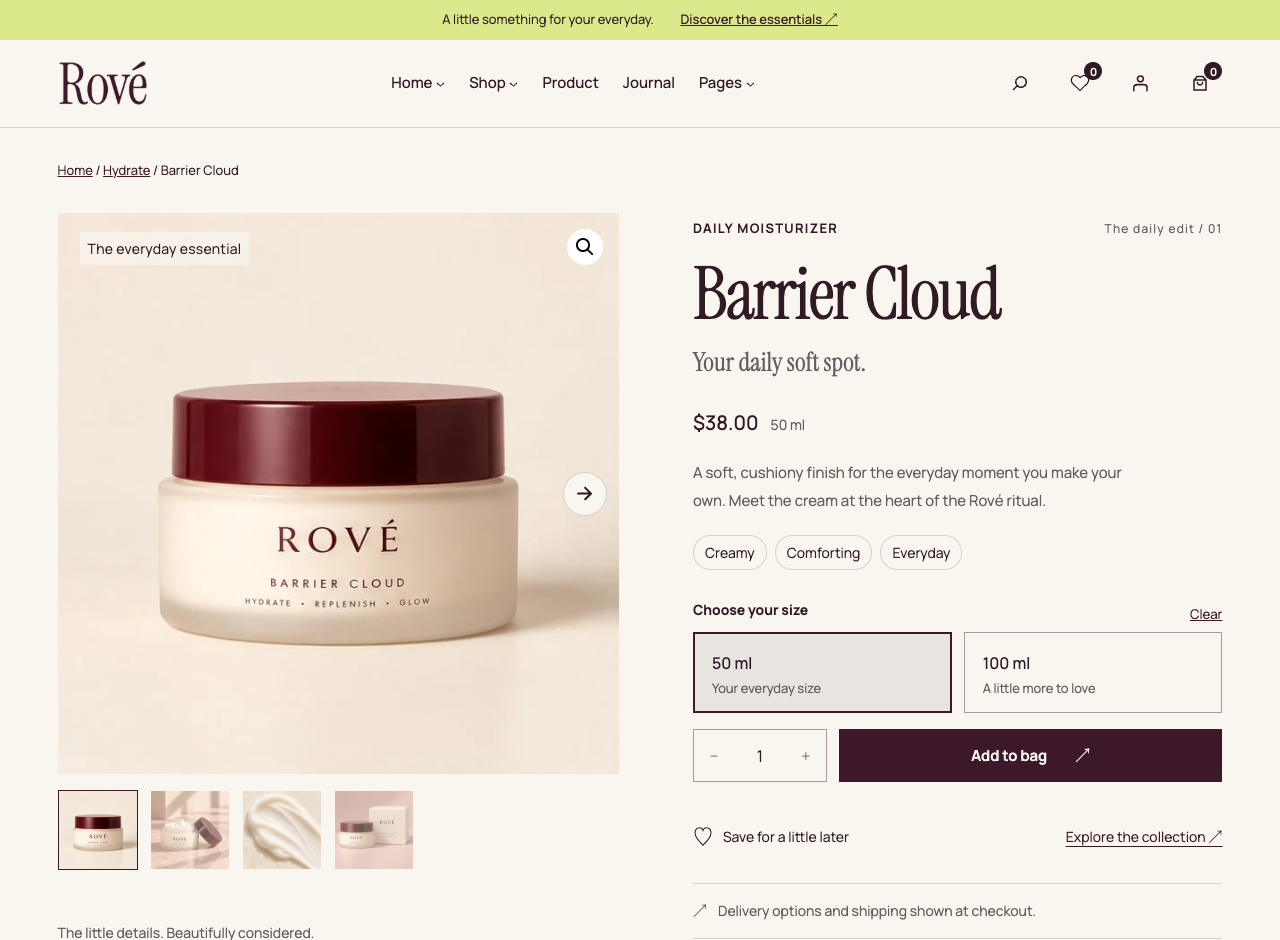
Optional editorial fields
Add these as ordinary product attributes using the exact names below. Do not use them for variations. Hide them from the native specifications table when they are only used for editorial sections. Missing optional data hides its section; the formula image falls back to the product image.
| Attribute name | Purpose |
|---|---|
| Rove product type / Rove subtitle | Small product type label / serif subtitle. |
| Rove edit label / Rove notes |
Editorial index / notes separated with |, for example Creamy | Comforting.
|
| Rove feel / Rove moment / Rove ritual step | Texture, daily moment and ritual step copy. |
| Rove story heading / Rove story introduction |
Story heading and introduction. | separates heading lines.
|
| Rove ingredients / Rove ritual instructions | Ingredient introduction / usage copy. |
| Rove formula image ID | Numeric attachment ID of a Media Library image, not a file URL. |
| Rove ingredient 1 / Rove ingredient 1 note | Ingredient title and note. The same fields are available for ingredients 2 and 3. |
| Rove content note | Additional product content note. |
Product-bound blocks can appear read-only in the Site Editor: change their values under Products, and edit only their layout in the template. Replace all sample ingredient and usage claims with verified product information.
AJAX Add to bag
With Store Tools active, supported simple and variable products submit without reloading, refresh the header/cart and show one bottom-center success message. Quick view includes gallery, variations and quantity controls, and closes after a successful add. Validation errors keep the form open.
Extension fields and native WooCommerce validation remain part of the request. Grouped, external or custom purchase flows may use normal navigation. Test your actual add-on/subscription/customization extension on staging before launch.
In Gutenberg
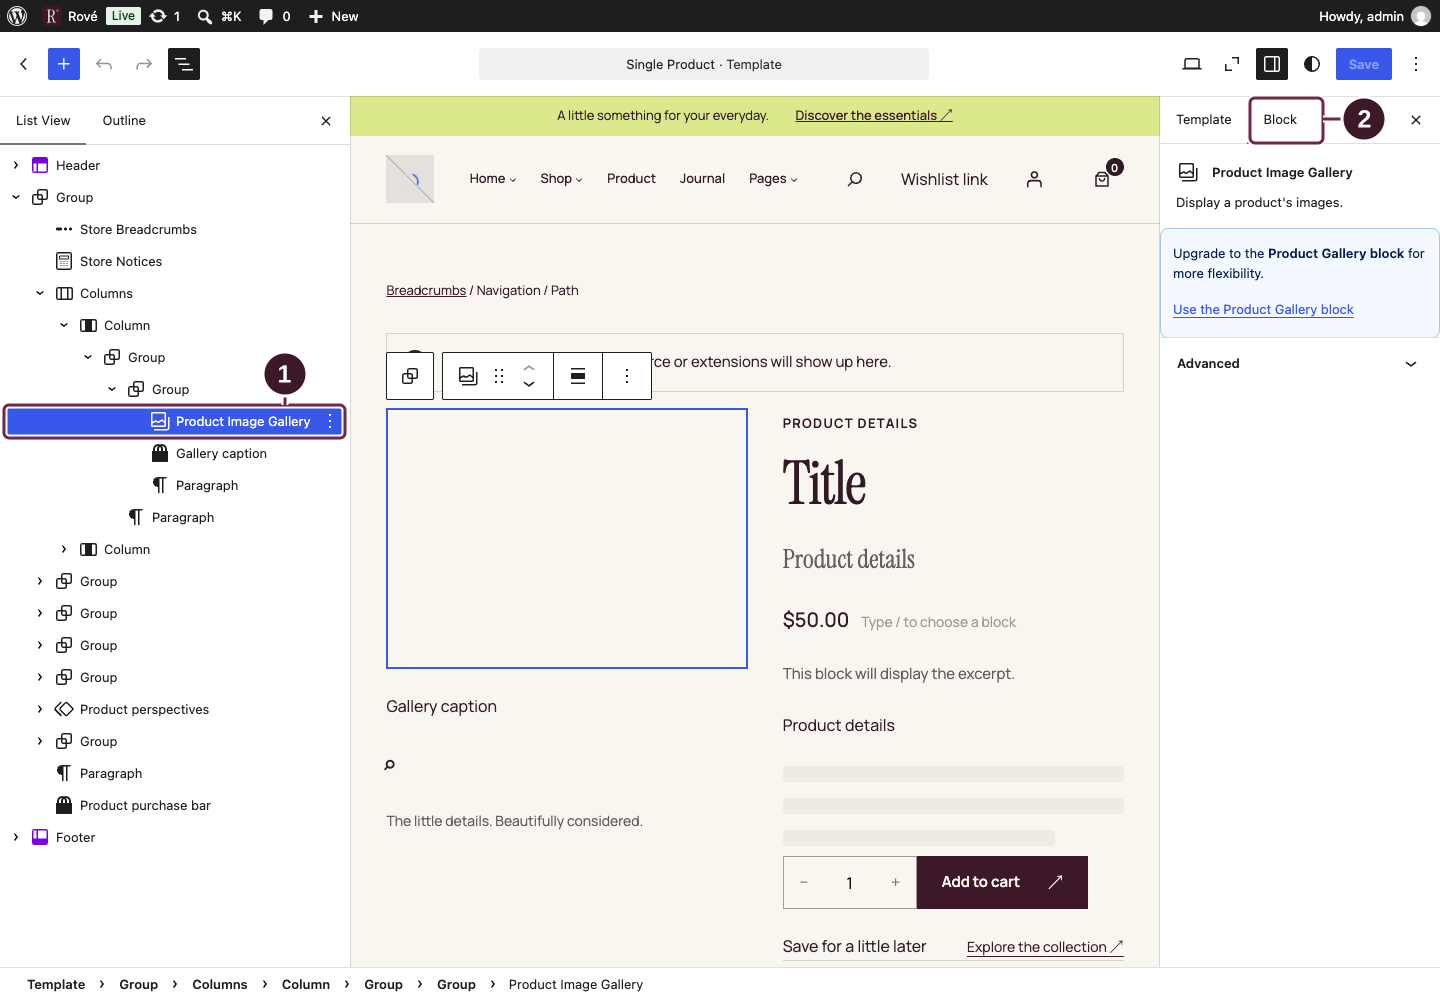
In Single Product, select Product Image Gallery to locate the native gallery block. Add or reorder actual gallery photos in Products → Edit, rather than replacing this shared block with ordinary Image blocks.
Open full-size screenshot ↗Locate the provided gallery block; manage the actual photos in the product editor.
- Select Product Image Gallery in the Single Product List View.
- Choose Block to identify this gallery. Keep the provided block for the existing gallery behavior; add or reorder photos in Products → Edit.
Follow the matching numbers below each screenshot. Click the image to enlarge it with all markers visible. Captured in WordPress 7.1; labels may differ slightly in other versions.
Cart, checkout & accounts
WooCommerce → Settings → Advanced → Page setup
WooCommerce → Settings → Accounts & Privacy
| Page / endpoint | How to manage it |
|---|---|
| Cart / Checkout | Assign the correct pages. Keep one native Cart block and one native Checkout block on their respective pages. Do not duplicate these blocks inside the wrapper template. |
| My Account |
The account page uses [woocommerce_my_account]. Registration, login, account details, orders and addresses follow WooCommerce settings.
|
| Lost / reset password | Native My Account endpoints handle these forms and token validation. They are not separate ordinary pages. |
| Order received / Order pay | WooCommerce checkout endpoints tied to a real order. Check them with sandbox/test orders. |
| Order tracking |
The demo page uses [woocommerce_order_tracking]. It checks order ID and billing email, not carrier parcel tracking.
|
Enable registration in Accounts & Privacy if required; the theme does not enable it for you. Configure gateways, shipping zones, taxes, currency, store location and transactional emails in WooCommerce. An empty checkout redirecting to Cart is normal.
In Gutenberg
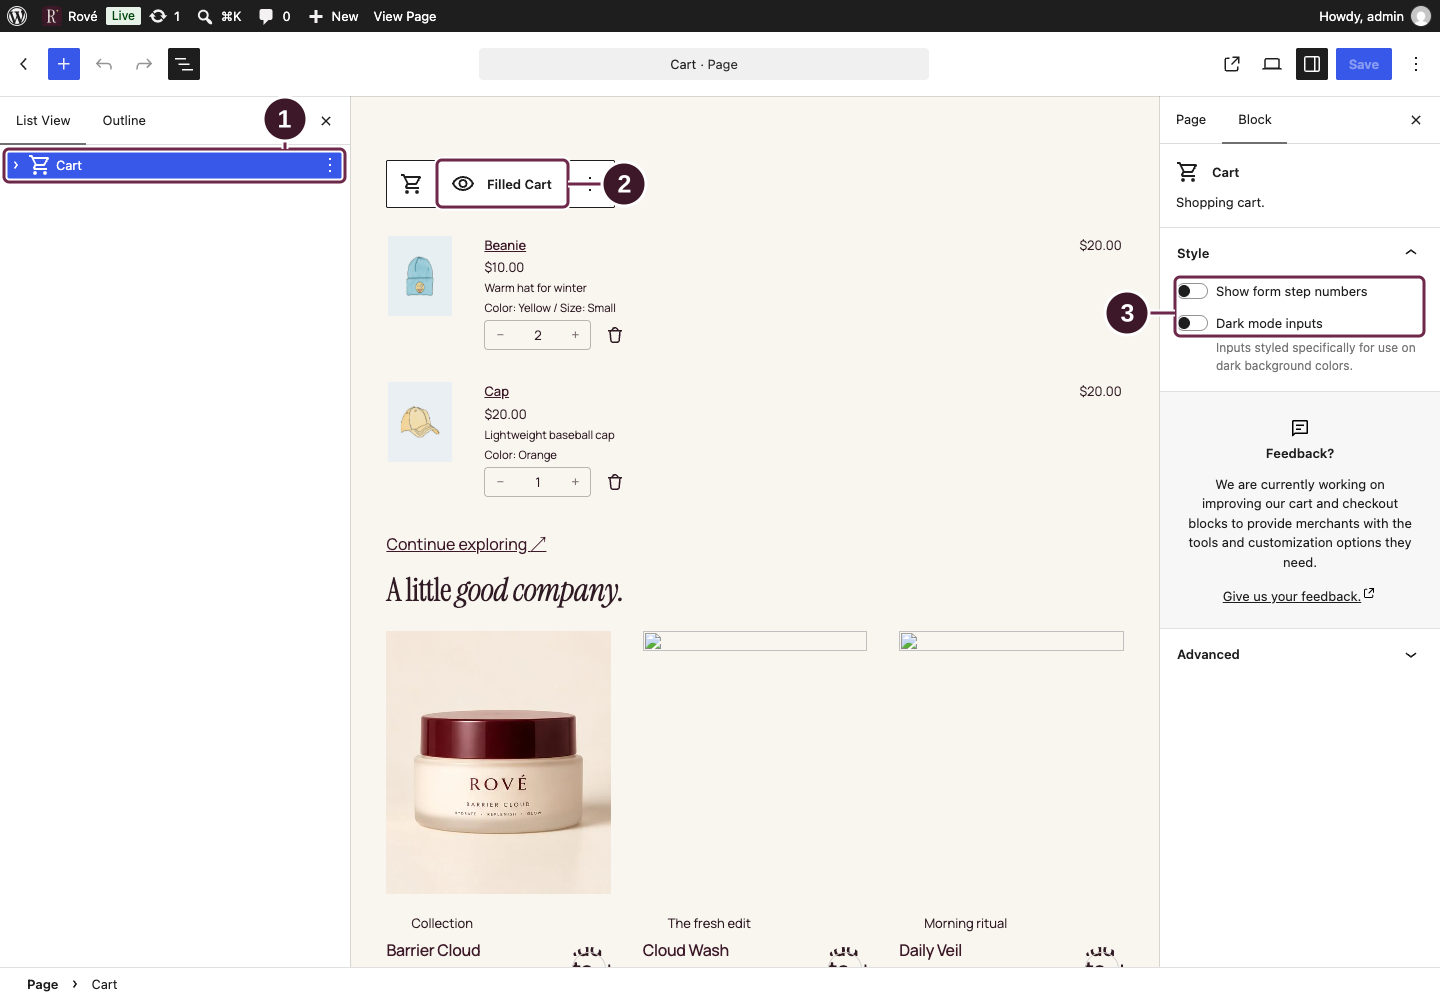
Edit the assigned Cart page and select its Cart block. Expand it in List View for the filled and empty states. Keep one Cart block on this page; use the same approach for the assigned Checkout page.
Open full-size screenshot ↗Use the assigned Cart page and retain its native Cart block.
- Select Cart in List View. Its arrow reveals nested blocks and states.
- Open the Filled Cart selector to inspect the filled and empty preview states.
- Review the available Style switches. These are optional; change only the ones you intend to use.
Follow the matching numbers below each screenshot. Click the image to enlarge it with all markers visible. Captured in WordPress 7.1; labels may differ slightly in other versions.
Wishlist
Requires Rové Store Tools → Wishlist page / My Account → Wishlist
Heart buttons on cards and product pages add/remove saved products. The header badge updates immediately, and the wishlist grid uses the shared product card style.
- Guests: items are stored in the current browser’s local storage, with a temporary memory fallback if storage is blocked. A guest list is not a cross-device account.
- Signed-in customers: saved items are stored in private user metadata. Guest items merge into the account after login, and the account list is available on other devices when signed in.
- Header destination: signed-in customers go to My Account → Wishlist; guests go to the standalone Wishlist page.
To recreate the standalone page, add a Shortcode block containing:
[rove_wishlist]Keep Store Tools active for these features. Use WooCommerce account access for customer management; do not make the wishlist endpoint public by changing access checks.
Journal & editorial pages
Posts → Add New / Edit
Appearance → Editor → Templates → Blog Home / Single Posts
- Create a post with a title, Gutenberg body, Featured Image and a concise Excerpt.
- Choose Categories and Tags. Publish when ready.
- Use a consistent image ratio and crop to keep the journal grid balanced.
The Journal lists eight posts per page, with four columns on desktop, two on tablet and one on small screens. Its pagination shares the Shop style. The homepage’s short Journal preview is a separate collection.
The page assigned as Posts page does not display its ordinary page body. Edit the Journal heading/layout in the Blog Home template, and edit the articles under Posts. Category, tag, author and date archives use their respective templates automatically.
About, contact and policies
Edit Our approach/About us, Contact, Shipping & Returns, Privacy Policy and Refund and Returns Policy under Pages. Use the assigned Rové template where available. Review business details, policy wording and footer links before publishing. A draft policy may not be visible to guests.
Search results and the 404 page are edited in Site Editor → Templates. They do not require a published placeholder page.
In Gutenberg
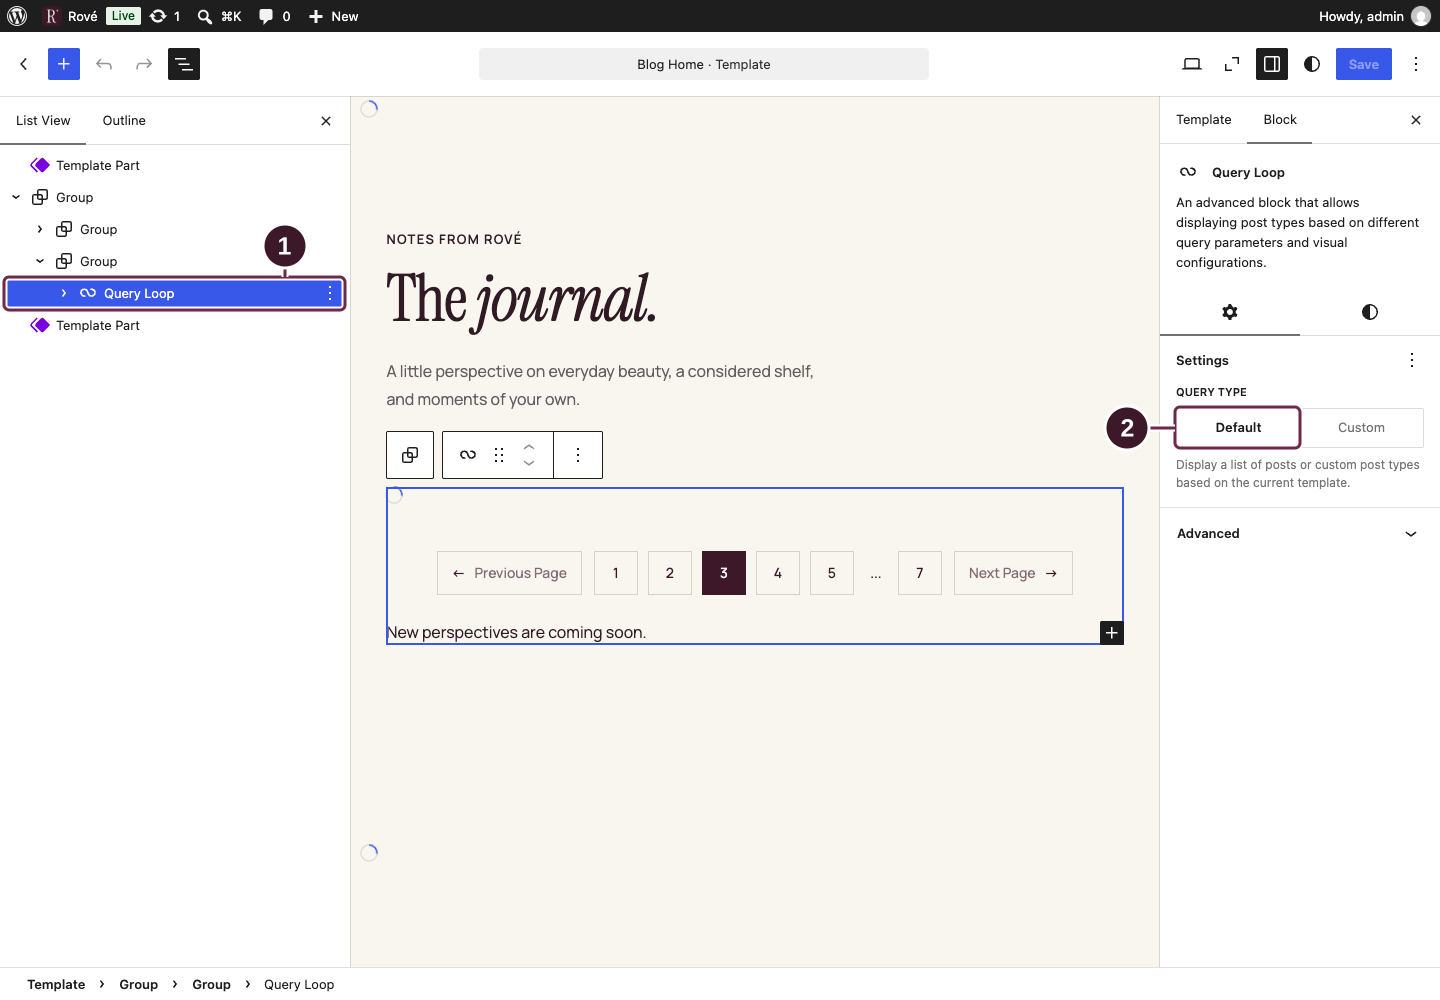
Open Blog Home and select Query Loop. Keep its archive context, then edit Post Template for the article card layout. Journal pagination belongs to this query, not to the ordinary Journal page body.
Open full-size screenshot ↗Use the Blog Home template for the Journal archive layout.
- Select Query Loop. Expand its arrow to find Post Template when editing article cards.
- Keep Query type set to Default so the loop follows its archive context.
Follow the matching numbers below each screenshot. Click the image to enlarge it with all markers visible. Captured in WordPress 7.1; labels may differ slightly in other versions.
Contact & newsletter forms
Contact Form 7
Contact → Contact Forms → your form → Form / Mail
Activate Contact Form 7 and edit the imported form, or create your own. Set the actual recipient in the Mail tab and use a sender address appropriate for your domain. Place its shortcode in the Contact page’s Shortcode block. Send a real test message and check both delivery and spam folders.
Stay in the glow — MC4WP
MC4WP → Mailchimp → API key
MC4WP → Forms → Rove footer newsletter → Settings → audience/list
- Connect your own Mailchimp account in MC4WP.
- Select the audience/list for the form and review its consent and confirmation messages.
- Publish the site’s Privacy Policy and select it under Settings → Privacy.
- Check Footer in the Site Editor and submit a test subscription. Complete double opt-in if enabled.
The theme waits for a connected form and a published Privacy Policy before showing the ready newsletter form. If MC4WP is absent, the footer uses a contact fallback. This is an integration, not a mailing service built into the theme.
A starter field layout is included at rove/docs/newsletter-form.html inside the theme. Copy its markup into an MC4WP form, not directly into an ordinary page.
In Gutenberg
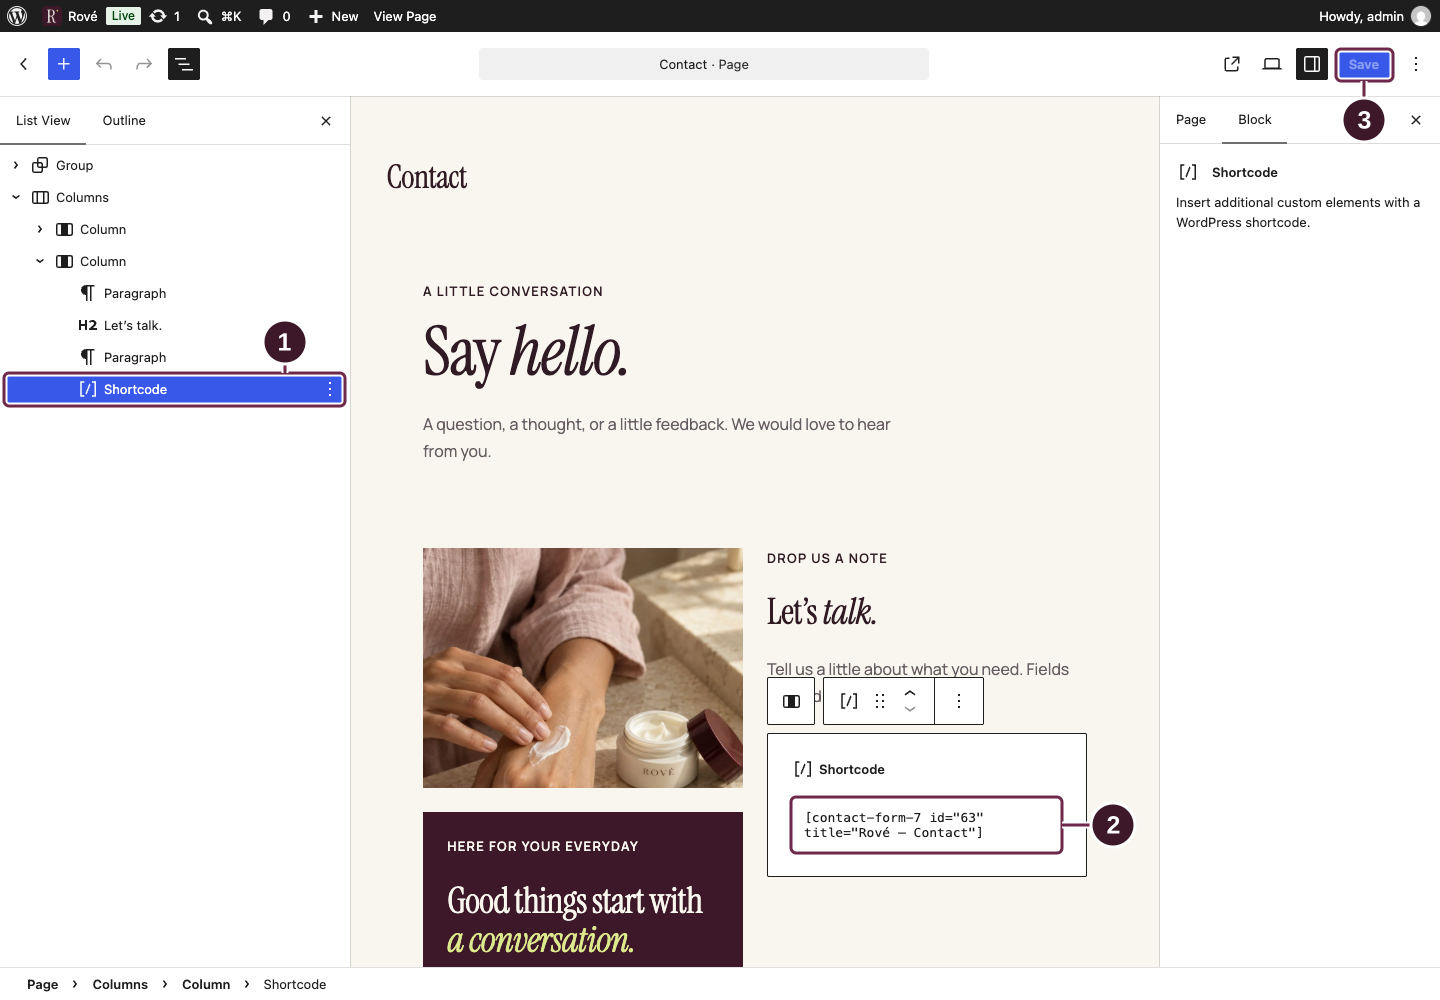
On Contact, select the Shortcode block to see which Contact Form 7 form is embedded. Edit fields and Mail settings in Contact → Contact Forms, not in the page’s surrounding text blocks.
Open full-size screenshot ↗Embed the correct form; configure its fields and delivery in Contact Form 7.
- Select the Contact page’s Shortcode block in List View.
- Check that the shortcode points to your Contact Form 7 form. Use the shortcode generated on your own site.
- Save the page after making an intended change. Edit fields and Mail settings separately in Contact → Contact Forms.
Follow the matching numbers below each screenshot. Click the image to enlarge it with all markers visible. Captured in WordPress 7.1; labels may differ slightly in other versions.
Media & site migration
Media → Library · Block editor → Image → Replace → Media Library
Page and product photos are Media attachments. Their metadata and references are stored in the database; image files and generated sizes live in wp-content/uploads. Content images are not served from a photo folder inside the theme.
- Choose images through Media Library to retain native attachment IDs, alternative text and responsive sizes.
- Write meaningful alternative text for informative photos; leave purely decorative images appropriately empty.
- Use a consistent crop on product cards and Journal covers. Compress originals before upload without making the displayed size blurry.
- Do not delete an attachment that a page, product gallery or formula-image field still uses.
The demo importer resolves new local attachment IDs on the destination website. If starting without demo data, select your own images in the patterns’ image placeholders. For broken images, check the attachment, uploads permissions, HTTPS/domain URLs and generated image sizes.
In Gutenberg
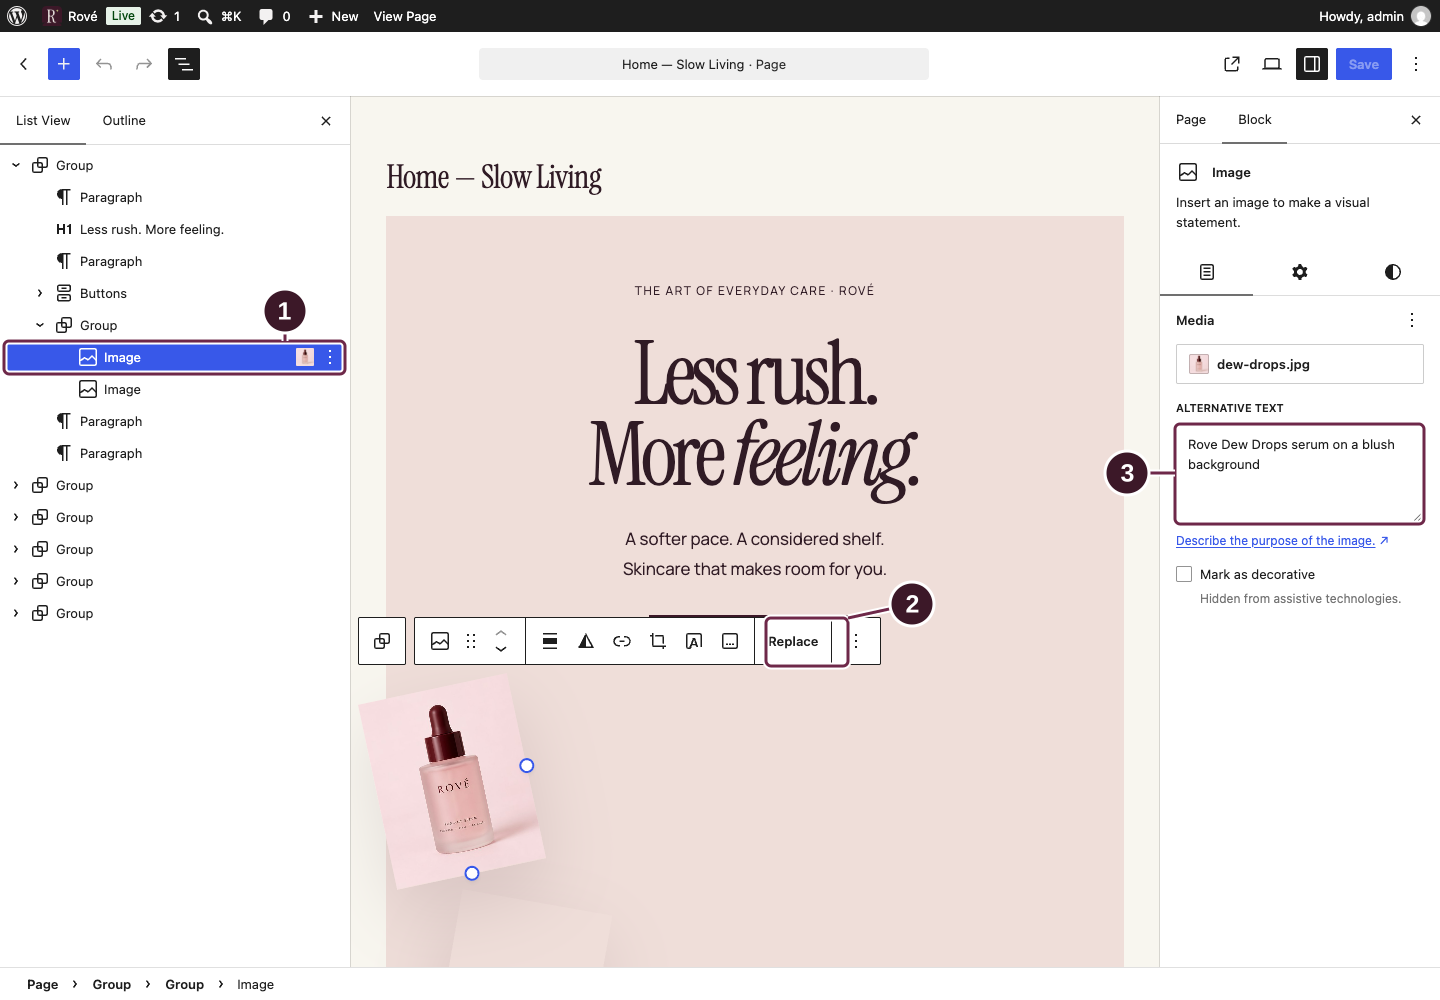
Select an Image in List View. The toolbar’s Replace action changes the image through Media Library; the Content panel exposes Media and Alternative text. Use Settings for image sizing where available.
Open full-size screenshot ↗Select the image, then replace its Media source and review its alternative text.
- Select Image in List View.
- Use Replace in the selected image’s toolbar to choose an image from Media Library.
- Review Alternative text in the Content panel. Describe informative images; use the decorative option only when appropriate.
Follow the matching numbers below each screenshot. Click the image to enlarge it with all markers visible. Captured in WordPress 7.1; labels may differ slightly in other versions.
Languages & RTL
Settings → General → Site Language
Users → Profile → Language (admin language only)
Rové is translation-ready with text domain rove and a translation template at rove/languages/rove.pot. Use your normal WordPress translation workflow for theme strings. Companion plugin strings belong to their own plugin domains.
Changing Site Language to an RTL language makes WordPress provide right-to-left direction, which the theme styles support. It does not translate your product names, page copy, menu labels, logo artwork or embedded third-party content. Translate these separately and review longer text on mobile.
A multilingual store needs a compatible multilingual solution and translated WooCommerce content. Rové alone does not create a language switcher or duplicate translated pages.
Updates & safe customization
- Back up the database and uploads, including saved Site Editor templates and settings.
- Test the update on staging with the same extensions as the live store.
- Install the new theme ZIP through WordPress and confirm replacement of the existing theme. Update companion plugins separately when supplied.
- Review the release notes, clear relevant caches and test navigation, gallery, cart, checkout, account and forms.
Use Site Editor, Customizer and your site’s content editor for normal design changes. For PHP or file-level changes, use a child theme rather than editing the parent theme directly. Parent files are replaced by updates. Keep business functionality in an appropriate plugin.
Performance without changing the design
Use appropriately sized Media images, retain native responsive image markup and avoid lazy-loading the main above-the-fold hero. Test performance as a logged-out visitor on the relevant page and device. Scores depend on hosting, data, extensions and network conditions; no fixed Lighthouse score is guaranteed.
If an optimization tool combines or delays scripts, verify menus, motion, variation forms, Mini-Cart and checkout afterwards. Change one setting at a time and restore it if a required interaction breaks.
Troubleshooting
“The theme is missing the style.css stylesheet.”
You probably uploaded the outer distribution. Extract it and upload only rove-1.0.82.zip in Appearance → Themes. Plugin ZIPs go under Plugins.
Import paused, timed out or shows a failed item.
Check the error shown, active WooCommerce/Store Tools, uploads permissions and host PHP limits. Fix the cause, reopen the importer and choose Continue import. Do not repeatedly create pages by hand or delete existing site content.
A homepage or page does not look like the demo.
Confirm the page’s matching template and the homepage assignment under Settings → Reading. Check whether a saved template overrides the current theme layout, whether the import completed and whether any original wrapper classes were removed.
Customizer colors or fonts appear unchanged.
Inspect explicit block styles and saved Global Styles, then check that your Customizer changes were published. See Colors & typography. An uploaded logo is a separate image.
Motion or floating images are absent.
Preview Home 2–5, check the relevant switches and test with a mouse on a desktop. Touch and reduced-motion modes intentionally use static alternatives. Home 3 pinning also needs a large enough viewport. No GSAP plugin is required.
Quick view or AJAX Add to bag is missing.
Confirm Store Tools is active and that the product has a purchasable type, valid price, stock and required variation selections. Check extension compatibility and script errors. Some custom purchase flows intentionally retain native navigation.
Wishlist does not follow a guest to another device.
A guest list belongs to that browser. Sign in to use the account-backed list; guest items merge on login. Confirm the customer is using the same account on the other device.
A page, product or account endpoint returns 404.
Check publication status, page assignments and the actual URL. Visit Settings → Permalinks and save the current structure to refresh rewrite rules. Confirm the server supports WordPress permalinks. Do not create ordinary pages for password/payment endpoints.
Newsletter stays in its waiting state, or contact mail is missing.
Check MC4WP connection, selected audience and published Privacy Policy. For Contact Form 7, check the actual recipient, sender and mail delivery. Test the destination service; the theme does not supply mailing credentials.
New layout changes do not appear after an update.
Clear relevant caches, then check saved Site Editor templates. A database version overrides the parent file. Back it up before resetting; an update does not intentionally discard merchant changes.
Before you launch
Work through this checklist with your actual store content and extensions. Ticks are stored only in this browser; they do not change WordPress settings.
Resources & support
Official references
When requesting support
Contact the theme seller through your purchase/support channel. Include theme, WordPress, PHP, WooCommerce and companion plugin versions; the affected URL; exact steps; and a screenshot or error message. Remove credentials, payment data and personal customer details. If possible, reproduce on staging.
Files & licensing
This guide is a standalone HTML/CSS package. Its small JavaScript file adds search, navigation highlighting and a local checklist; reading does not depend on it. Fonts are bundled under their OFL licenses: Manrope and Instrument Serif. See the documentation license and the separate license files supplied with the theme, plugins and brand kit.
Documentation version 1.2 · 16 October 2026 · Rové theme 1.0.82. This guide describes the supplied release; it is not a claim of WooCommerce Marketplace approval. Update the guide and screenshots alongside future releases.